Back to top: Field procedures
Introduction
The philosophy behind the excavation methods and recording system is that everything counts, whether it is a single body sherd or a small lump of clay which might reveal, when cleaned properly, a seal impression. These are all collected and recorded within an interlinked comprehensive system, the Urkesh Global Record (UGR). This system forms the background of the comprehensive analysis and recording system used for all the ceramics excavated in all the various excavation units. Over the many years of the Tell Mozan/Urkesh excavations the methods and procedures were constantly refined so that they were more efficient. The description here gives a summary of the standard basic procedures that were in effect for most of the field seasons.
This section explains in detail the procedures both for collecting the sherds in the field and the steps for their analysis in the excavation house, including their final disposition. At the very beginning of the excavations in Tell Mozan/ancient Urkesh we decided to analyze all excavated ceramic sherds, including both body sherds and shape sherds. The whole and reconstructable vessels were analyzed within the procedures established for the analysis of all objects from the excavation, while the sherds were processed and analyzed according to the explanation below.
Back to top: Field procedures
Collection
In principle, all sherds were collected from every excavation unit and analyzed. The sherds were collected by unit and feature in q-lots which were small contexts within the feature; coordinates of the context were entered in the field records. No q-lot is allowed to be more than is contained in a medium size plastic bag (approximately 40 × 25 cm although this varied according to what size bags were available in the local market). This restriction resulted in a fairly limited number of sherds in any q-lot. The tags closing the bags are written in indelible black ink on surveyors tape; the tags specify the excavation unit, feature number, q-lot number, initials of the person who wrote the tag and the date. These ribbon-type tags are used to close the bags. The fact that the bags were small had also the practical advantage that the sherd bags would not tear easily. No q-lot is kept over from one day to the next, no matter how few sherds it contains. The bags were taken back to the in-coming area of the dig house at the end of the field day. If the excavators saw an unusual sherd or cluster of sherds, perhaps indicating a whole vessel, they would put them in a labeled small bag within the sherd lot. However if the sherds appeared in the field to be all part of a complete vessel this would be considered an item and was processed separately from the rest of the sherds in the feature with a process used for items.
The sherd bags are returned to the dig house at the end of the day. Directly from the field the unwashed sherds were stored by unit and feature in a large storeroom filled with shelves which led from the field into the expedition house. Before the sherd lots were placed on the shelves, a separate inventory was taken so that no lots went missing and if a number was assigned and not used, that was noted. We had come to this procedure by trial and error because it was so time consuming to look for sherd lots that were missing in our record, sometimes not to be able to establish what had happened to them. It was from these storage shelves that the sherds were taken to be washed, always by unit and feature.
In the expedition house the ceramic processing took place in a large courtyard dedicated to this activity with the room containing the Ceramic Library next to it. The courtyard is covered during the field season with roofing tarps so that the bright sunlight was filtered for the sherd analysis; the tarps also helped in keeping down the intense heat (on many days more than 40 degrees centigrade). The sherds are washed by unit and feature which means that there is a constant interaction between the field and the analysis teams.
Back to top: Field procedures
Exceptions
An exception to the rule of analyzing all sherds was the treatment of sherds from topsoil contexts. These were either checked as they were being excavated and then immediately discarded or were collected but not within the q-lot system. They were inspected and any unusual types of shape, fabric or decoration were retained but the rest were discarded in the field.
Another major exception was the excavation of J7. The excavation of this unit was not foreseen in the planning for the excavation season but serious and urgent needs of the local community led us to decide to exavate in this area. The local emergency was the result of a particularly dry year and caused a difficult economic situation for many of the local people. A very imortant aspect of the decision to exavate in J7 was to provide employment for as many additional workmen as possible. The J7 excavations, in an area with few expected finds, were designed to employ a maximum number of workmen with minimal staff supervision because all the staff were already engaged in the excavation areas already chosen for that season. There were three main purposes in choosing J7 as the area to excavate: to explore the eastern portion of the Plaza area (= JP). In doing this we wanted to create a passageway for visitors to enhance their perception of the monumental staircase in J2; we wanted the visitors to view the monumental stairs from the same elevation the ancients would have seen the stairs. Because we had excavated other parts of the plaza we knew that there would be few finds and so we could excavate with a methodology that would maximize the amount of workmen who could be employed without sacrificing documentation, or overextending the staff. Because of this choice we examined all the sherds in the field and kept only the ones that were unusual.
The procedural methods developed over time and were not always entirely followed for a number of reasons. This resulted in gaps which can be seen in the record of the various books.
Back to top: Field procedures
Post-Excavation Methods
Back to top: Field procedures
Processing and analysis in the expedition house
Throughout the subsequent stages of processing and analysis the sherds were always kept together by excavation unit and feature. This meant that in general the sherds were washed by unit and feature. Only on a few occasions, because of the excavation strategy, a feature was continued to be excavated after a gap; in these cases the sherds were analyzed over a period of time.
Back to top: Field procedures
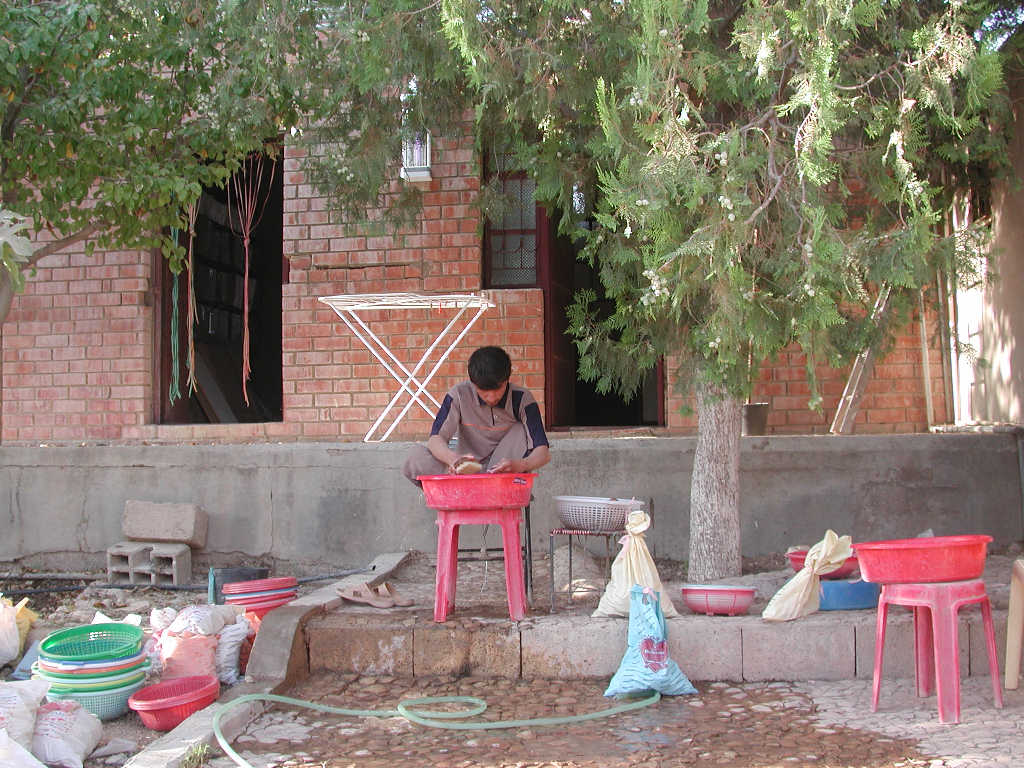
Sherd Washing Stage
Since all the sherds were to be analyzed (both body and shape sherds) therewas daily a very large amount of sherds from the various excavation units which needed to be washed. Because of this large number it was impossible to do this on a daily basis. The sherd washing work place in the sherd yard, under a tree for shade and with access to water and a muddy water discard area as a part of the work area. The area was paved so that it was always clean and relatively dry. The sherds were washed in plastic tubs which were manageable for our sherd washers since the q-lots of sherds never contained many sherds. As the sherds were washed they were put into plastic sieves by q-lot and the original ribbons written in the field with the stratigraphic and q-lot number information was tied to the sieve; the typical plastic household-type sieves were ideal for this purpose and not expensive as we needed hundreds of them. We had constructed a special metal drying rack for the sieves so that a large number could be drying at the same time. The dry sherds in the sieves were then arranged by excavation unit and feature along a sidewalk in the sherd yard against a wall. On the wall signs indicated what area and feature the sherds came from. The sherd analysis team took the sherds to analyze from this sidewalk by unit and feature.

|
|

|
Back to top: Field procedures
Analysis stages
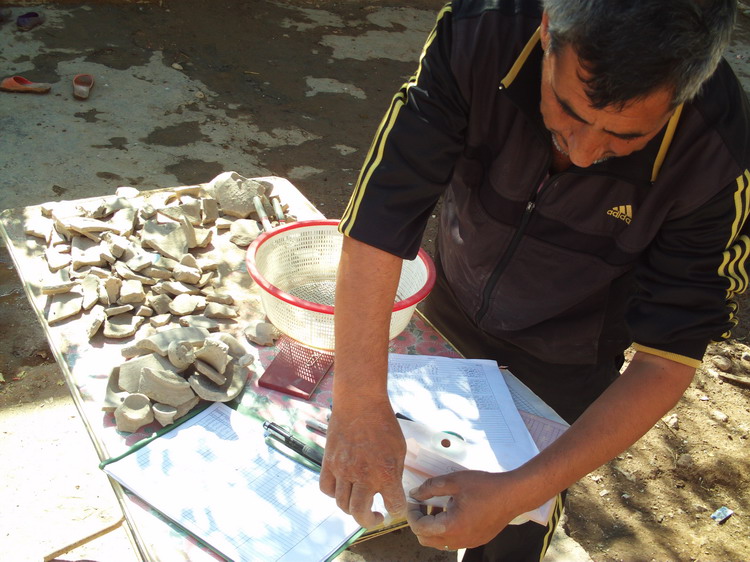
In the analysis stages there were essentially two different paths followed. Initially after the sherds in the q-lot were inspected for joins or anything unusual, then the body sherds were separated from the shape sherds and the shape sherds had the stratigraphic information written on each one. At this point the labeled shape sherds continued to be kept in the sieve.
Back to top: Field procedures
Body sherds
A dedicated person analyzed all the body sherds from the unit and feature being analyzed, separating these sherds by ware type. In order to determine the ware type the analysis takes into account the color, firing, inclusions, and any unusual characteristics. In order to do this the section of the sherd (for both body sherds and shape sherds) was broken with a pliers so that a fresh surface was studied. The analyzed body sherds were then separated and counted by ware type and recorded onto our ceramic analysis forms.
The body sherds that were decorated were only saved if they had an unusual decoration. The final disposition of the body sherds were two: either they were reused by us or discarded. The reuse took two main paths: they were embedded in the top layer of a cement matrix made in forms ca 60 × 60 cm. The resulting tiles were used in the palace on top of the backdirt covering all the floors so that the visitors walked only on the sidewalk of tiles, thus preventing damage to the floors and mudbrick walls. In the excavation house communal walking surfaces were paved with cement with the top layer being embedded body sherds. The entire sherd yard was also paved in this way. The second was to fill in the topography of the mound near the main entrance to the excavation house so as to make a flat surface for parking a few cars.
Back to top: Field procedures
Shape sherds
The shape sherds (rims, bases, handles, spouts, body sherds with unusual decoration, and sherds that had traces of secondary use) were analyzed by a local team who we had especially trained for this work. Primary among them is Hammade Hamza who is still doing this work even during the period of the war when we are not able to go back to the site. At this point the shape sherds were still in the plastic sieves. At this point the shape sherds are given individual p numbers (a “qp”, i.e. “q-pottery” number), connected with the excavation unit and q-lot (e.g., A16q874-p8). These numbers are written on the interior of the sherd along with the feature number. The example just given comes from the excavation unit A16, feature 318, and q-lot 874. The individual sherd number within the q-lot is p8. Each individual sherd is then analyzed by categories that include ware types and shape types. The codes for shape and ware types are entered on the encoding form (click to see excel template). The codes for wares come from a master list with descriptions of all ware types found during the excavations. The shape codes were found in a master catalog of sherd drawings based on the shapes previously excavated from each time period.
Back to top: Field procedures
Chronological catalogs
The basic shape types, from the beginning of the analysis, were organized by shape into catalogs by period. Because we had a fulltime and in-house vector drawing specialist, who we had trained, we were able to change and add to these catalogs comparatively quickly. These catalogs naturally grew as we continued the excavations in those time periods. Each shape was given a code based on overall shape, family, sub-family and type number. Examples are best seen in the catalogs and Cross-horizon sections of the right hand side of this book. Throughout the long period of the excavations these catalogs were continually being revised and expandedto accomodate our constantly growing perceptions of the shapes and wares. The definitions of the ceramic shapes are found on the left hand side under shapes, while the actual catalogs of shapes by period are found on the right hand side under horizon. The ceramics by shape, across all horizons can be found in tipology.
There is a close relationship between the Ceramics Book categories of catalogs on the right hand side, the categories of attributes on the left hand side and the descriptions of the individual sherds in context within each unit book. For a brief description of the catalogs, see the relevant section in Cybernetica Mesopotamica.
Back to top: Field procedures
Assemblages
One of the intermediate, non-digital steps was the creation of assemblages. They were created for individual units to help in the digital implementation process. At times the excavations of a unit were out of step with the analysis of the ceramics from the unit, meaning that the ceramic corpus was so large, or there were other units that quickly needed information based on their ceramics. These conditions at times created a backlog of q-lots not yet analyzed in the sherd yard. Because of this it was necessary for me to check all the un-analyzed q-lots from the unit to determine what shapes were important.
These I arranged into assemblages based on the shapes found in any given feature if the feature appeared topologically or stratigraphically important, see an example from J2. The assemblages facilitated the analysis of the ceramics so that codes already in use from other units could be consistently used and if codes did not yet exist they could be established. The assemblages were therefore an intermediate stage in the digitization process and were extremely helpful when it was possible for us to digitize all the sherds of the unit.
Back to top: Field procedures
Ware descriptions
A number of specialists, over the years, contributed to the evolving descriptions of the ware types: Marilyn Beaudry, Yoko Taniguchi, Marianna Nikolidou and Ellery Frahm. Each contributed their expertise and experience to the ware descriptions as they had already been established in the field. The final descriptions of the ware types can be seen in the ware section under Categorization/Attributes. See the publication of some of this work in Frahm, Nikolaidou & Kelly-Buccellati 2008.
Back to top: Field procedures
Colormod project
Giacomo Chiari of the Getty Conservation Institute shared with us his software for the analysis of scanned sherd sections in the field so that a much larger dataset could be analyzed. This involved cutting the sherd sections with a high-speed saw and then further sanding them smooth. The resulting sherd sections are very flat so that they can be scanned in the field. At this point the digital images could be analyzed by the Chiari program; the publication of this large project is forthcoming by Marianna Nikolaidou and Marilyn Kelly-Buccellati.
Back to top: Field procedures
Update processes
All during our excavation years the ware and shape types of individual sherds were under review. As a preparation for the opening of this digital book all the shape catalogs and ware types have been reviewed and adjusted to reflect our current thinking. All the changes of shape through the various stages of the review process are shown in the Shapes Conversion.List with the final descripton of types given in the Shapes-Codes page.
Back to top: Field procedures
Sources of problems
In the field, the methodology was clearly defined but some problems were identified during the work. Mostly this was a single mistake but others were more apparent. To name the most apparent:
- skipped or mislabeled q-lot numbers, duplicate p numbers, or skipped numbers within the p number sequence for the q-lot,
- mismatch between the rim diameters determined in the field and those determined by the draftsman who drew the sherd,
- mismatch between numbers on the drawing and ceramic analysis numbers.
For the most part we were able to resolve the problems, either directly in the field or afterward. If we could not resolve the problem then the data was discarded but kept available by putting it in a separate discard file.
In the sherd analysis stage after the sherds were washed and became dry in the expedition house sherd processing area the sherds from each q-lot were sorted separating body sherds from shape sherds. Then the body sherds were studied to determine if any were important from the viewpoint of ware, shape, decoration, or any other characteristic we saw so that these would be described separately. Next the remaining body sherds were sorted by ware and counted. For the most part these body sherds were used by us or discarded since we had from our earliest seasons an important study collection of all the wares in our on-site sherd library. The next step was to analyze all the shape sherds from the point of view of ware, shape, decoration and any other characteristic we saw. The number of the excavation unit, q-lot number and p number of the individual sherd were written on the interior of the sherd. Additionally the ware code and, for many sherds, the shape code and feature number were also written. This information was also recorded in our excel files in the field. The codes on the sherds were never intended to be removed or changed; this was important because we kept all the shape sherds from every unit in our on-site sherd library or storage area. Additionally, for the most part, there was not space to write additional information on them. Also they were written in permanent ink, so could not be erased. We chose this method since we were retaining them for possible future study.
The next step was to harmonize all the codes since over the 25 years of the excavation some codes had been changed and some code descriptions had been sub-divided as we became familiar with the variations of the wares. We also checked the excel files that contained the total sherd and whole vessel analysis of each book to make sure that they had no mistakes, no old codes, and were consistent. If we saw problems in an entry and couldn’t resolve the problem then the record was removed from the unit book website but kept in a separate file in case of later use. Since the codes could not be physically removed from the sherd, this meant in the circumstance that there were mistakes or we had a different idea about ware or shape codes that should be assigned, we were not able to change those on the sherd. This explains why there is in some cases different information written on the sherd than what is published in the UGR.
Back to top: Field procedures
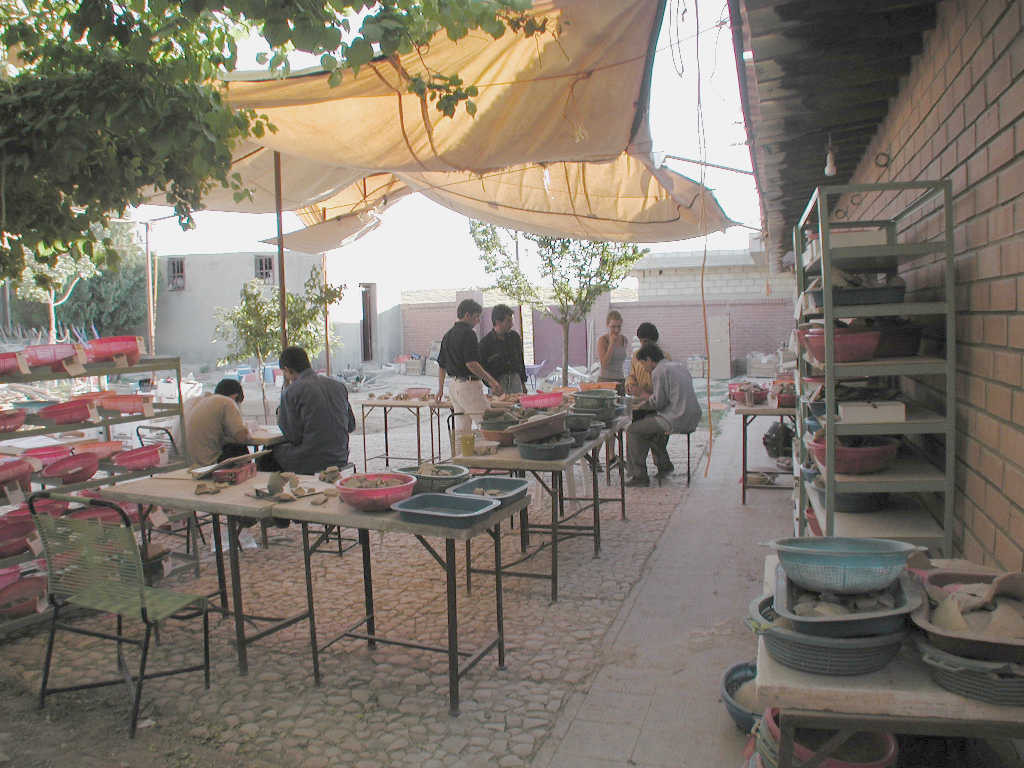
Physical arrangement of the sherd yard
The sherd yard was next to the incoming area and near the main laboratories in the exavation house. It consisted of a paved patio-like area covered with a tarp to avoid glare and to cut down on the heat.
In this area were a number of work tables where the sherd analysis was done.
|

|
When the analysis of the shape sherds was completed the sherds were replaced in the sieves and taken to the drafting area inside the sherd library. Here the sherds previously chosen to be drafted by mkB were drawn in pencil and then immediately a vector drawing was produced. If the sherds were to be photographed they then went to the photography lab. At the end of the analysis phase the sherds were either placed in one of the in-house displays or were placed in white styrofoam cartons by area and feature and permanently stored on metal shelves organized by excavation unit in the large expedition storeroom attached to the southern side of the expedition house. The purpose of this permanent storage was to have the ceramics available for further analysis in the future when new technologies could be used.

|

|
Back to top: Field procedures
Three display areas
In the exavation house there were three display areas having different puropses, audience, sizes, functions, and time periods during which they were available.
Back to top: Field procedures
Ceramic overview display
The expedition house has a meeting room which is furnished with a large dining room-type table, a couch and a number of chairs. It is in this room that staff meetings took place; guests were received in this space. A part of one wall contained five well constructed shelves. On each shelf a few typical ceramic sherds from a particular time period we exavated at the site were displayed. These showed for each time period the specific characteristics of the ceramics that allowed the archaeologists to identify the periods they represent. This display was purposely kept small and only changed if some especially beautiful and typical sherd was found in the excavations. This new sherd would then replace another one in the display so that the overview aspect was always retained. This exhibit was for casual visitors to be able to see some of the ceramics that are important for the site.

Back to top: Field procedures
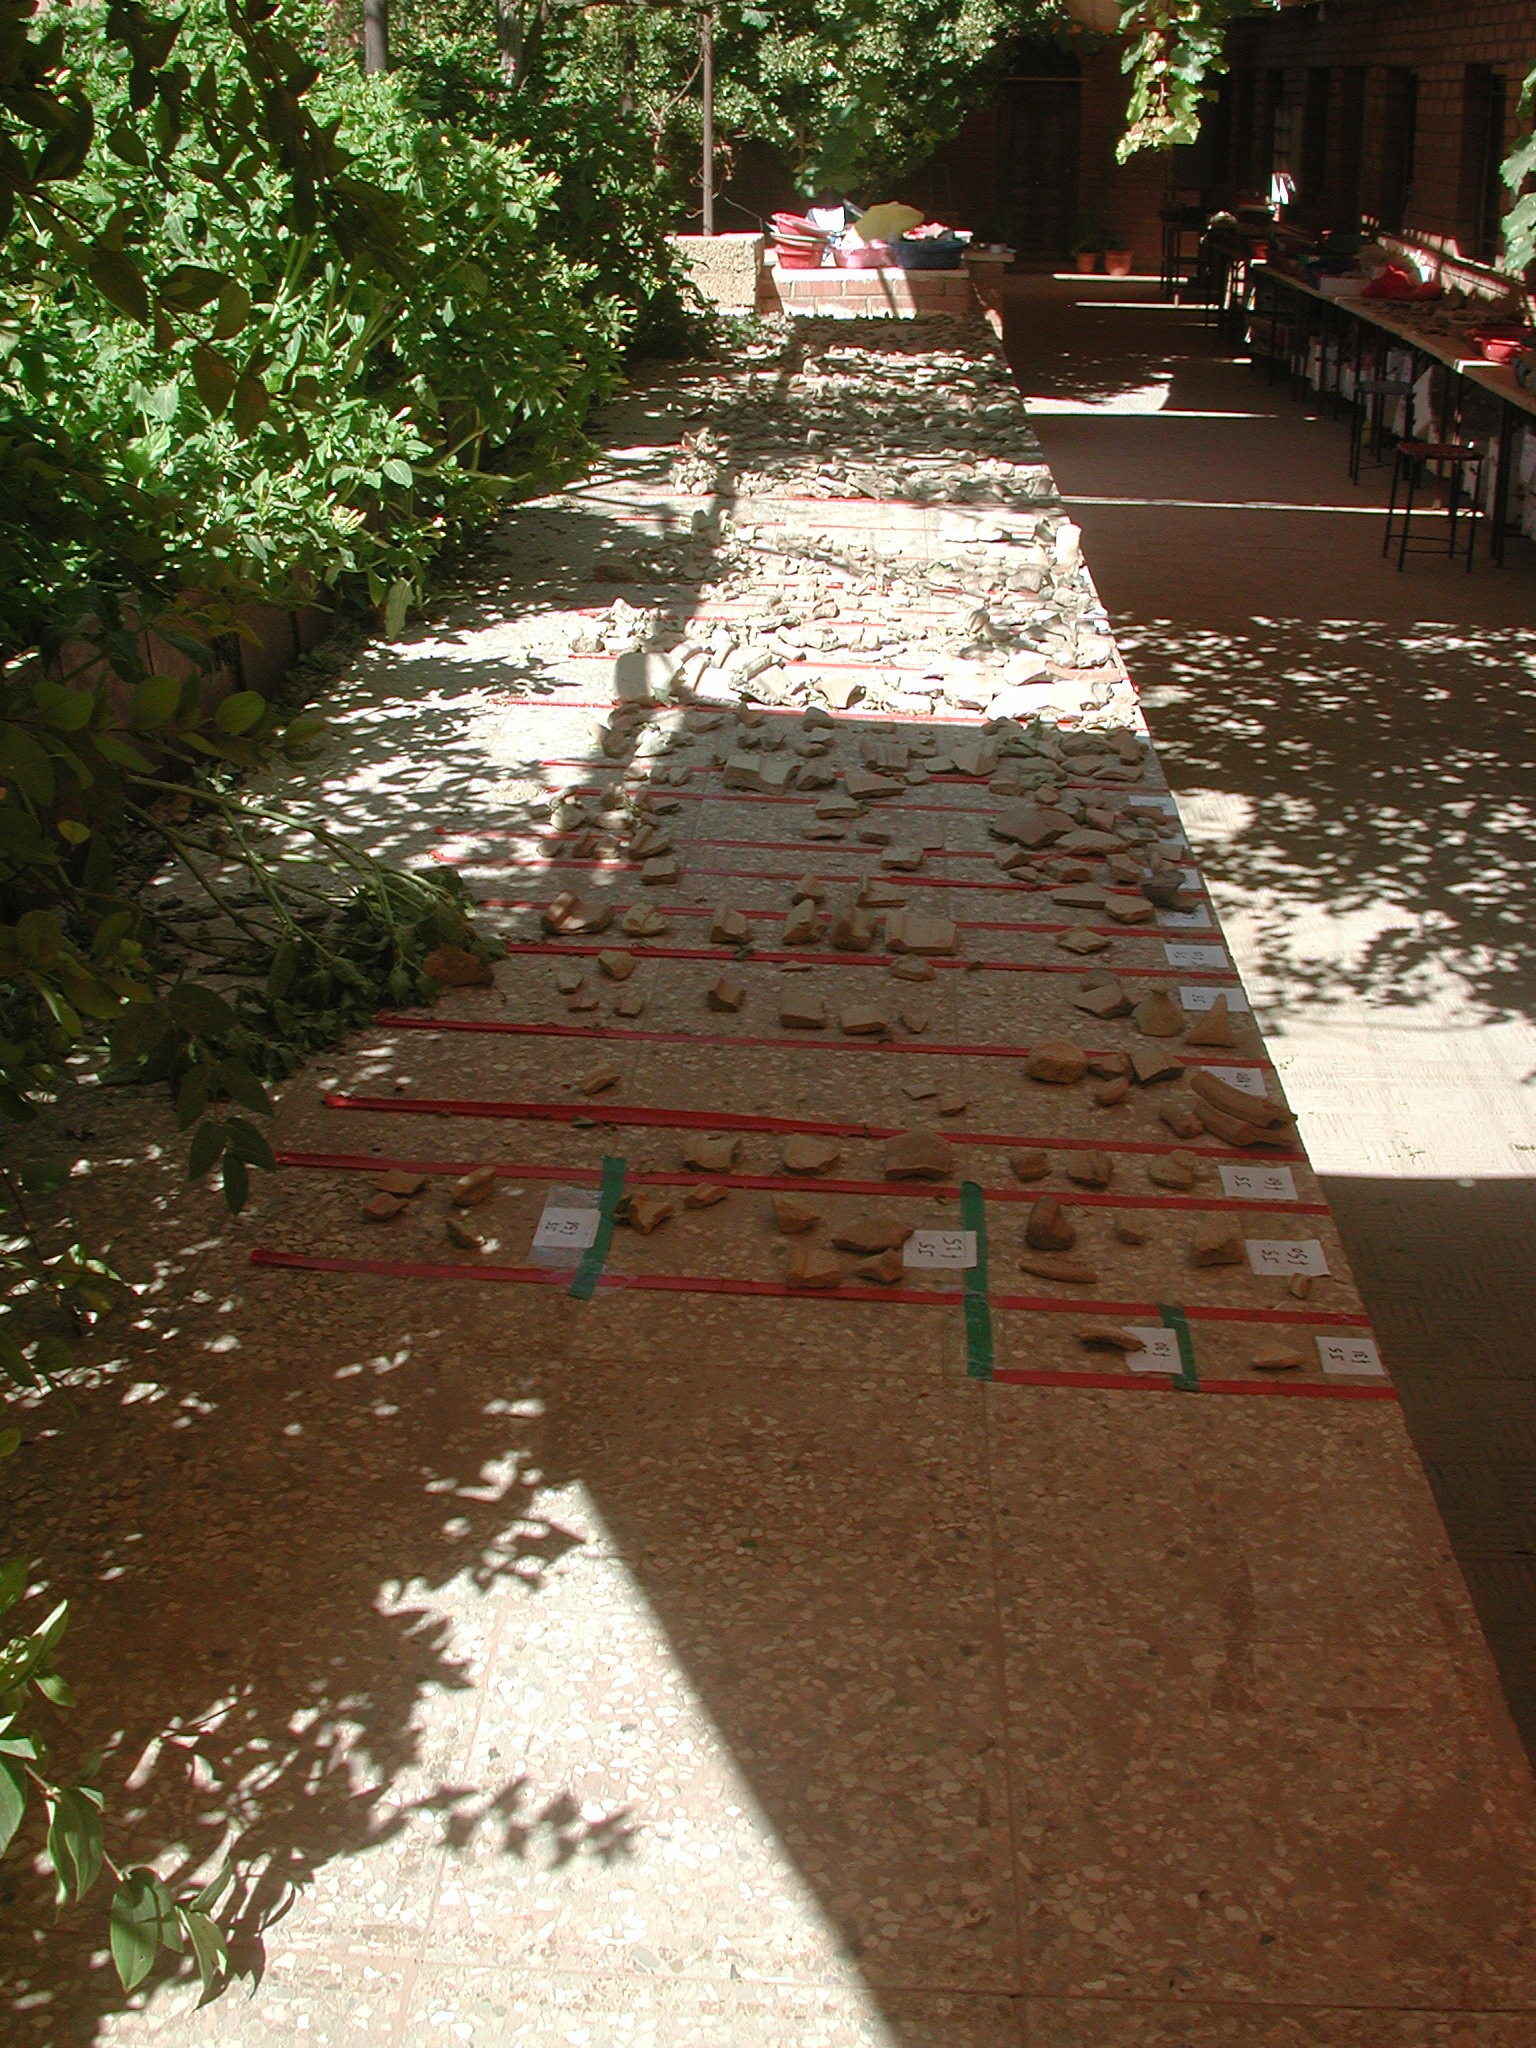
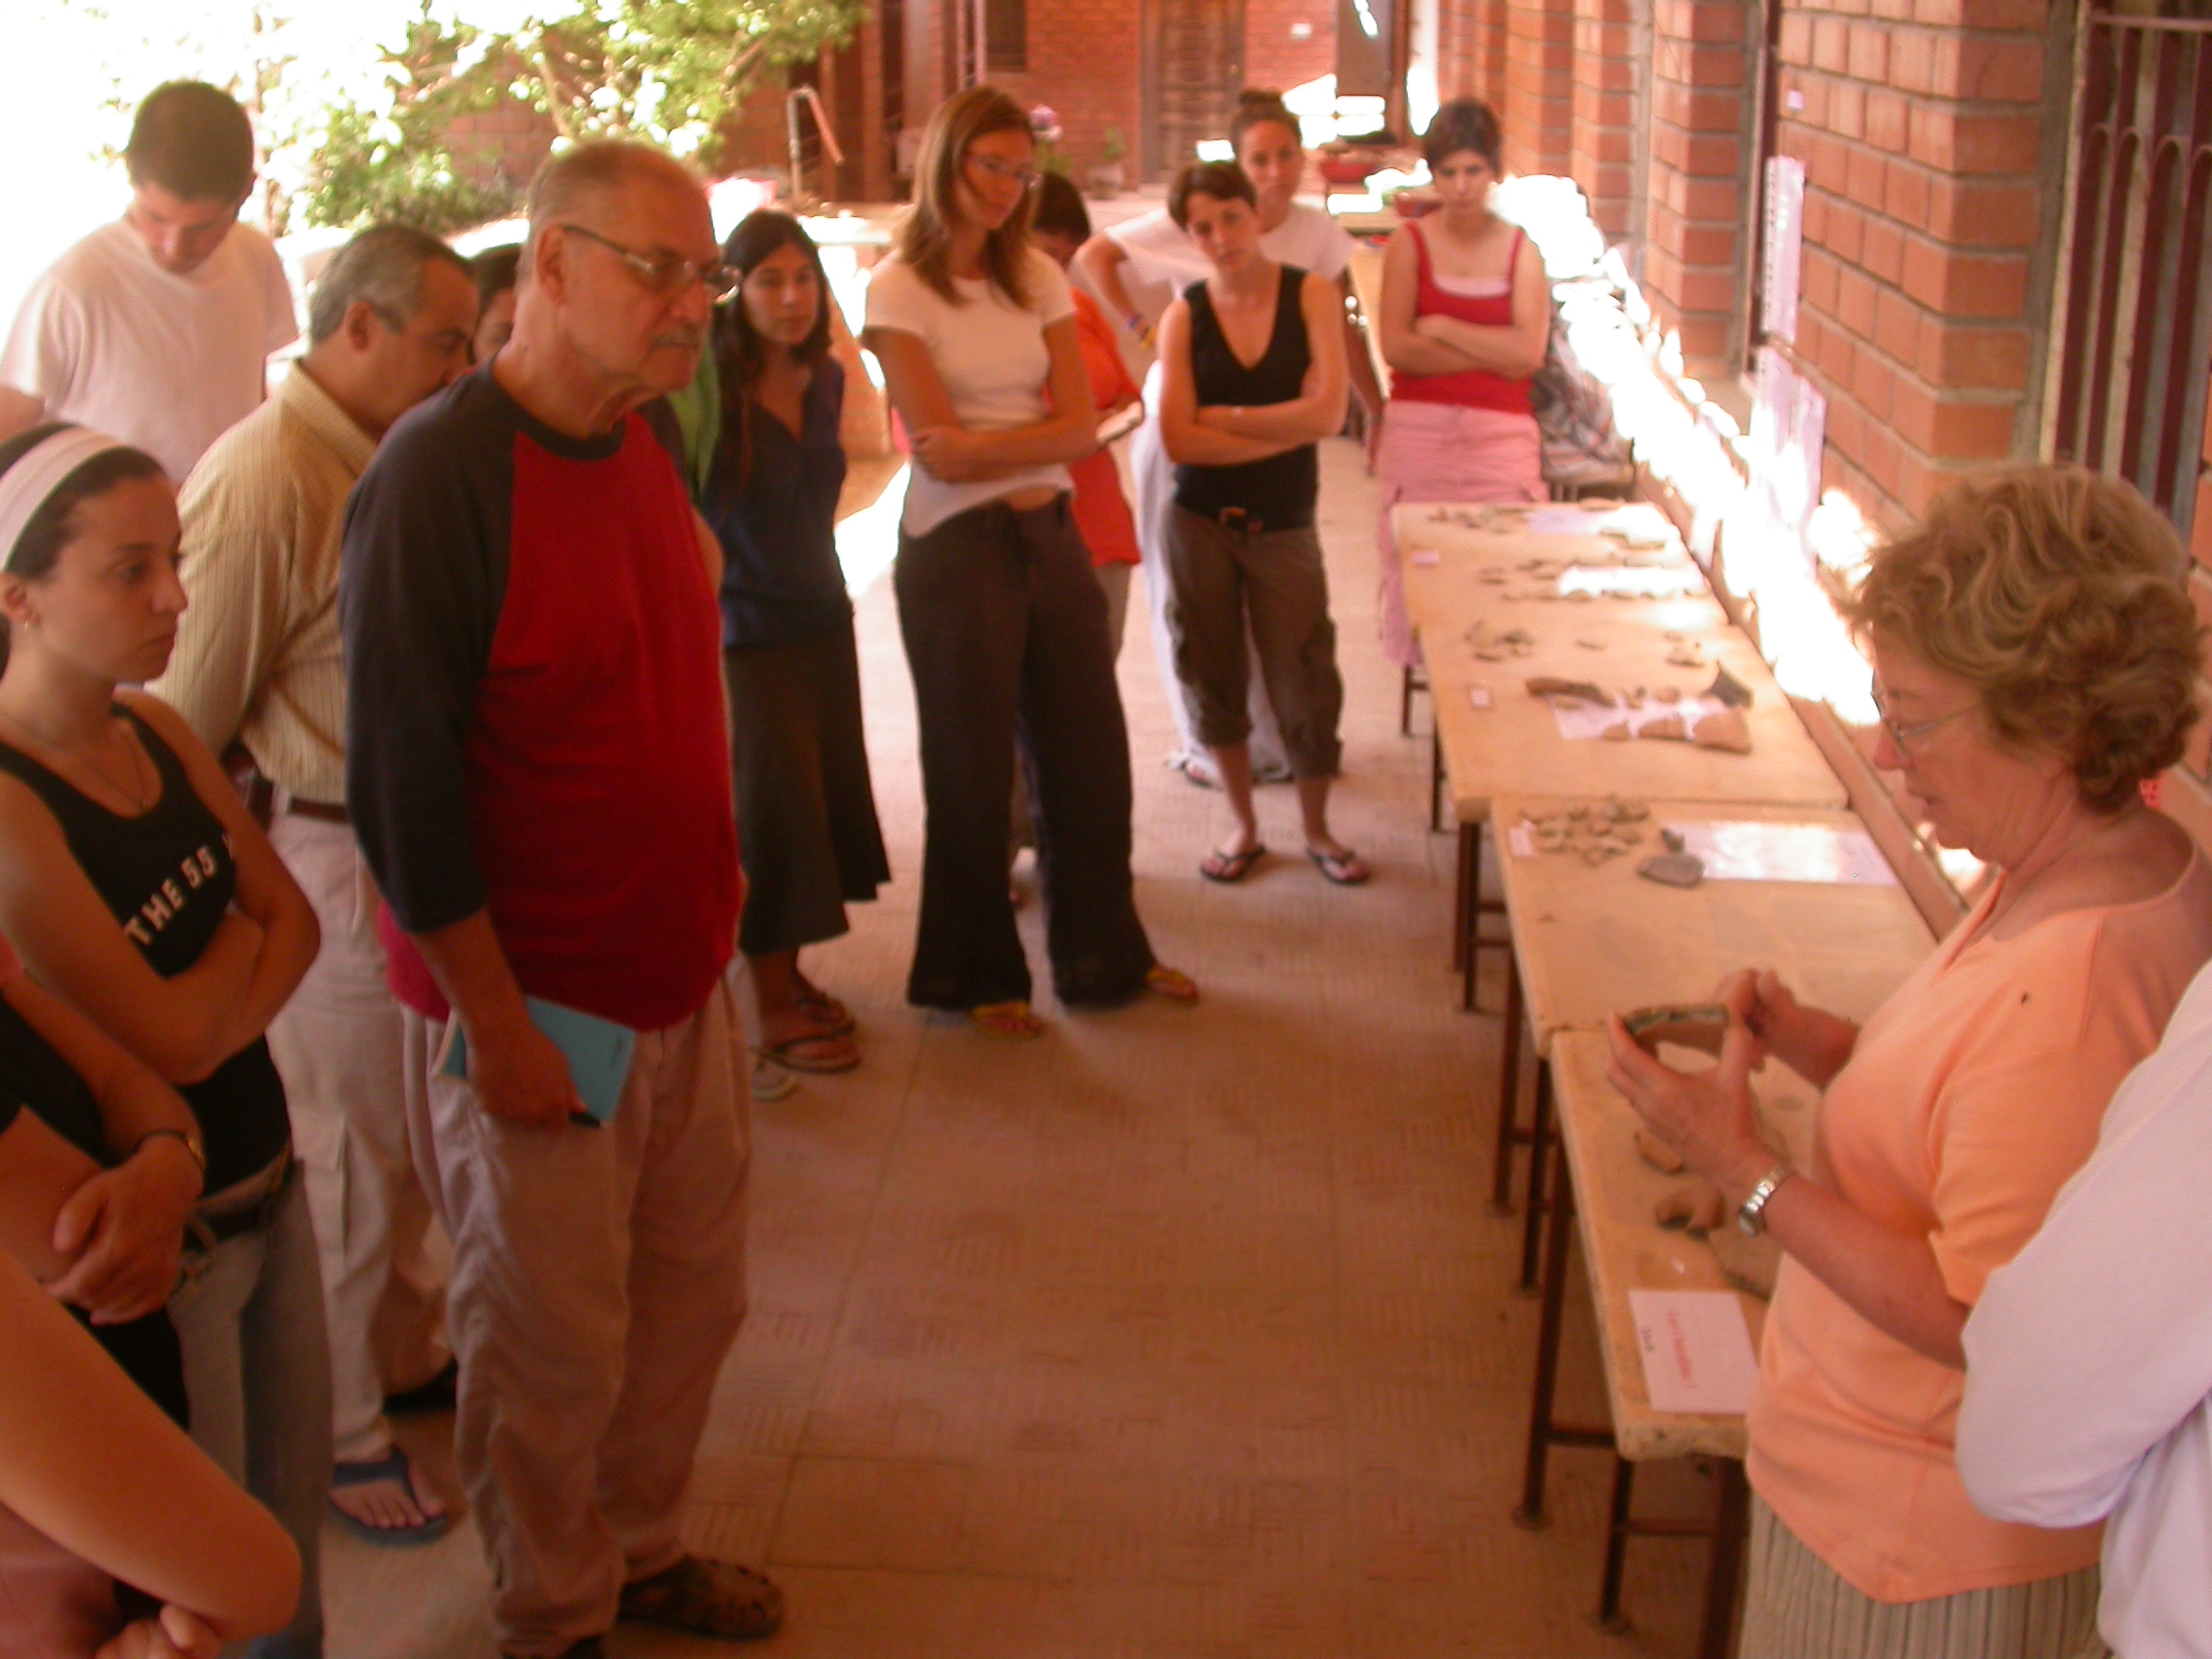
Sherd walkway display
Just outside the kitchen/dining room was a long and wide outdoor corridor which led from the work rooms and laboratories to the dining room. Because the excavation season was very hot, this walkway had a canvas cover to protect it from the sun, thus reducing the heat along the walkway. On one side of this walkway was a wall about a meter in height that protected the walkway from the courtyard which was on a slightly higher level. The wall was topped by a wide shelf-type platform, also about a meter wide. On the opposite side of the walkway there was room for a series of walkway display tables. Displayed on both the tables and on the platform were the analyzed shape sherds from important features in units we were at that point excavating. The primary audience for this display was the archaeologists who through talks and discussions would be able to readily study the ceramics being excavated; the display would also indicate to them the characteristics of the ceramics in the time periods of their own excavation units. The large sidewalk display was also for visiting archaeologists to be able to inspect in detail the ceramics from the periods we were excavating. The display sidewalk changed throughout the season as the ceramic analysis progressed.
|

|
|
Back to top: Field procedures
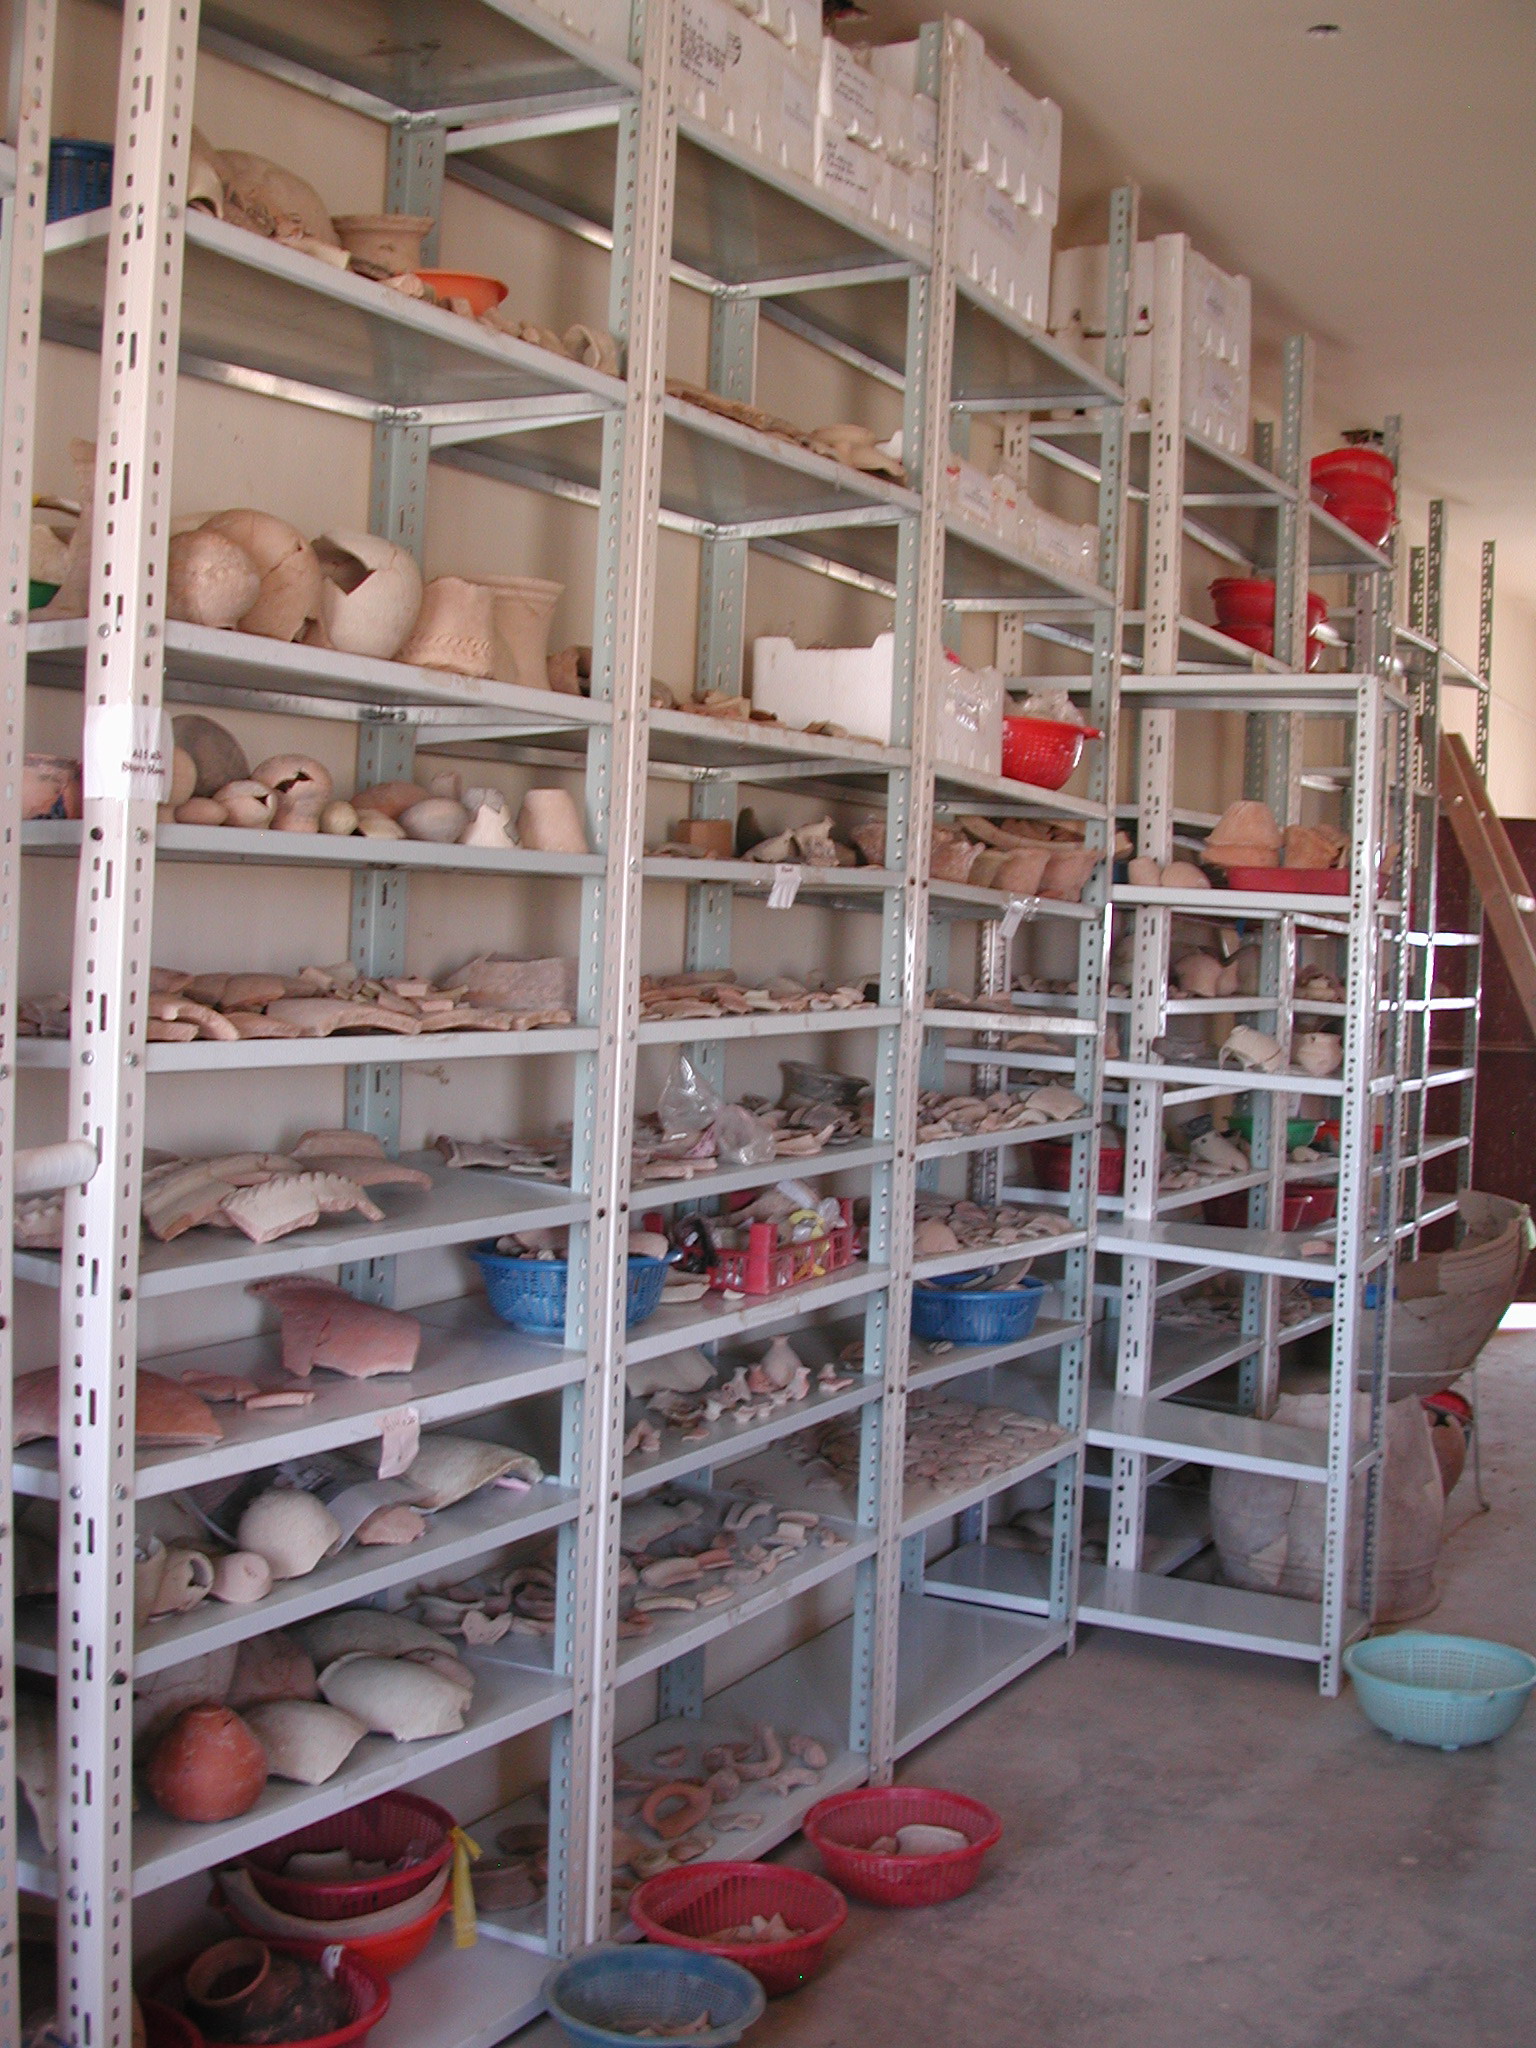
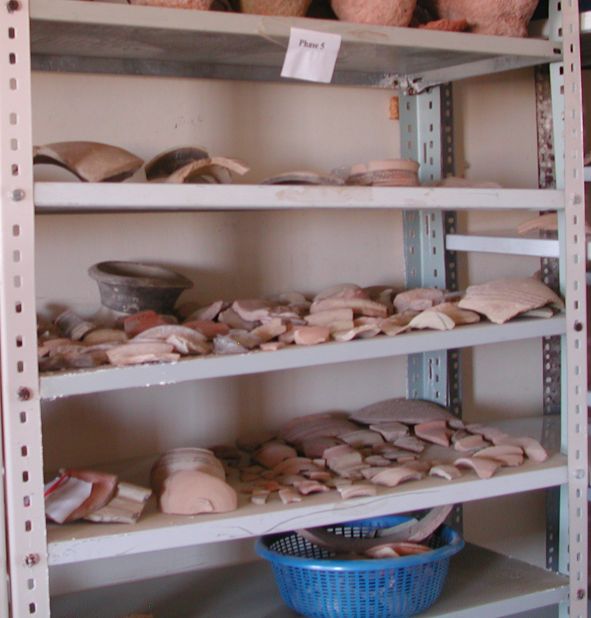
Sherd library
A large room in the excavation house was dedicated to the Ceramics Library. The library is a room approximately 5 meters long and three meters wide. Metal shelves were installed for the length of the room on both sides. The Library contained not only the best examples of a type, either shape or ware type, but also encompassed their changes through time. This was especially helpful in the case of the ware types for which there was a marked continuity but with gradual changes over the time periods we were excavating. The largest and most extensive display of sherds and partially reconstructed vessels is contained in this library. The first shelves opposite the door contained typical examples of all the ceramic ware types and their variations through time. This collection was kept in small white boxes that could be transported to the sherd yard when needed to check the analysis of a particular sherd or group of sherds. Also on these shelves were various shape types, placed in small boxes also for easy transport to the sherd yard. Other shelves were dedicated to a display of typical sherds for each phase excavated in Tell Mozan/Urkesh. A large number of shelves contained shape sherds from the most significant features from previously excavated contexts. The library was extensively used for the analysis of the Tell Mozan/Urkesh ceramics but also used by other excavators in the region for comparative analysis.
|
|
|
Back to top: Field procedures
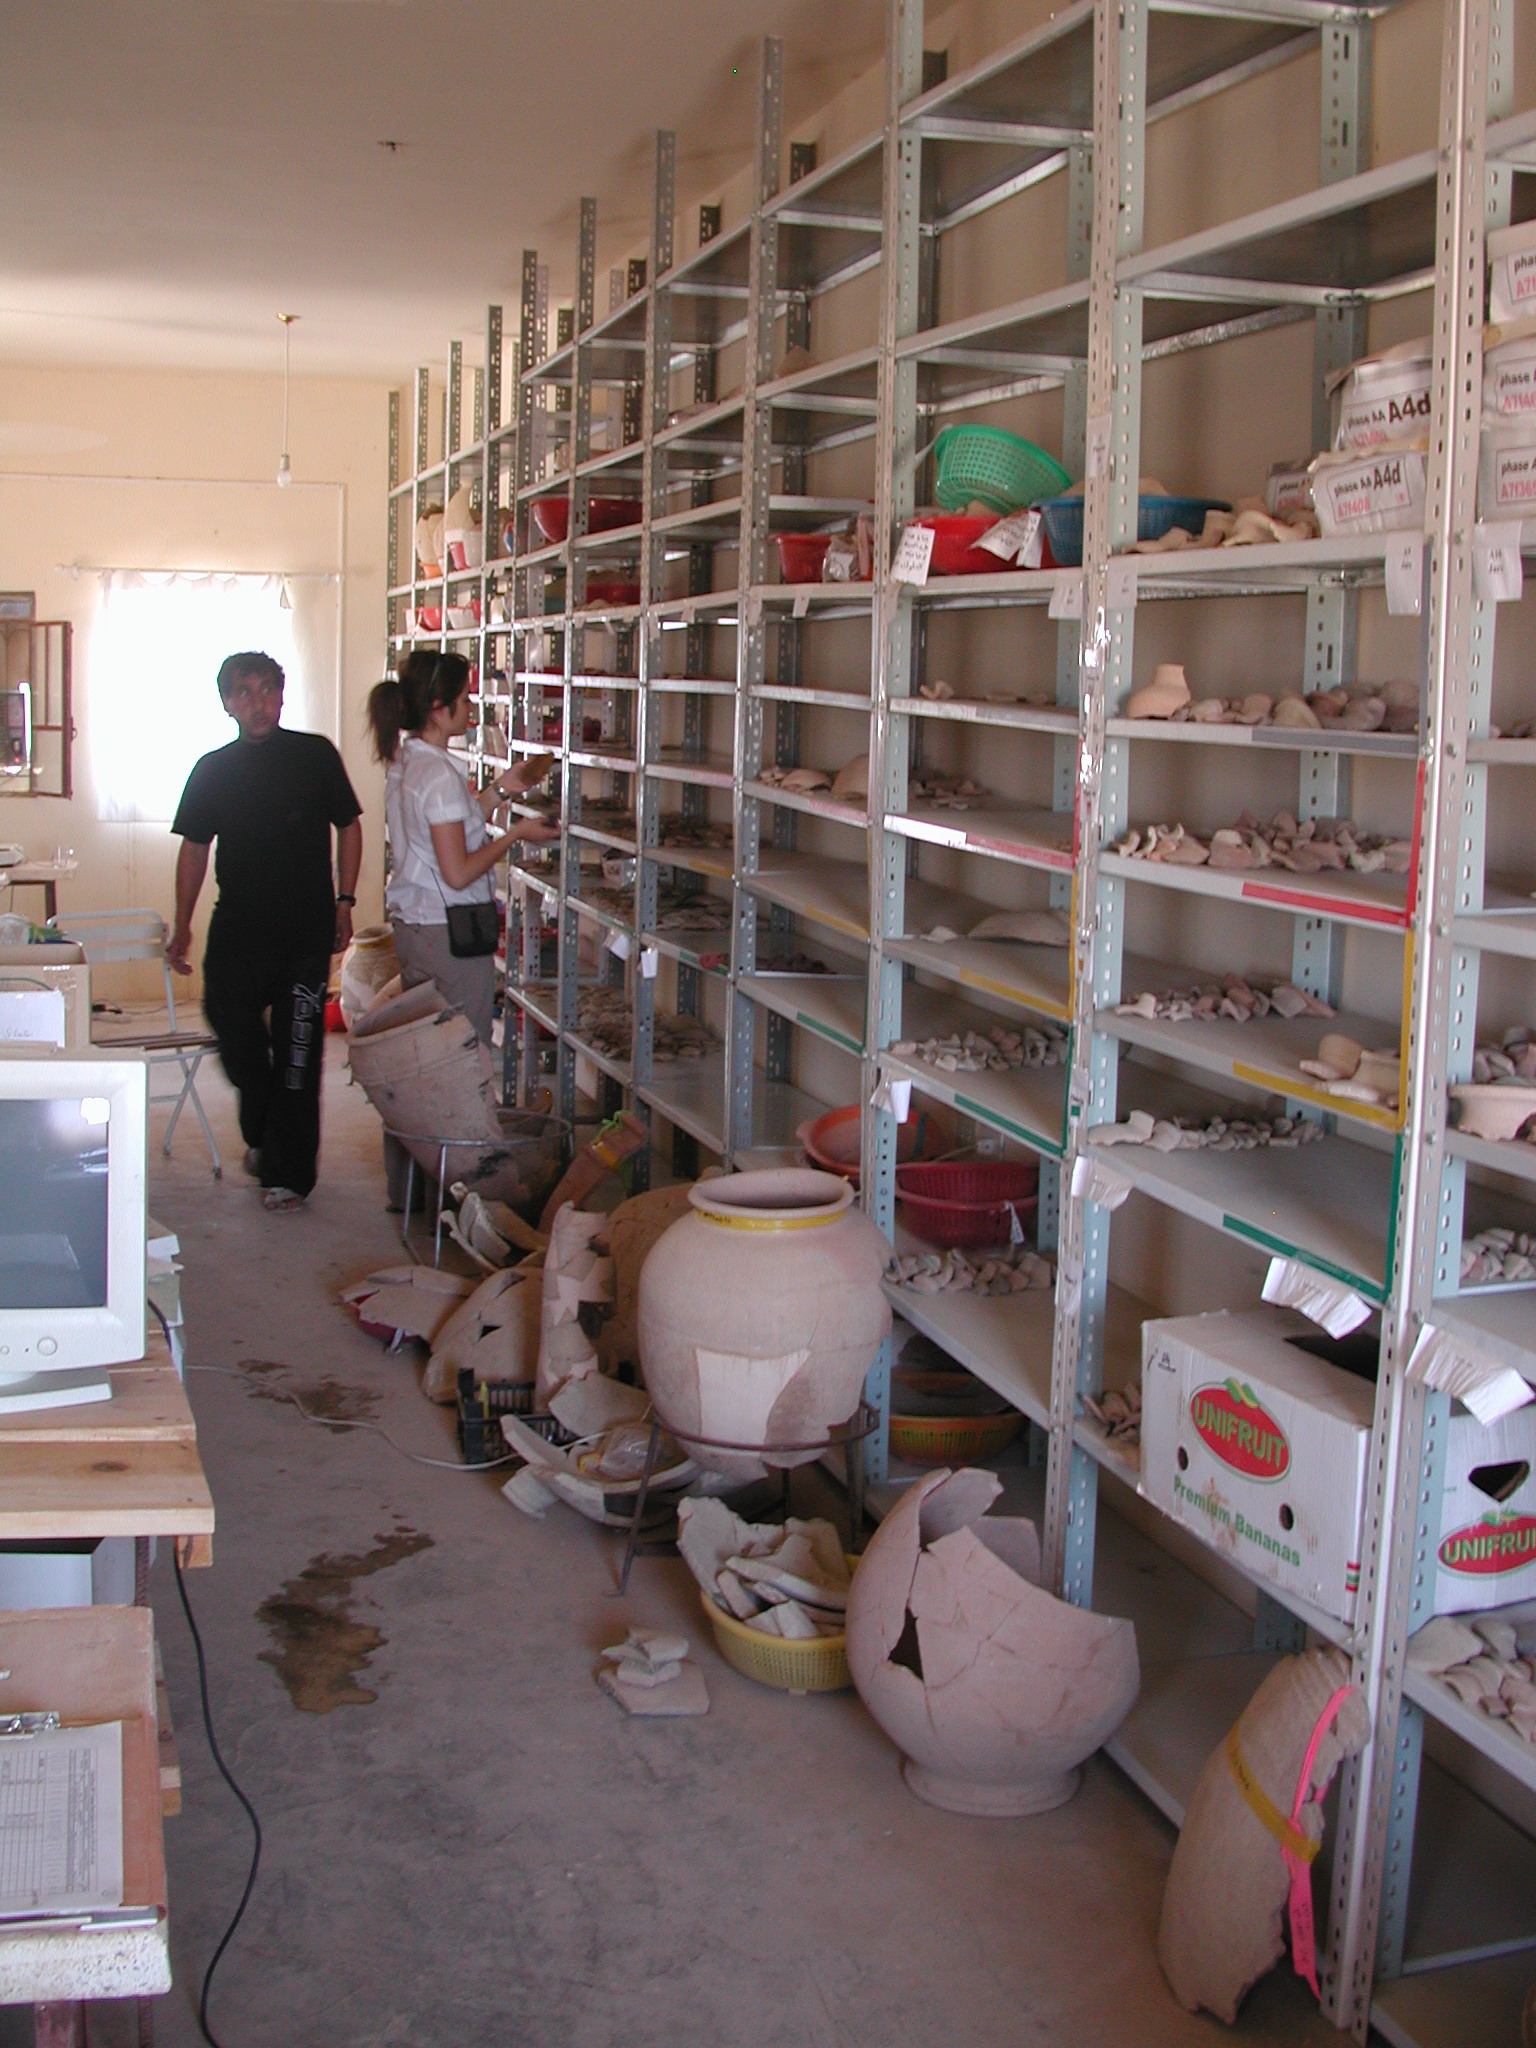
Storage
|
All the shape sherds, and some body sherds that were considered important, were kept either in the in-house sherd library at Mozan or in a large storeroom attached to the expedition house. If all the sherds from a given unit were not processed then they were all kept in the large expedition storeroom until they were fully analyzed. The ***room is 40 meters long, with ample space for long term usage***; sherds boxes are labeled, and a link to the boxes is given in the record (this is not present in the current versions of the unit books, but the data are available and will be entered in the near future). The ultimate purpose for their being kept is that in the future if new ideas or new interpretations are put forward, they may require a re-examination of the shape sherds. This is a distinct advantage of having a separate file for every single item. For general information on storage at Mozan see the Urkesh website. |
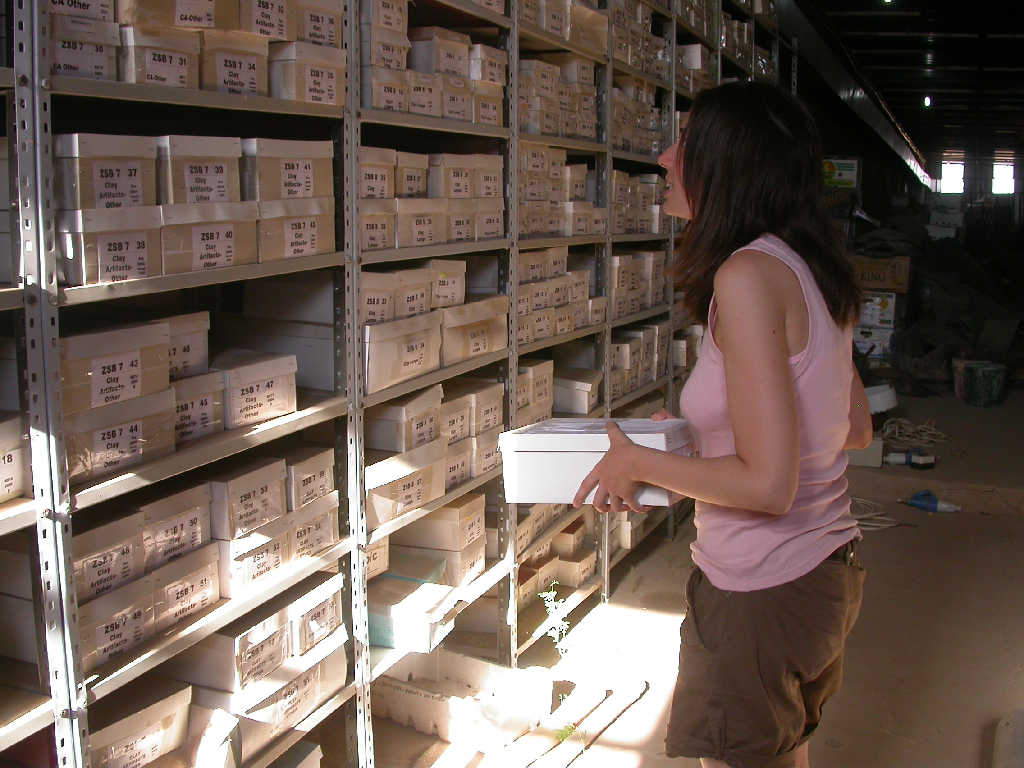 All boxes are clearly labeled for easy retrieval of any sherd as needed |
Back to top: Field procedures
Ceramics in the unit books
The details of the individual sherds in their contexts are found in all the single unit books (see the UGR).
Back to top: Field procedures