Back to top: Overview of Unit J5
Physiognomy
The physiognomy of J5 is defined by the unique typology of some of the structural finds and by the modifications that these caused in the overall strategy.
Back to top: Overview of Unit J5
Assumptions
On the basis of our initial excavations on the temple complex, it was assumed that its general form was symmetrical and that it formed an oval, walled in stone and sitting above an open plaza, with the temple at the center and possibly with several points of access. Based on the excavations of the last two seasons and on an extensive geophysical survey, we have modified our hypothesis. Among other things, the formal boundary of the temple complex now seems to be confined to the southwest. The eastern part may well end at the staircase. Excavations in unit J1 in the MZ19 season (2006-Q) revealed that, at its western extremity, the revetment wall made a sharp turn to the north. Furthermore the wall in that vicinity seemed to comprise a double line of stones, separated by about 5 meters with possibly a paving of large flat stones between them. This season, we wish to follow this wall to the north, to determine the nature of the relationship of the components of that part of the wall system, and to determine the physical links, if any, between the temple complex and the Tupkish palace. The geomagnetic survey data show there may be a northern boundary to the plaza in this general location, possibly through a link with a substantial building, which may be associated with the palace. Sharing importance with excavation will be the production of a completed field portion of the global record by the close of the study season in late September.
Back to top: Overview of Unit J5
Initial strategy
To accomplish these goals we will incorporate and build upon that portion of unit J1 that contains the double wall. First, we will clean and document the previously excavated portion of the revetment wall. Next, we will open two new loci, k23 and k24, north of the west face of the outer of the two lines of stone. There, at a depth of about 150cm below the surface we expect to be able to follow this face which runs roughly north northwest. The geophysical survey indicates the prescence of a structure to the west within the range of the new loci. If we find the turn we will follow it to the west with additional loci in that direction. In order to define the nature of the wall system as it turns north we will remove some isolated pillars of soil which partially cover it in the portion previously exposed as a part of the J1 excavation. If necessary to further explore the construction, we will open a second line of loci running north and located to the east of k23 and k24. In order to accomplish the publishing goal, we will station an experienced assistant in the house on a rotating basis to process objects and enter and process data and photographs as they are recorded in the field.
Back to top: Overview of Unit J5
Significant insights
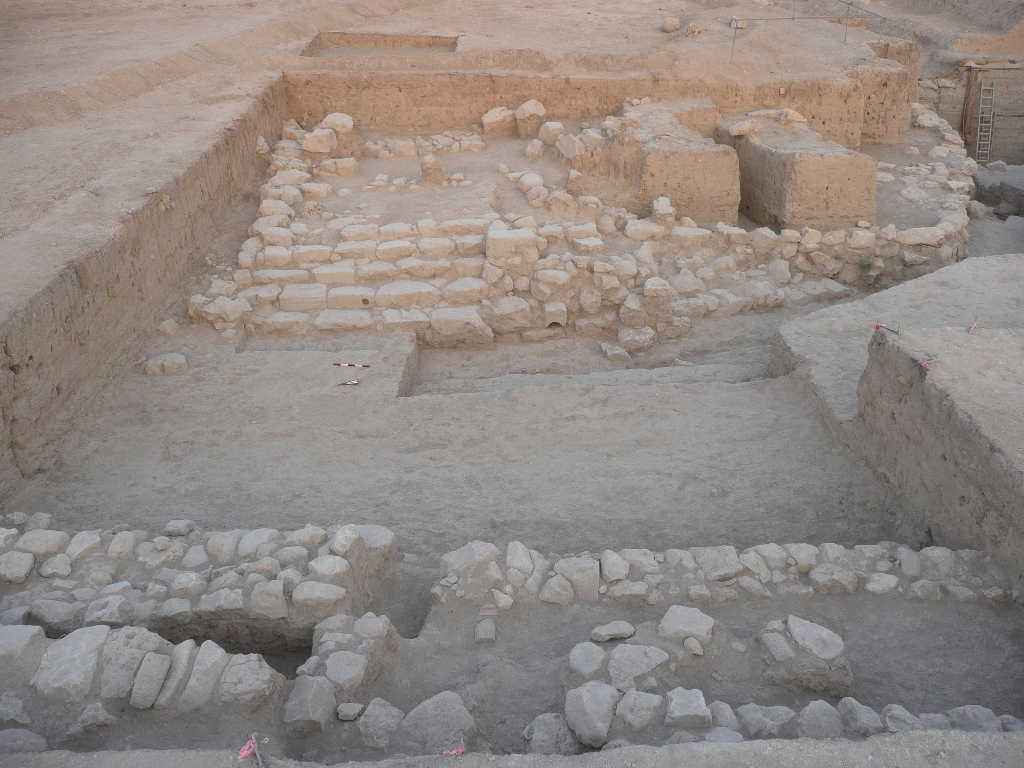
West monumental stone staircase and associated structures
The discovery of a second monumental staircase on the western end of the temple complex altered our ideas on the importance of ceremonial structures late into the Mittani period.
(1) Previous excavations in J2 and J3 indicated that as accumulations filled the plaza and covered the revetment wall, memory stones and brick columns were used to preserve the functional identity of the eastern staircase and wall system.
(2) In time at the west end of the EDIII revetment wall, the Mittani builders decided to fashion, on a reduced scale, a mirror image of the wall, staircase and apron.
(3) With the discovery of the western staircase we decided to fully expose and preserve this Mittani phase even though it meant that we may not be able to excavate earlier phases of the wall system below it.
|
|
|
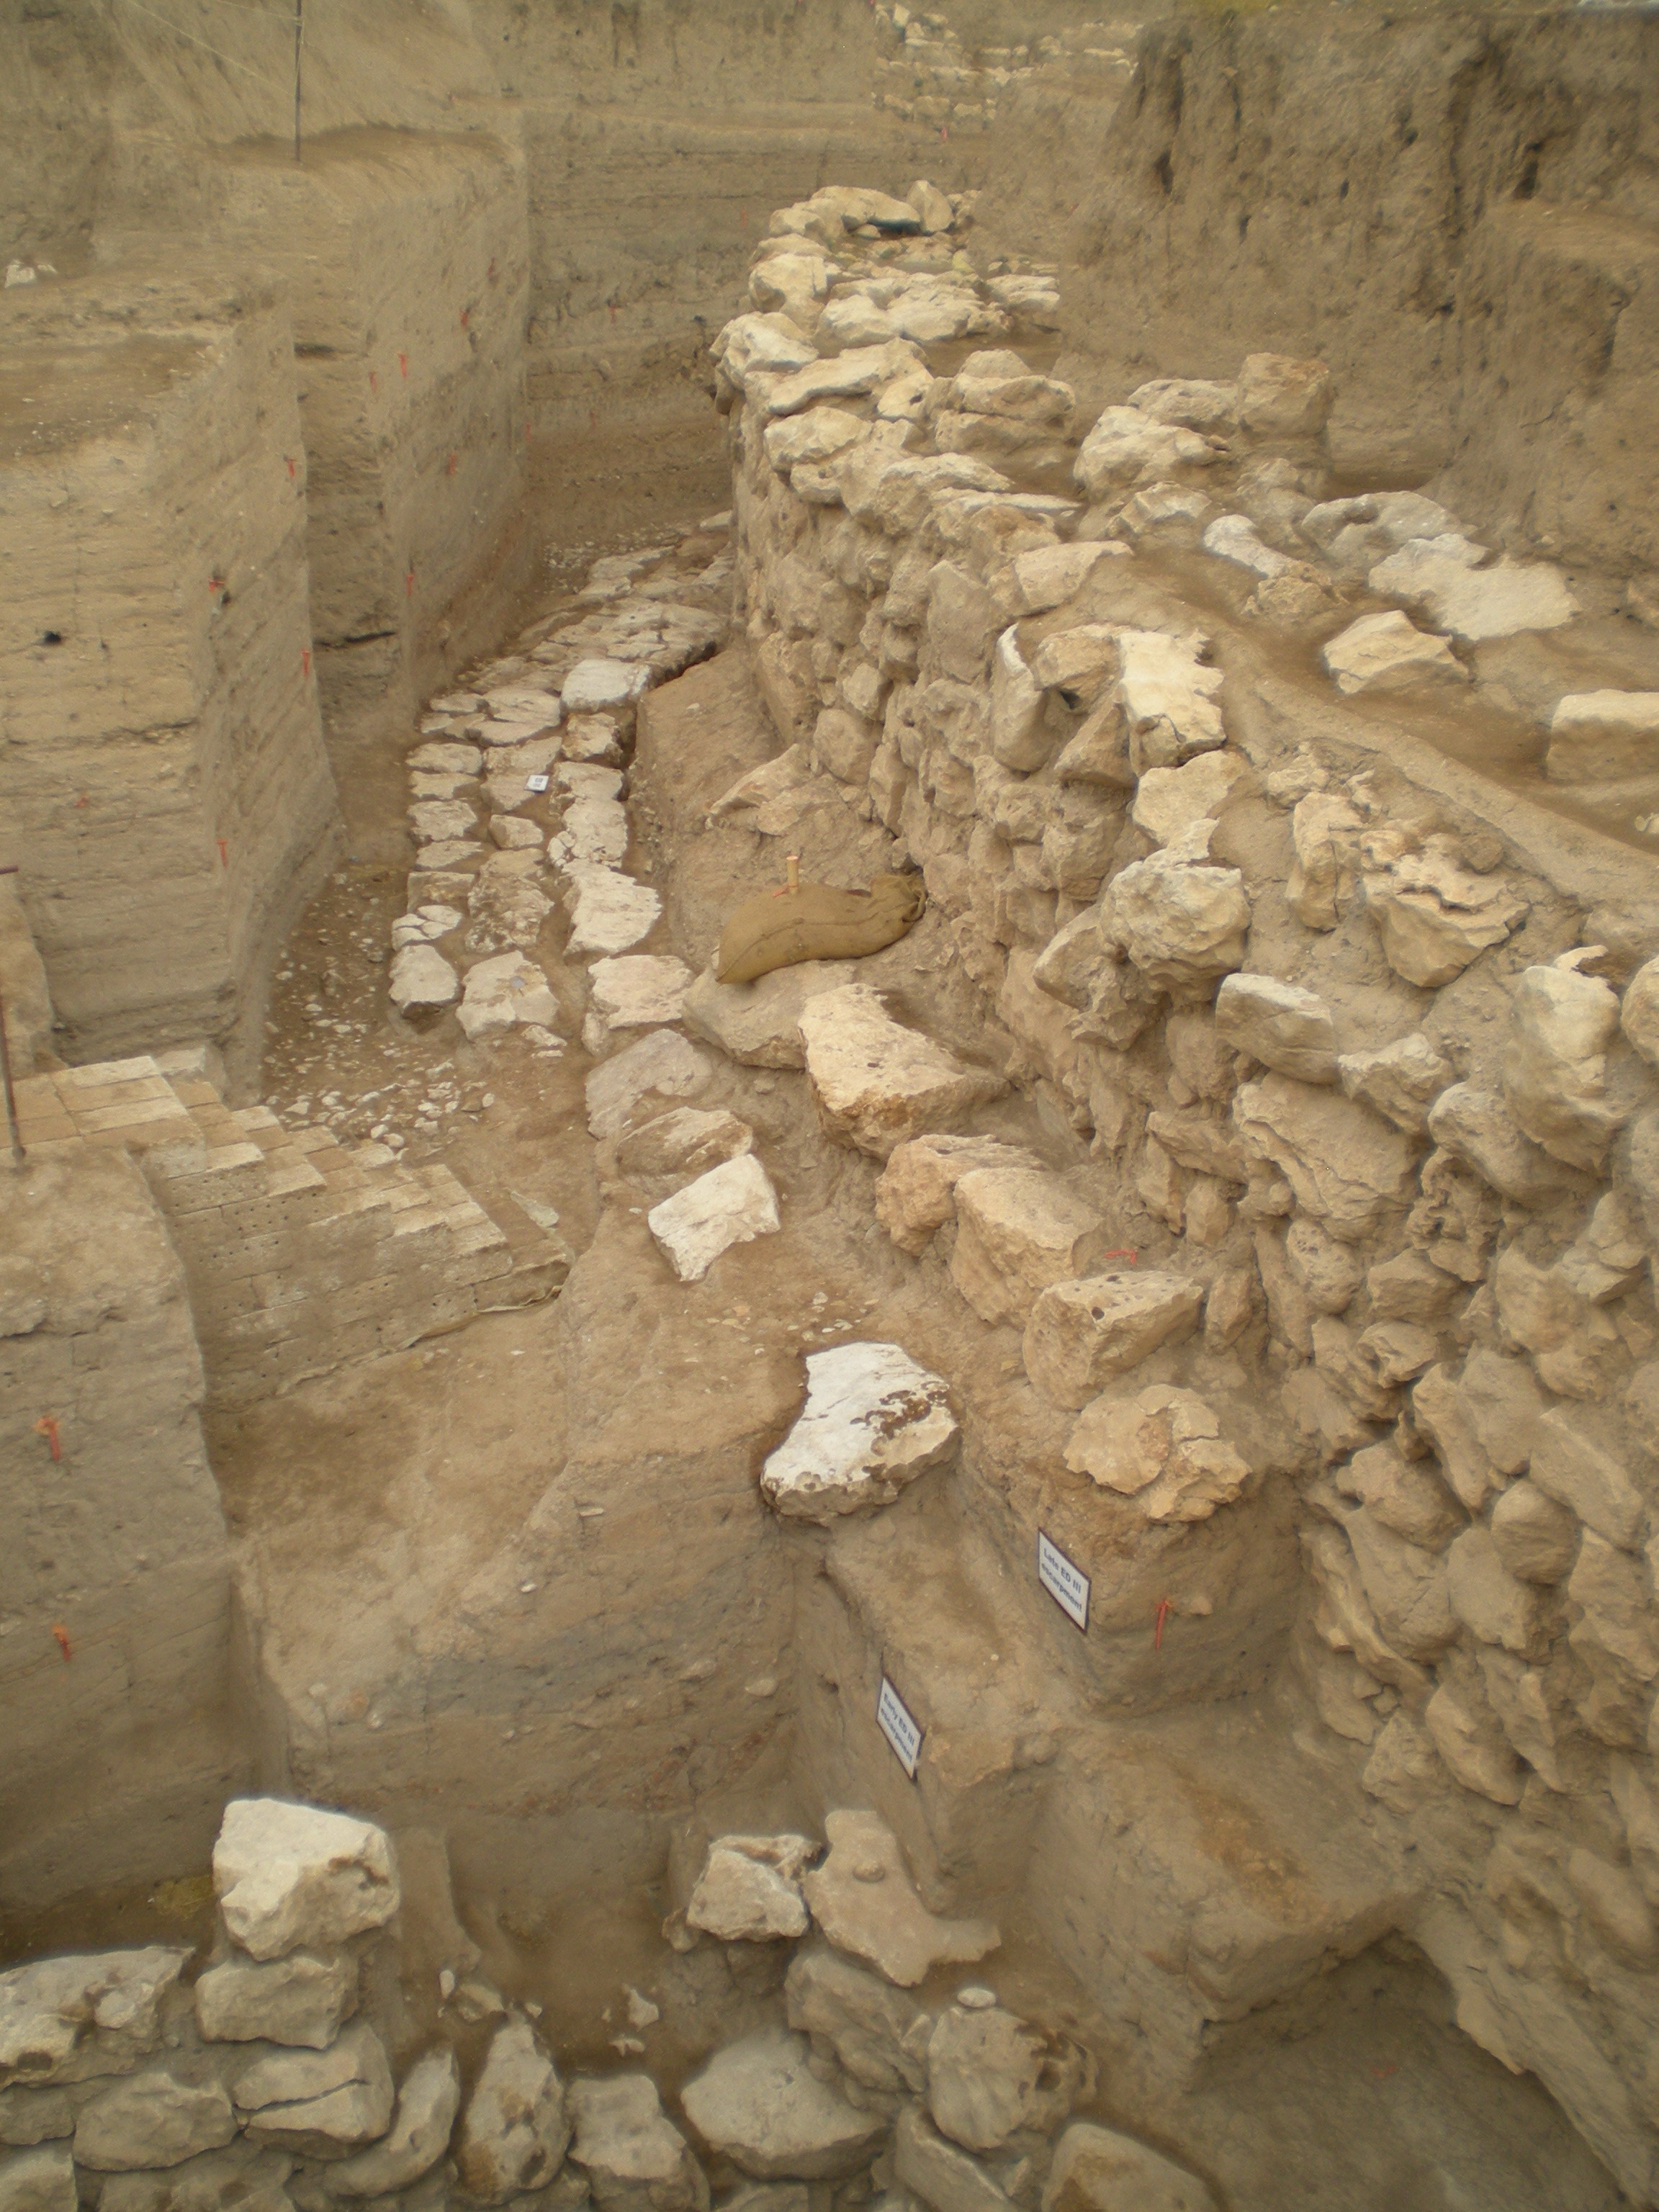
Revetment wall and its escarpments
At the end of last excavation season (2008) we believed that there were three revetment walls:
(1) A large wall built of rough stones and dated to the Early Dynastic period in J1, extended west well into J5. A single baqaya escarpment was visible
(2) A late Mittani wall added onto the end of the ED wall and extending north
(3) A wall of cut stones extending northwest from under the Mittani wall and having a mud escarpment. We did not know when it was built.
This situation was clarified by the 2009 excavations:
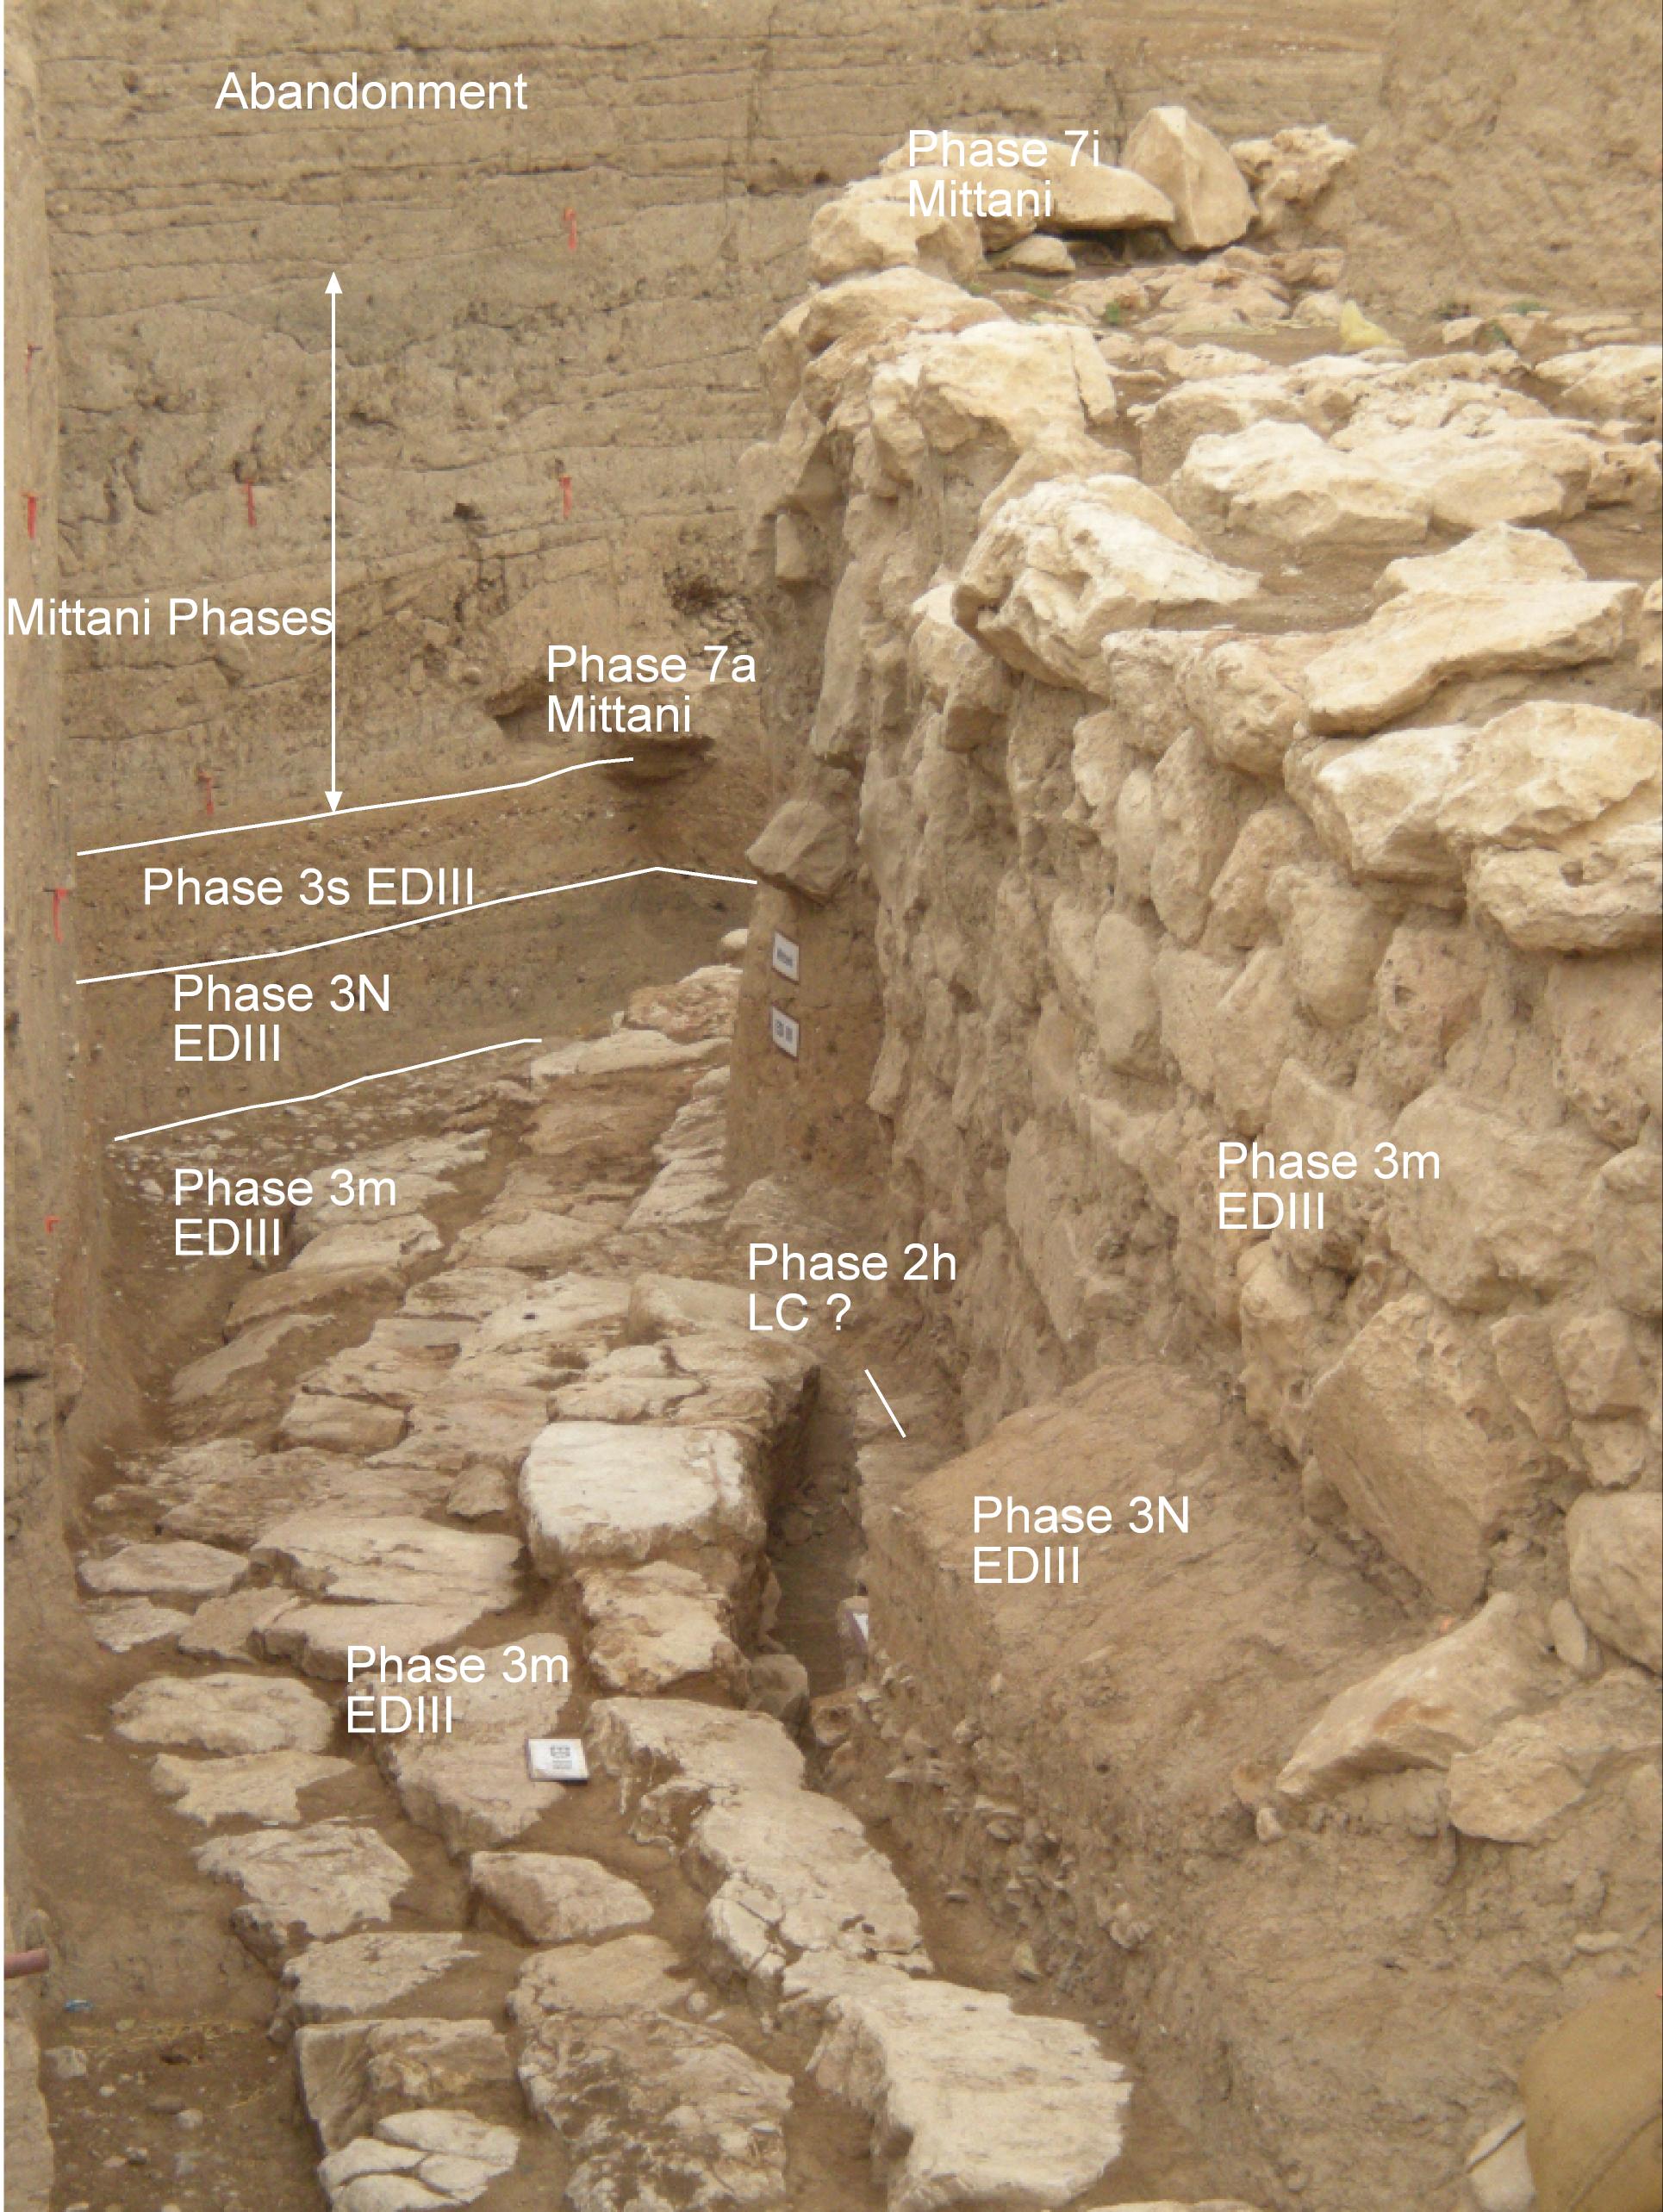
(1) The EDIII wall had two escarpments; a slightly later one of baqaya, and an earlier one of rows of large, cut stones. Both were dated to EDIII.
(2) The Mittani structures and accumulations were directly atop the ones from EDIII. There was no material from intermediate phases.
(3) The first escarpment followed the east-west revetment wall and turned, without a break, northwest to follow the cut stone wall. Thus we know that the cut stone wall was a part of the EDIII wall system.
(4) Both the rough stone and cut stone EDIII walls rested on an earlier wall which aligns with a wall segment in J1 to the east that is dated to the Late Chalcolithic period.
(5) Most importantly these EDIII structures are relatively close to the surface of the temple mound, which indicates that a substatial earlier settlement lies directly below.
|
|
|
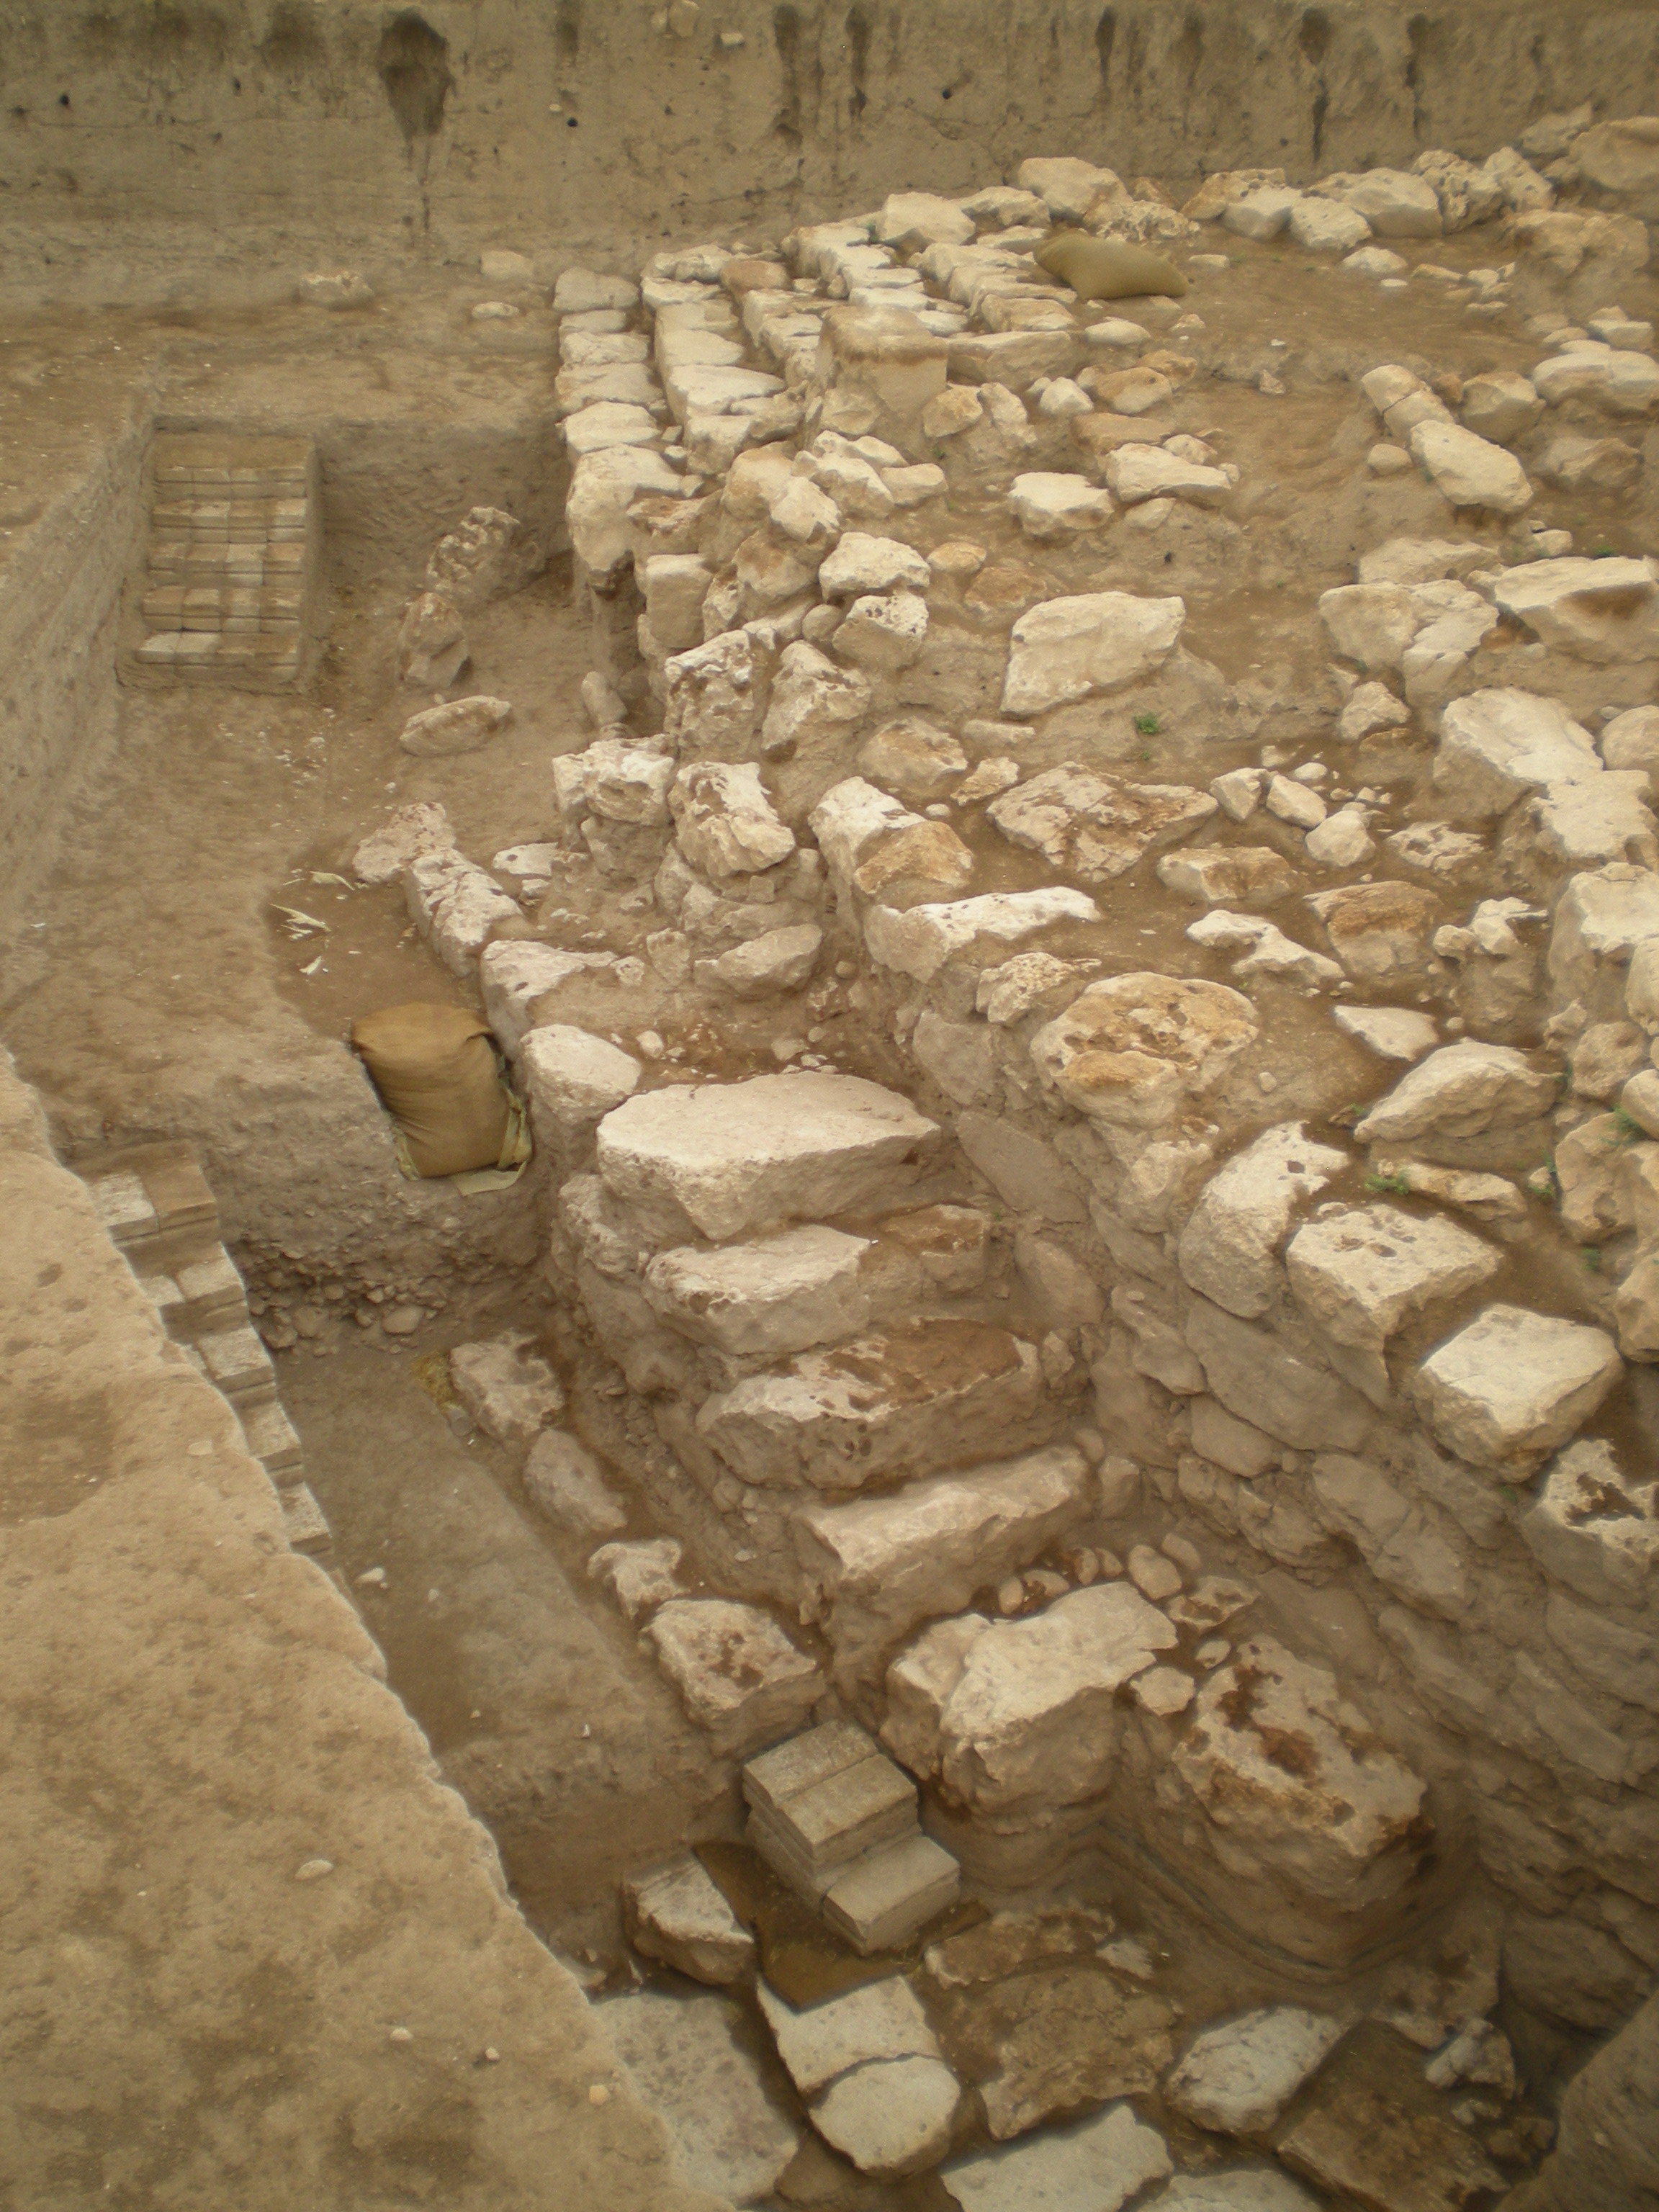
Control of water flow
Excavations in this unit and in J1 have shown that damage caused by water flowing along the outside of the various revetment wall systems has been substantial and continuing:
(1) The second baqaya escarpment to the main EDIII revetment wall was built atop the first stone escarpment soon after it was built to better control the flow of water which had broken into the plaza.
(2) Early in the Mittani westward construction two complex water control structures were built to protect the EDIII walls: one of stepped large stones and the other a brick dam with a pebble holding pond.
(3) Late in the Mittani period, a simple weir was built to divert water around the Mittani revetment wall.
(4) The discovery of a pebble floor which abuts the stone first escarpment to the south and west suggests that there are substantial structures just beyond which served to channel the water runoff along the face of the revetment walls.
|
|
|
Impact on strategy
Now that we understand that Mittani structures were built directly atop the EDIII walls and escarpments, we can explore quickly the northern extensions of the early walls. Perhaps most intriguing is that the water protection systems and the pebble pavement which abuts the early walls indicate that there are a series of EDIII and Mittani structures atop, which for a thousand years channeled flood waters between them. Next excavation season it will be important to explore to the north and to the west of the part of the revetment wall built of cut stones to find these structures. Also, we will look for a place near the outside of the EDIII walls where we can sink a test trench to determine the nature and building dates of earlier structures underneath.
Back to top: Overview of Unit J5
The pertinent areas
JP is the main area to which unit J5 belongs. It refers broadly to the area that includes the revetment wall and the open plaza to the south and west of it. It is part of the complex which includes the BA temple and the BT terrace bounded by the revetment wall.
Back to top: Overview of Unit J5
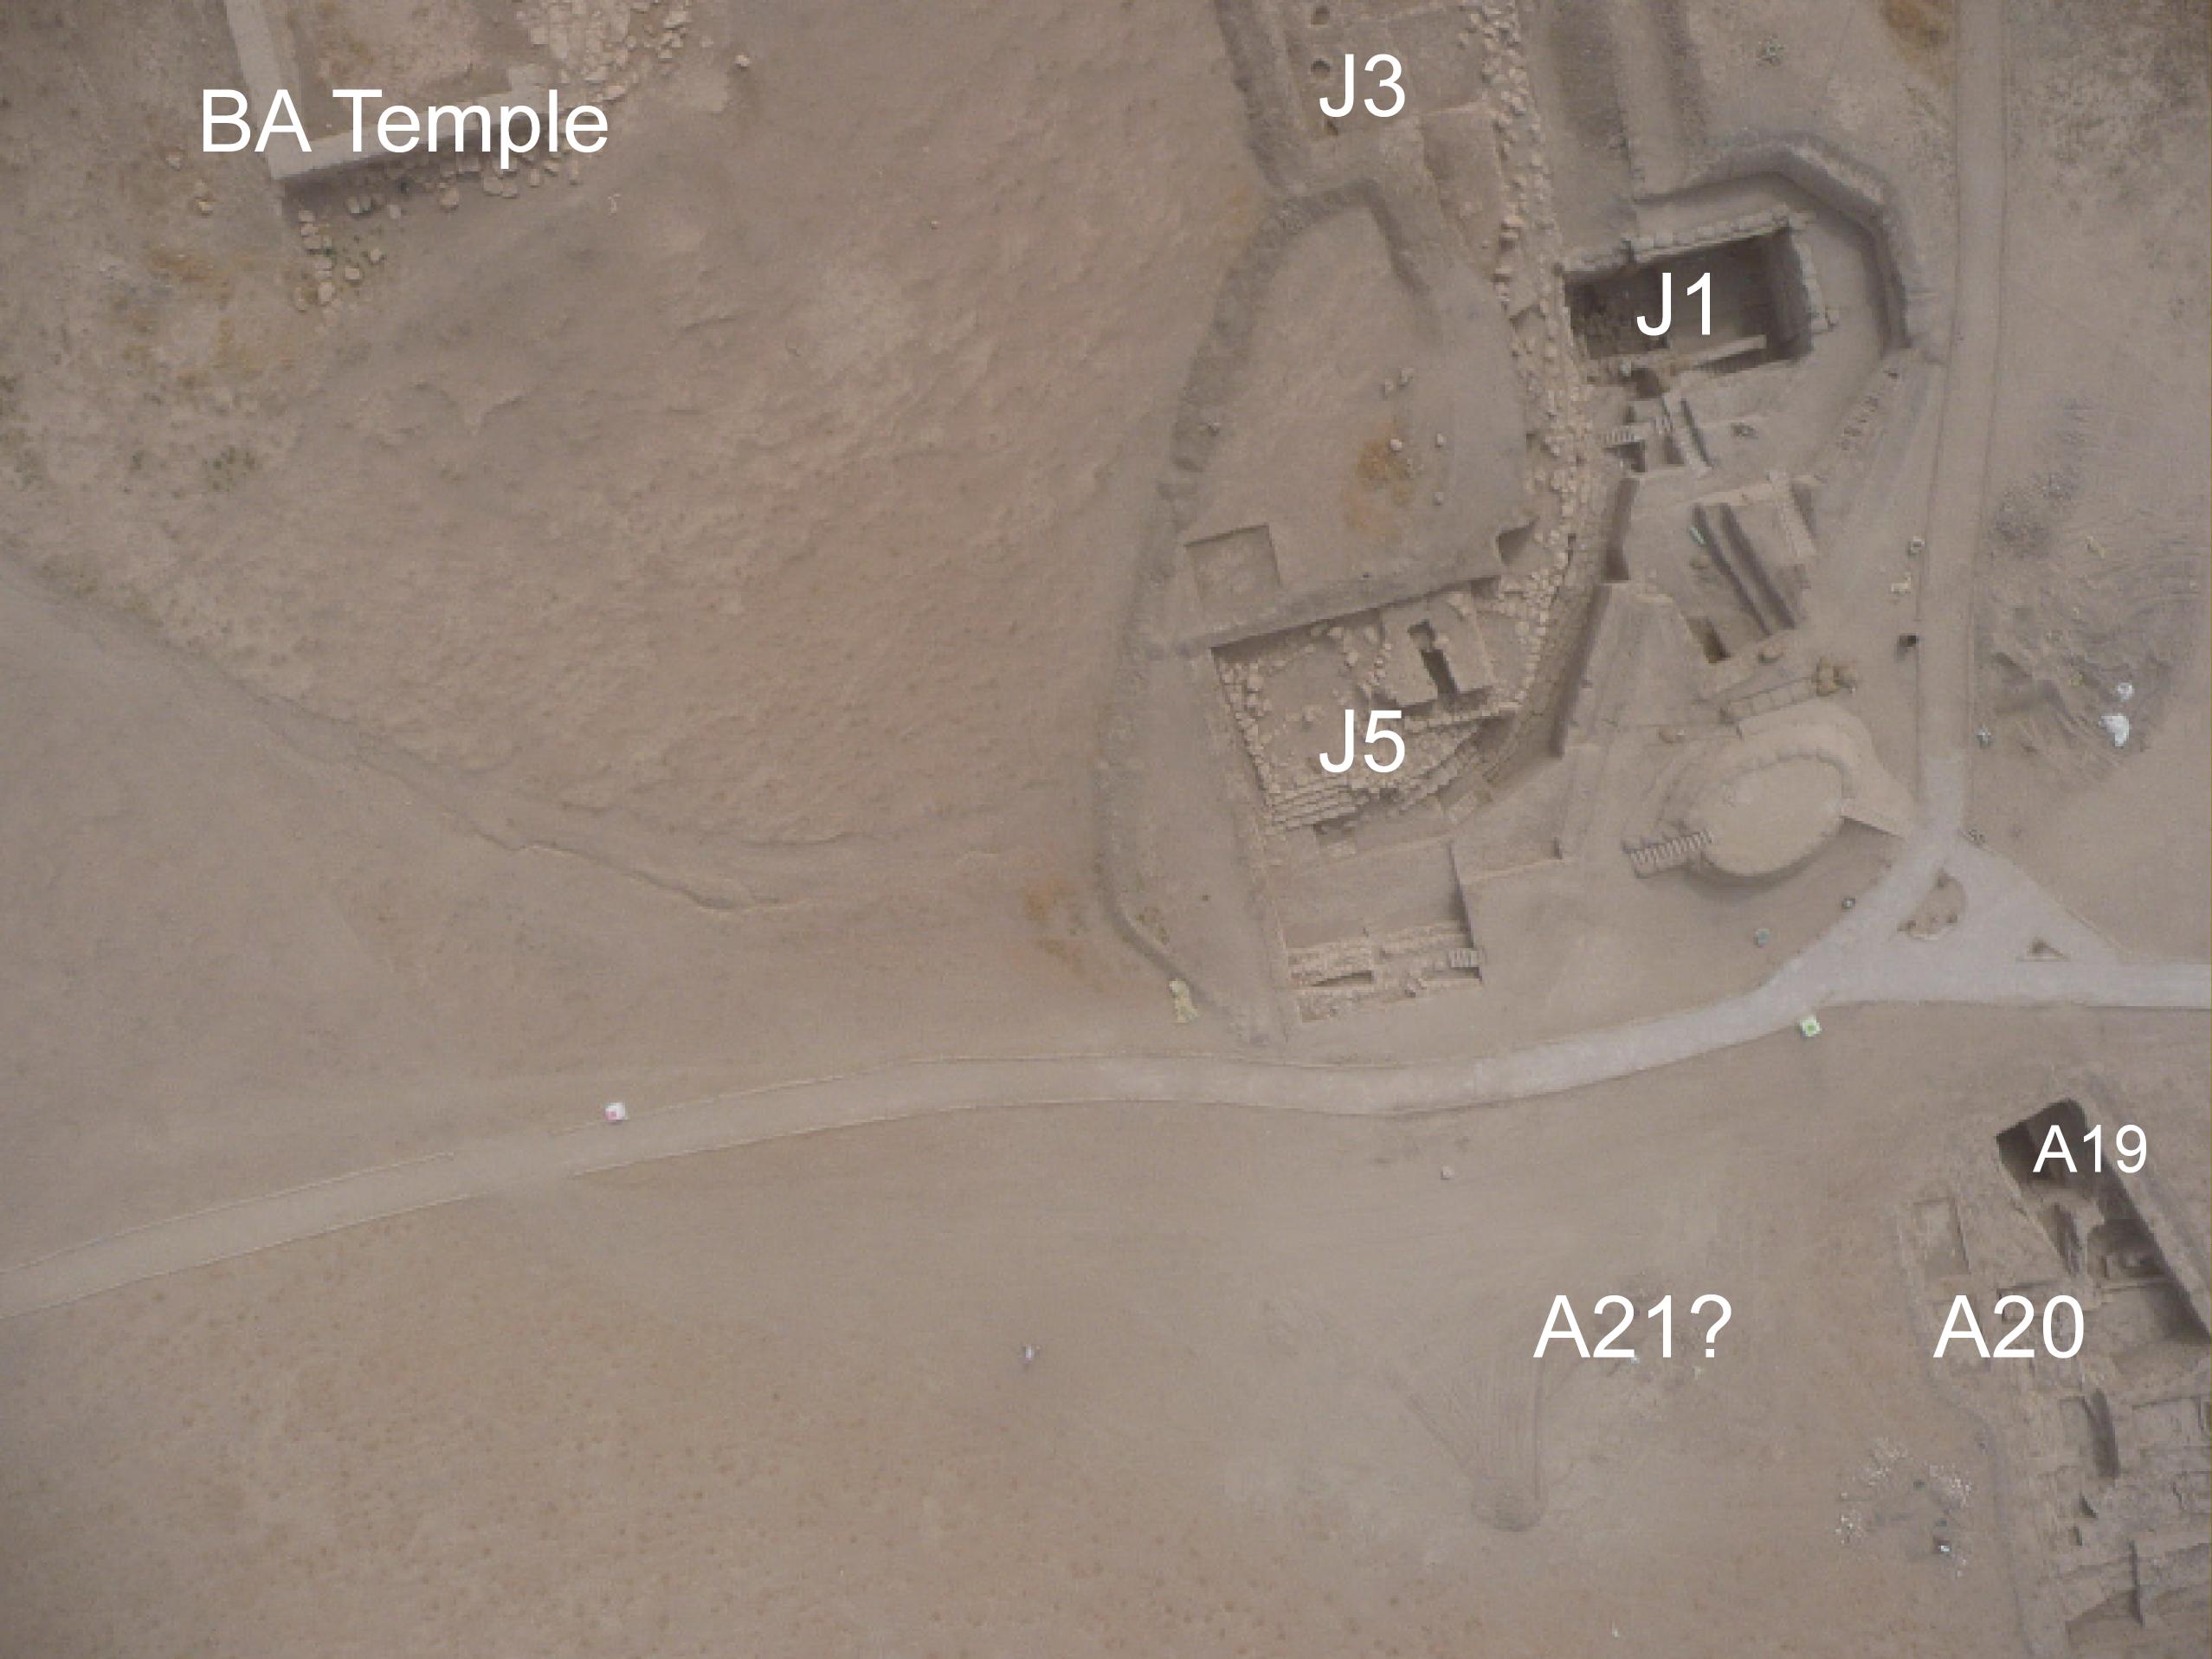
Location
Unit J5 is adjacent to unit J1 to the east (from which it was spun off and with which it shares the stratigraphy) and A20 to the west.
J1 was initiated to determine the nature and extent of the revetment wall, its escarpments and its associated plaza to the south. When explorations to the west of the exposed plaza revealed that the east-west revetment wall system was unexpectedly complex as it turned to the north, J5 was created to devote ample rescources to the investigation.
Further to the west, A20 was a unit created to explore the transition between the Mittani residential areas in A18 and the plaza/revetment wall complex.
A20 was started at the sameJ time as J5, while J1 was started in 2003.
|
|
|
Back to top: Overview of Unit J5
Phases
Phase 2h. The main revetment wall is built upon an earlier cut stone wall, tentatively dated to the Late Chalcolithic period by alignment with a similar wall in a similar location in J1. So far no other LC deposits or structures have been excavated in J5.
Phase 3m. All of the stone construction in the eastern part of the unit (revetment wall and its stone escarpment) were built in the Early Dynastic III period.
Phase 3n-3s. In the latter part the EDIII period, these earlier structures were used and modified with the addition of a second, layered baqaya escarpment.
Phase 4 through Phase 6. There is no evidence of construction or use during these periods, even though Urkesh was a significant city during this time period. This is probably due to the fact that the wall and its protection systems were performing their functions and that this part of the temple mound was isolated and used only for sacred functions.
Phase 7a-7e. Early Mittani efforts to control damage from flowing water.
Phase 7g-7m Western retrenchment, use and rebuilding during the middle and late Mittani periods.
Phase 8m. Limited occupation, but no known structures, during the Middle Assyrian period.
Phase 8r-9c. Isolated late period installations.
|
|
|
Back to top: Overview of Unit J5
Excavations in 2008
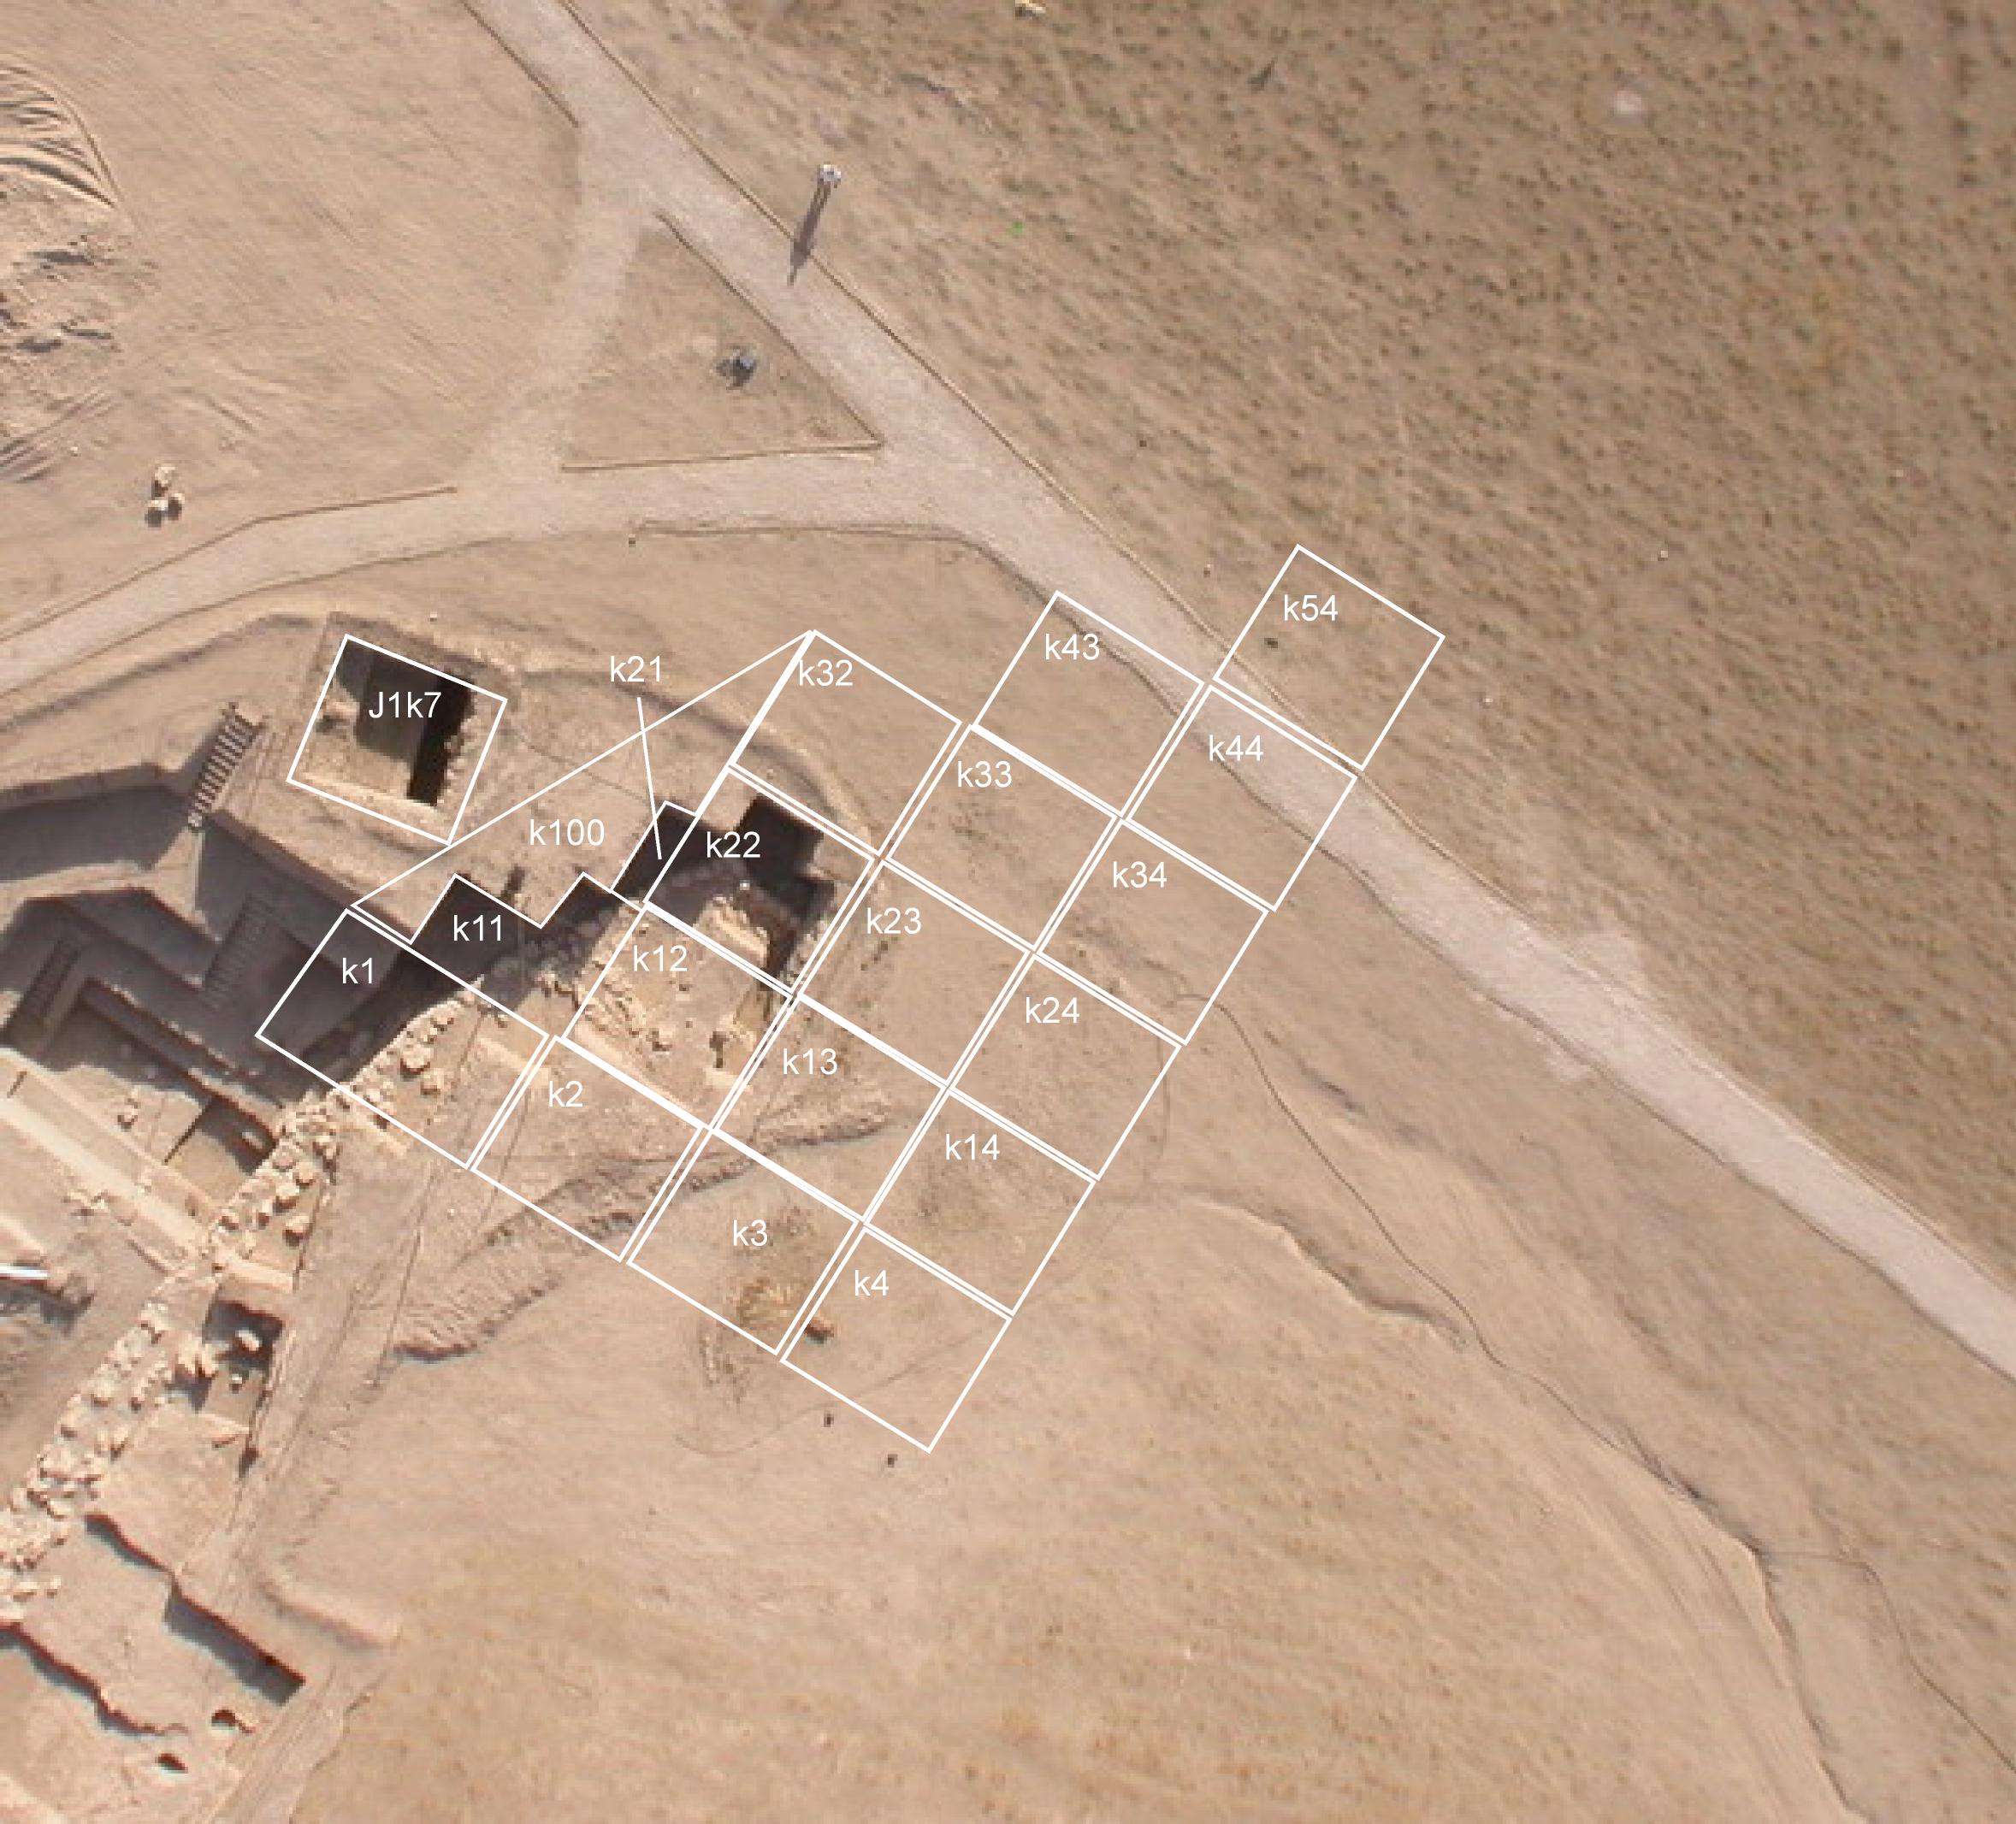
Excavations began on July 13, 2008. The aerial photo from August 2007, taken after the excavations in the westward extension in J1 were completed, shows the situation on that day. The new loci, k3, k13 ,k23, k33 and k43; k14, k24, k34, k44, and k32 were defined at the beginning and served as the main squares in the first season.
Loci to the south, k1, k2, k11, k12, and k21 had already been excavated in 2007 as part of J1. Although some have irregular shapes, the features in them were incorporated into J5 as if they had been excavated by us.
Locus k100 has an irregular shape and reflects the soil column that was "left over" as partial squares were excavated as the wall was traced to the west and north by excavators from J1.
Locus J1k7 is a remnant from early excavations in J1. It has a different orientation and its purpose was to find the plaza floor to the southwest of the revetment wall.
|
|
| 
|
Back to top: Overview of Unit J5
Excavations in 2009
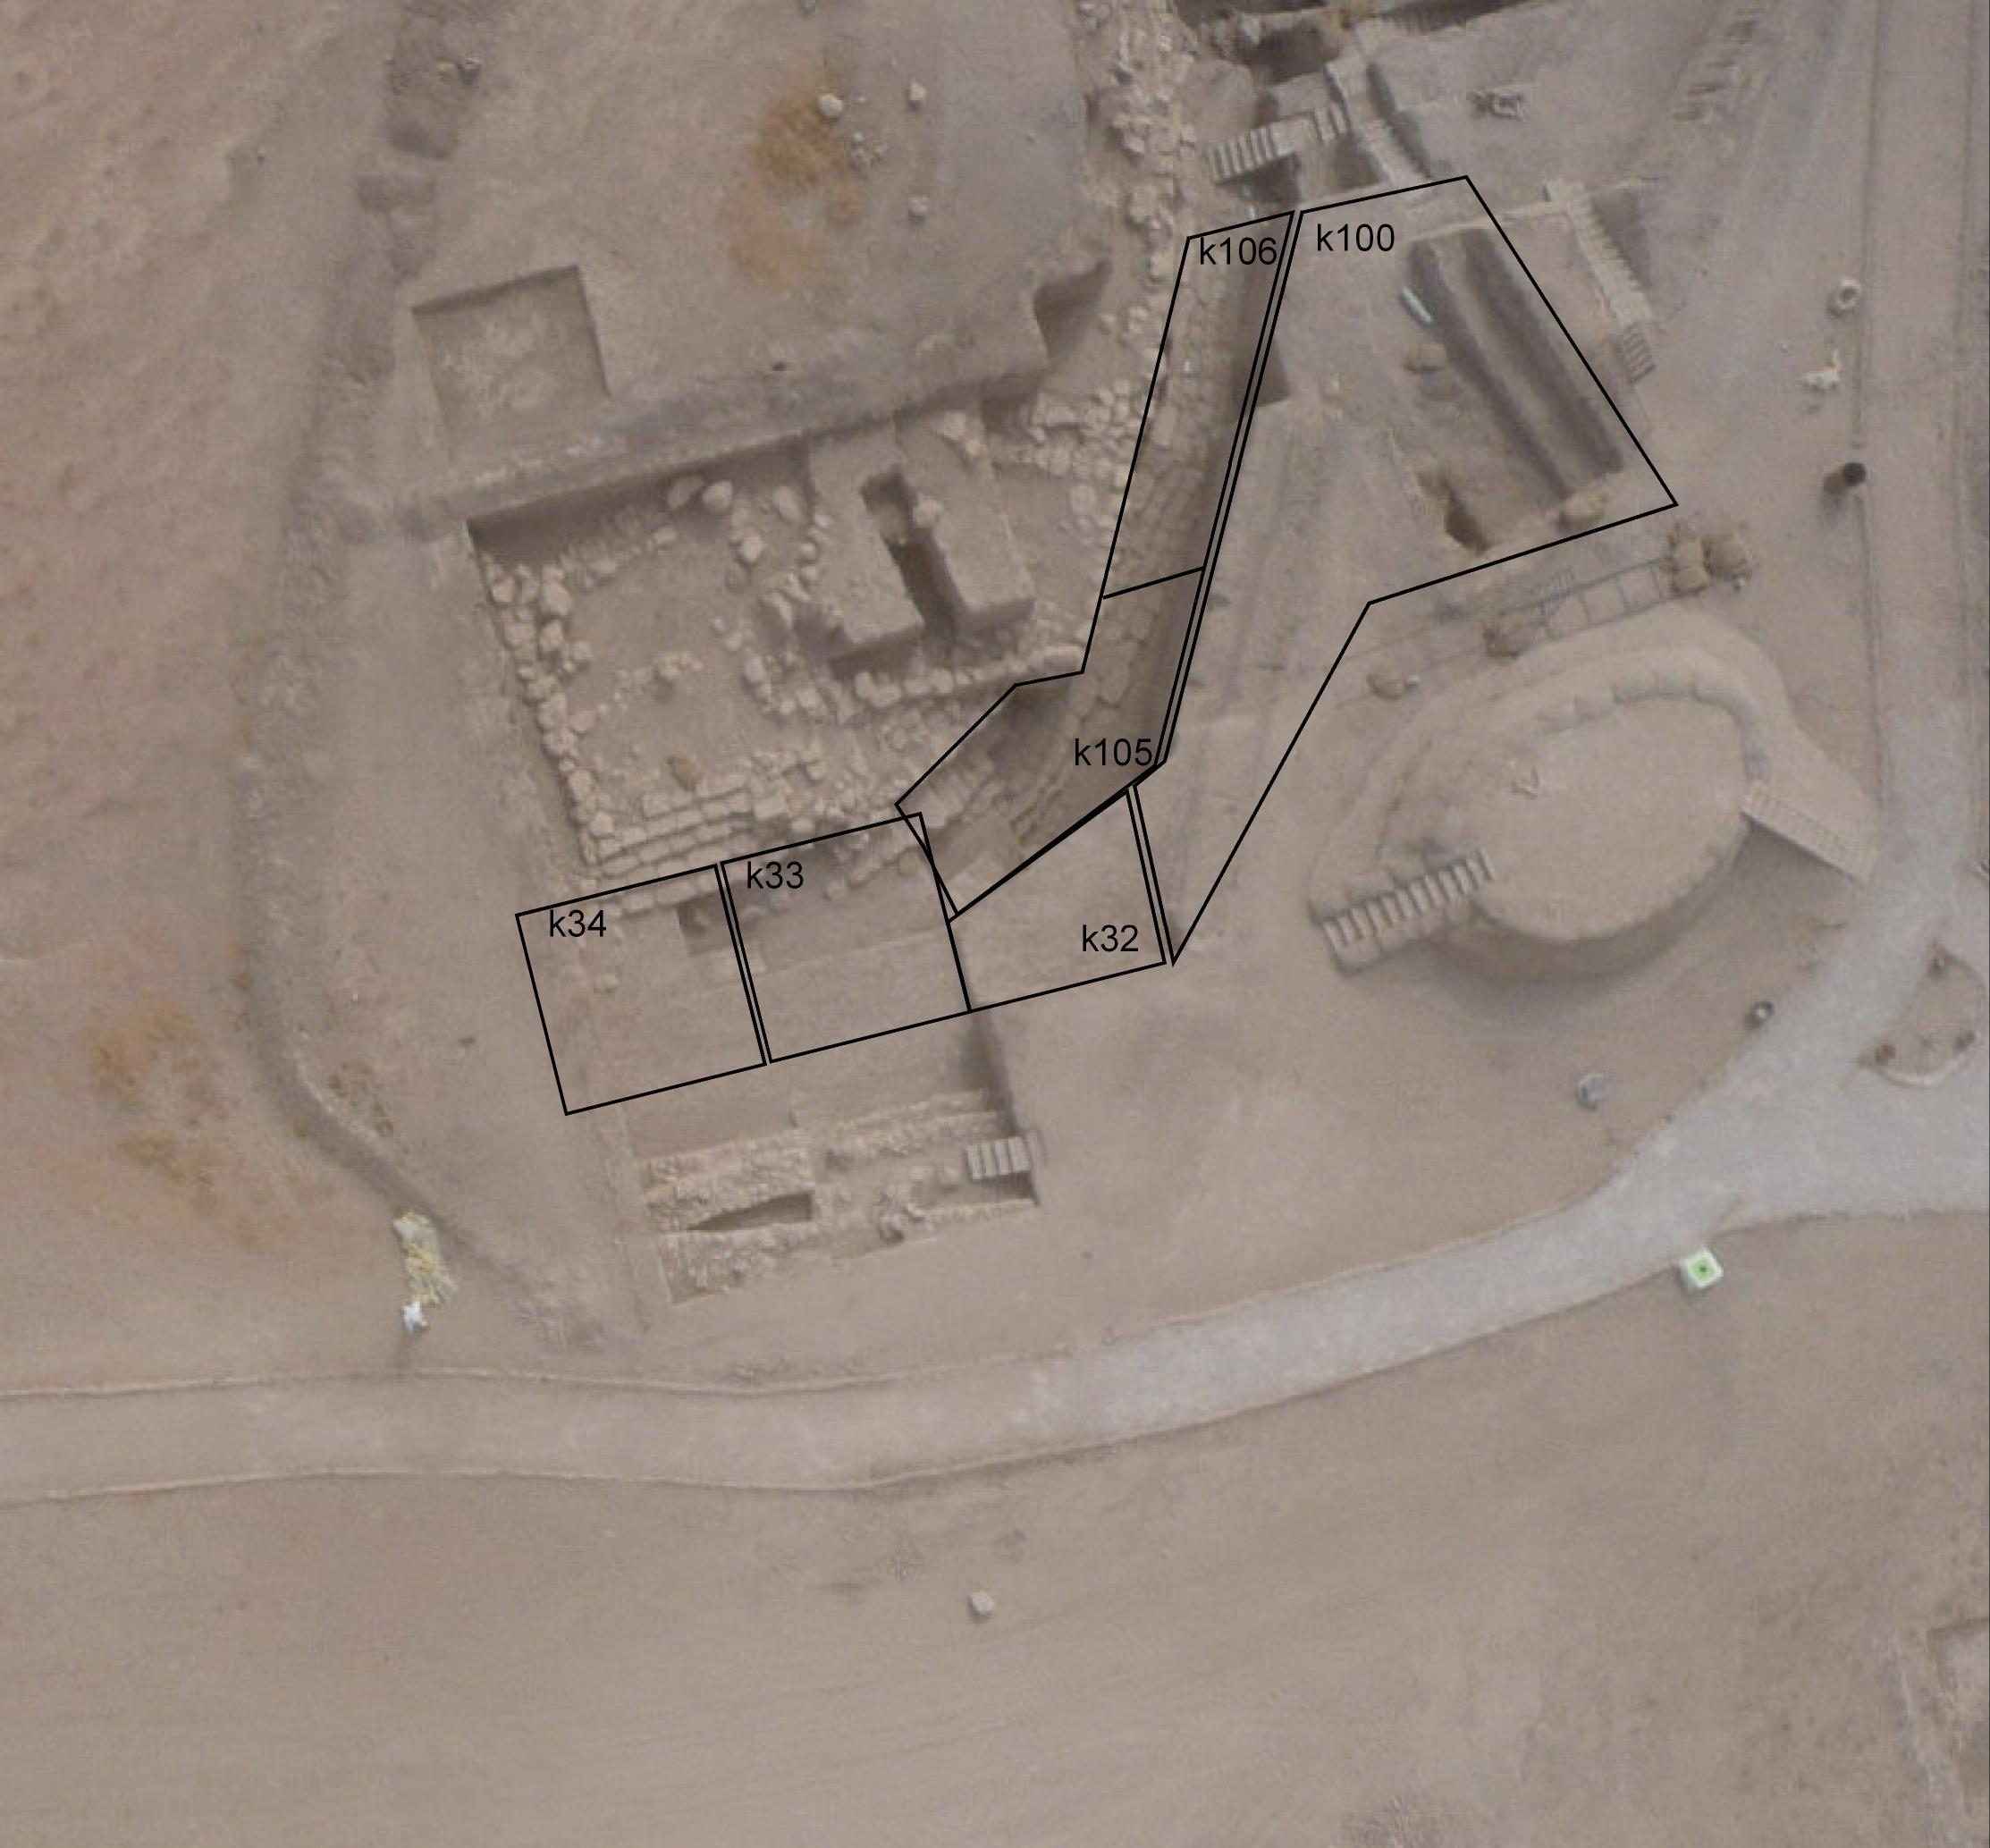
Excavations began on 20 July 2009 and ended on 27 August 2009. The results are shown on a kite photograph taken on 18 September 2009.
We focused this year's excavations on exposing the revetment wall systems and their protective structures, including escarpments and weirs. Although we did some minor work in loci which were active last year (k32, k33, k34, and k100) most of our investigations were done in the relatively narrow space between the south and west faces of the Early Dynastic III revetment wall and the high north and east baulks of k100 and k32. For convenience we split this region into two loci, k105 and k106 (both were combined briefly at the beginning of excavations for cleaning.)
In locus k106 we exposed the EDIII stone escarpment, and a later layered baqaya addition. Also, we excavated part of the top of an earlier wall upon which the early revetment wall was built. In locus k105 we exposed the northward and western extension of the stone escarpment, thereby showing that the rough and cut stone revetment walls were built at the same time We also discovered three diffent stone and brick structures built to moderate the flow of floodwater. In addition, we also excavated a pebble floor surface associated with the stone escarpment.
|
|
| 
|
Back to top: Overview of Unit J5
Goals for next excavation season
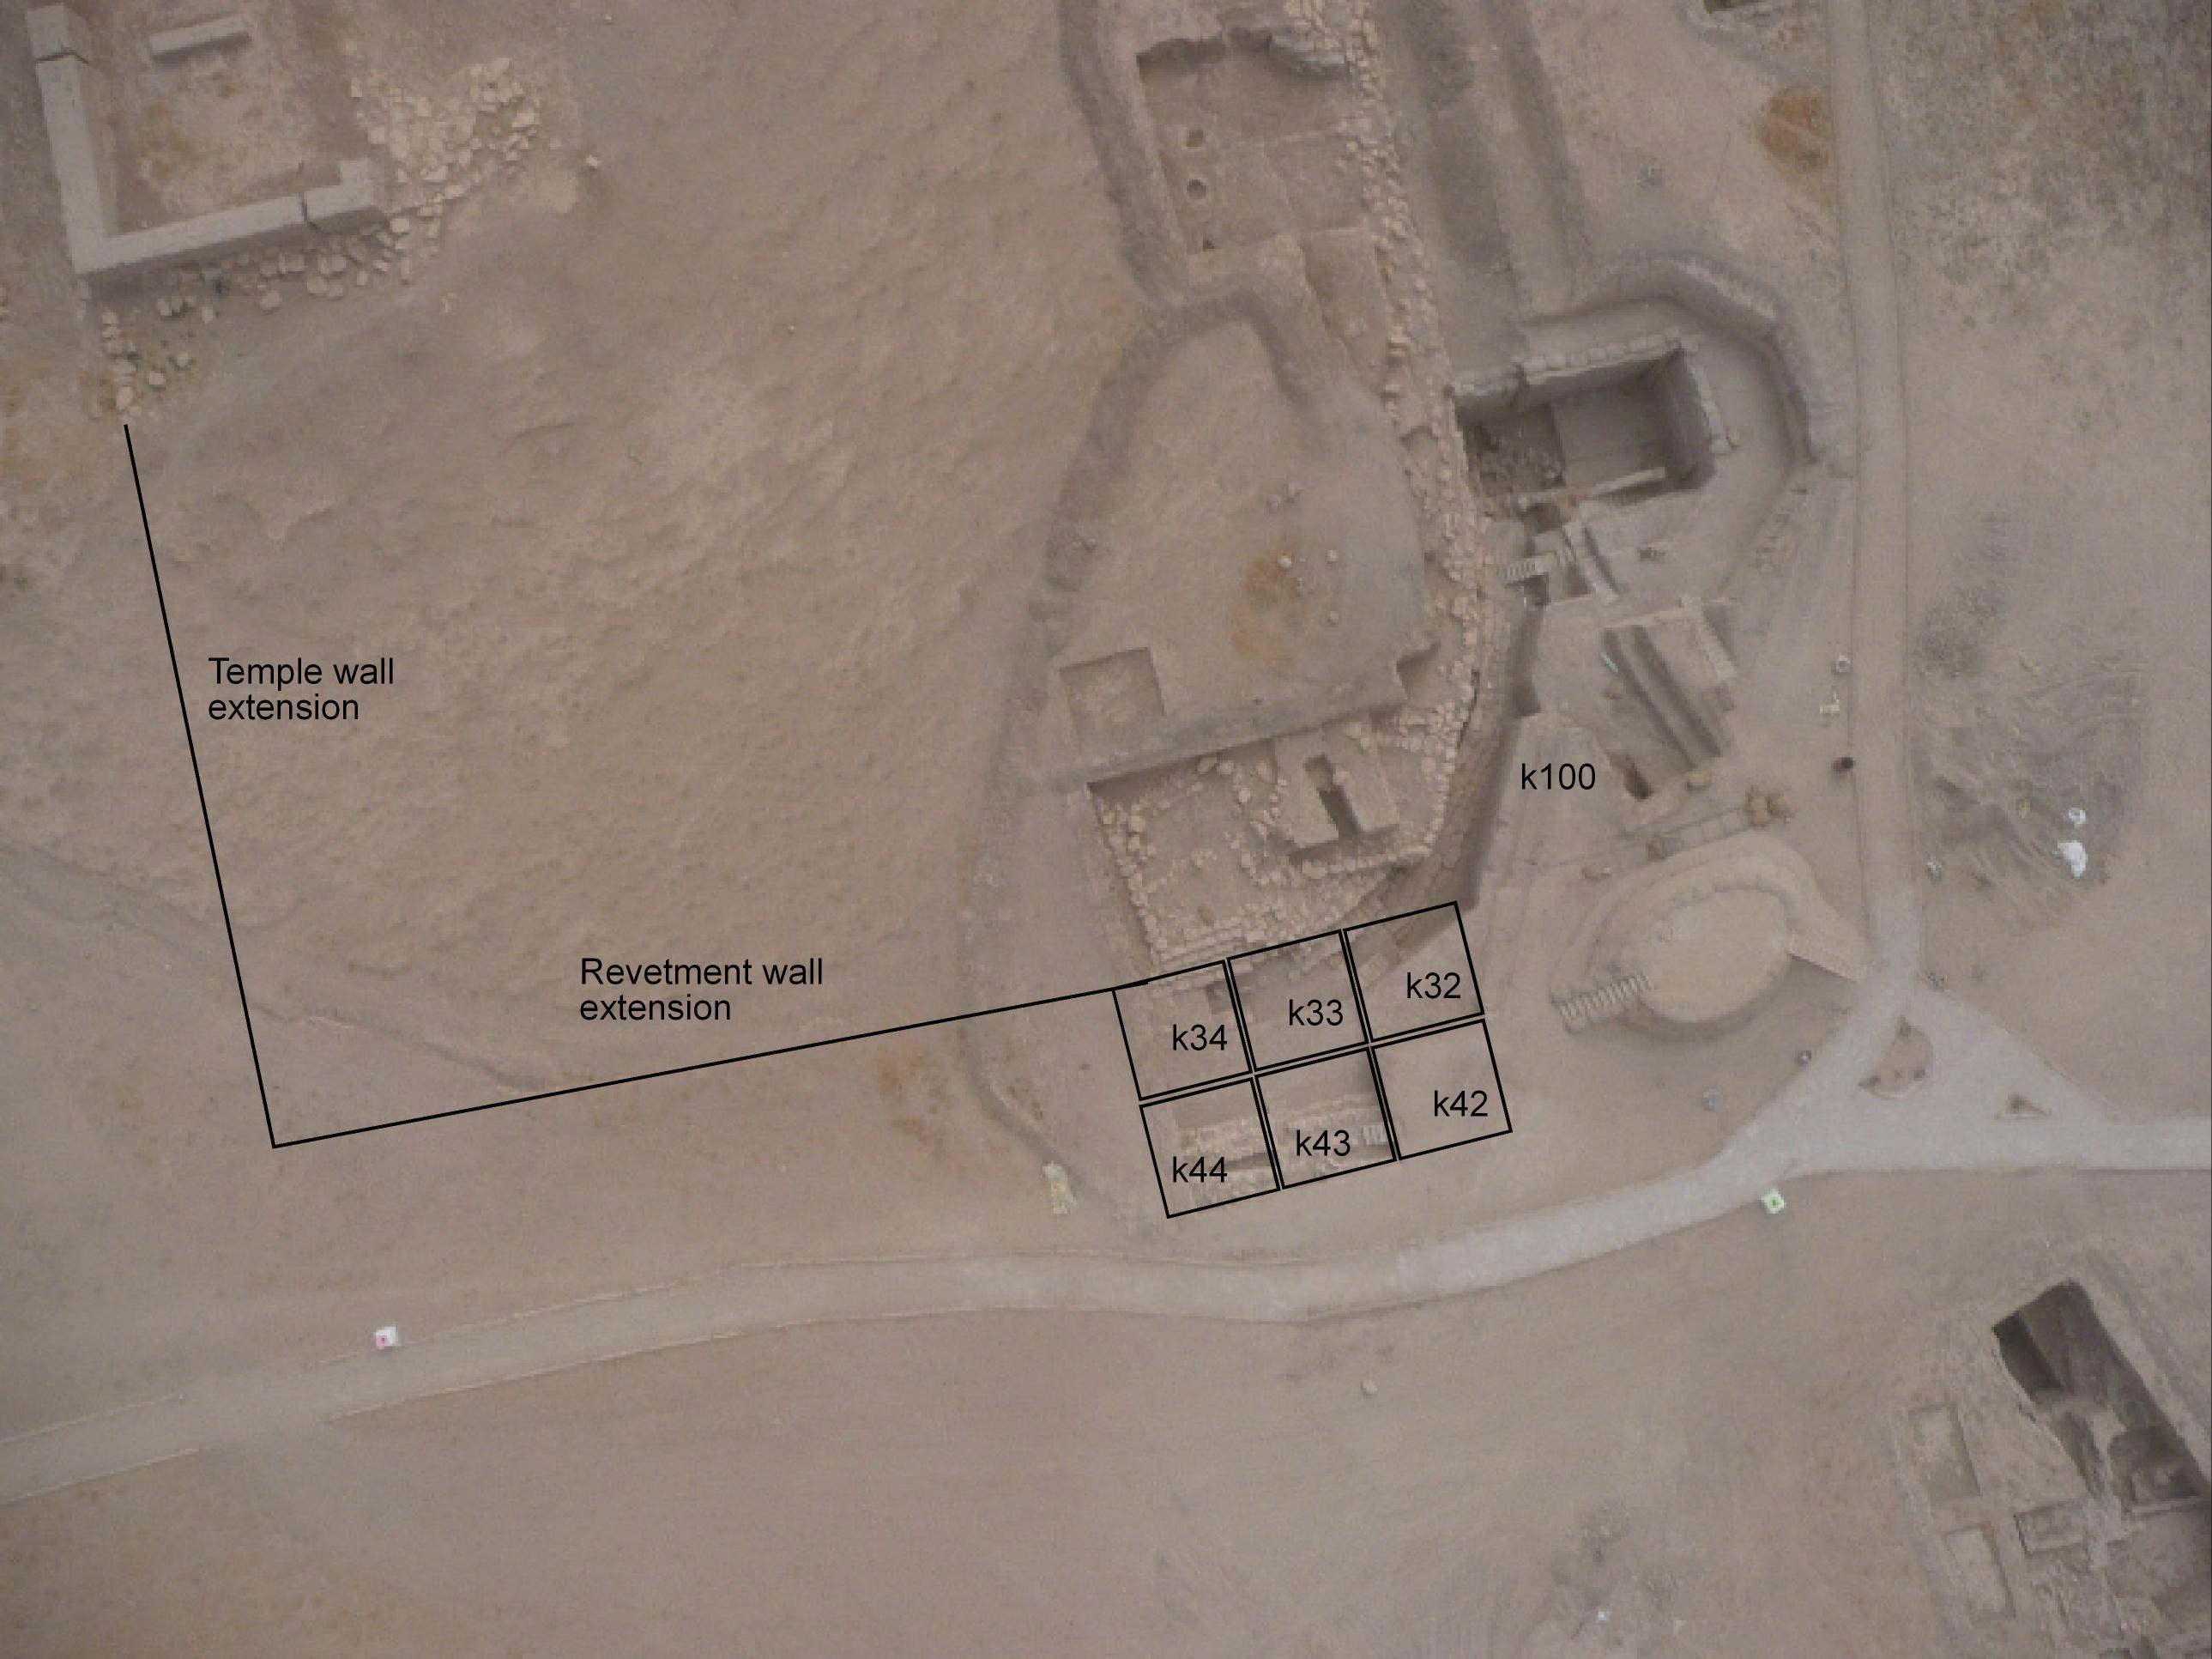
One explanation for occasioning the persistant attemts to ameliorate the damage to the revetment wall system from flowing water may be a set of structures close to the wall just to the west and south of the stone escarpment and linked to it by the pebble floor. These structures and the wall system may have formed a channel that confined the water and forced it along a path that eventually flooded the Plaza.
If these structures exist, they should be between the staircase and the lines of stones to the west and within a few meters of the revetment wall elsewhere. Excavations in k32 to k34 and a new locus k42 to k44 to the west and k100 to the south should reveal what contained the water, which by the present shape of the mound, should have flowed harmlessly to the west and south.
The part of the EDIII wall that is built of cut stones turns north, but we do not know how far it extends in that direction after it passes under the western staircase. There is a possibility that it intersects with a line of stones which extends westward from the temple. These issues could be explored by following the stone escarpment northward past the staircase.
If the cut stone revetment wall continues to the north, then there should be an place to the west of its escarpment where it would be possible to probe beneath the Early Dynastic III layer to see if the expected Late Chalcolithic deposits and structures lay directly underneath.
There are several pillars of soil which obscure sightlines and cover portions of stone architecture and therefore should be removed.
|
|
|
Back to top: Overview of Unit J5
Main results
The main findings of the two seasons may be summarized as follows:
- The western staircase, associated structures, and pavements
- The stone escarpment and its associated pavement.
- The superposition of Mittani deposits directly atop those of Early Dynastic III.
- The presence of deposits containing Middle Assyrian ceramics atop Mittani deposits.
- The presence of Early Dynastic III structures so close to the top of the tell bespeaks of a substatial earlier settlement directly below.
- Persistant attempts to prevent or ameleorate damage from flowing water along the revetment walls.
- An EDIII floor possibly linking the stone escarpment with major structures to the west and south.
- Large ceramic inventory and attendant statistics
Back to top: Overview of Unit J5
General statistics
| approximate cubic meters
|
300
|
| total number of features
|
293
|
| total number of items
|
61
|
| total number of q-lots
|
498
|
| total number of sherds
|
2,809
|
| total number of output files
|
9,205
|
| total number of records
|
1,144,184
|
| total number of hyperlinks
|
509,186
|
| total number of photographs
|
1,459
|
| total number of drawings
|
51
|
| total file size (with low resolution graphic files)
|
73.4 MB
|
Back to top: Overview of Unit J5