Back to top: A. Site Conservation 5 – Techniques
1. Overview
The most distinctive aspect of site conservation at Tell Mozan consists of the localized shelters that protect individual walls. The techniques of construction are presented here in detail, with specific reference to the materials used and the mode of assemblage.
Stone walls with no mud bricks are for the most part left exposed, with a minimum of protection, that is described here as well.
While I seek to minimize the use of external intervention that affects the constitutive elements of the original document, there are cases where such alteration becomes necessary, either in the way of chemicals that are injected into the very fabric of the original, or through an over layering with plaster type materials.
Horizontal surfaces present problems of an altogether different nature, and they are treated accordingly.
Back to top: A. Site Conservation 5 – Techniques
Options
Depending on the conditions of the wall, I distinguish three options as to whether or not to use protective localized shelters.
- Extant, damaged walls. – Wherever the walls are extant, they are protected with a localized shelter, except for partition walls without mudbricks.
At first, I placed the localized shelter structures everywhere, i. e., including the partition walls without mudbricks and even sections where there were no physical remnants of walls to be protected. However, the shelters would quickly be damaged by the winds that had an easy play against the vertical panels because the shelters were hollow on the inside, the wall being either missing or very low. As a result, I adopted two alternative solutions.
- Partition walls without mudbricks. – If only the stone substructure (or foundation) is extant, and if the wall is a partition wall, then I omitted the shelter protection, and marked instead the outline of the wall with white rods.
- No wall extant. – In this case, I reconstructed the wall, and marked it with a painted hatched pattern to highlight the fact that it was not an original structure.
The distinction between the three approaches is illustrated by the photo below (taken in 2009), of sector A of the Palace of Tupkish.

Back to top: A. Site Conservation 5 – Techniques
2. Shelters
The choice of using localized shelters is determined by specific conditions, which are described under options.
I give here the structural details of the localized shelters in their current configuration at Mozan. There are three major components, and one will find full details about each in the pertinent sub-sections:
For each of these I present first the current system, and then I give details about earlier experiments, whereas the overall development of the system as a whole is discussed in the section on the history of the project.
Back to top: A. Site Conservation 5 – Techniques
Back to top: A. Site Conservation 5 – Techniques
General design
Taken together, the metal frames constitute like a cage that is placed atop the wall remains.
Main characteristcs of the metal frames are:
- Structural components. – The metal used is iron throughout, which is treated with anti-rust paint. There are two main components: L, T or square section bars (typically 4 cms. on the side), and tubular pipes (typically one inch in diameter).
- Assembled elements. – The components are assembled into modules that consist essentially of grate-like panels for the top, and single pieces for the uprights.
- Modularity. – The modules are linked with sockets and screws that allow for assembling and diassembling as needed.
- Stability. – The weight of the assembled "cages," interlocked as they are with each other, is sufficient to hold them in place, without anchoring them to the ground.
- Non-invasiveness. – As a result, the "cages" are totally non-invasive: they simply sit on the ground, and only in a few cases are the feet attached to stakes that are set in the ground (which is normally backfill above the floor surfaces).
- Distance from wall tops. – The top of the extant walls are often quite uneven in their outline. This is regularized, in the cage, to a standard height for different segments of the walls, and in any case the "roof" of the cage is always at a considerable distance from the top of the wall.
- Distance from wall faces. – The distance from the wall faces is uniform, about 10/15 cms. This increases slightly the perception of the volumes, but it prevents the panels from rubbing against the wall faces in case of strong winds.
|
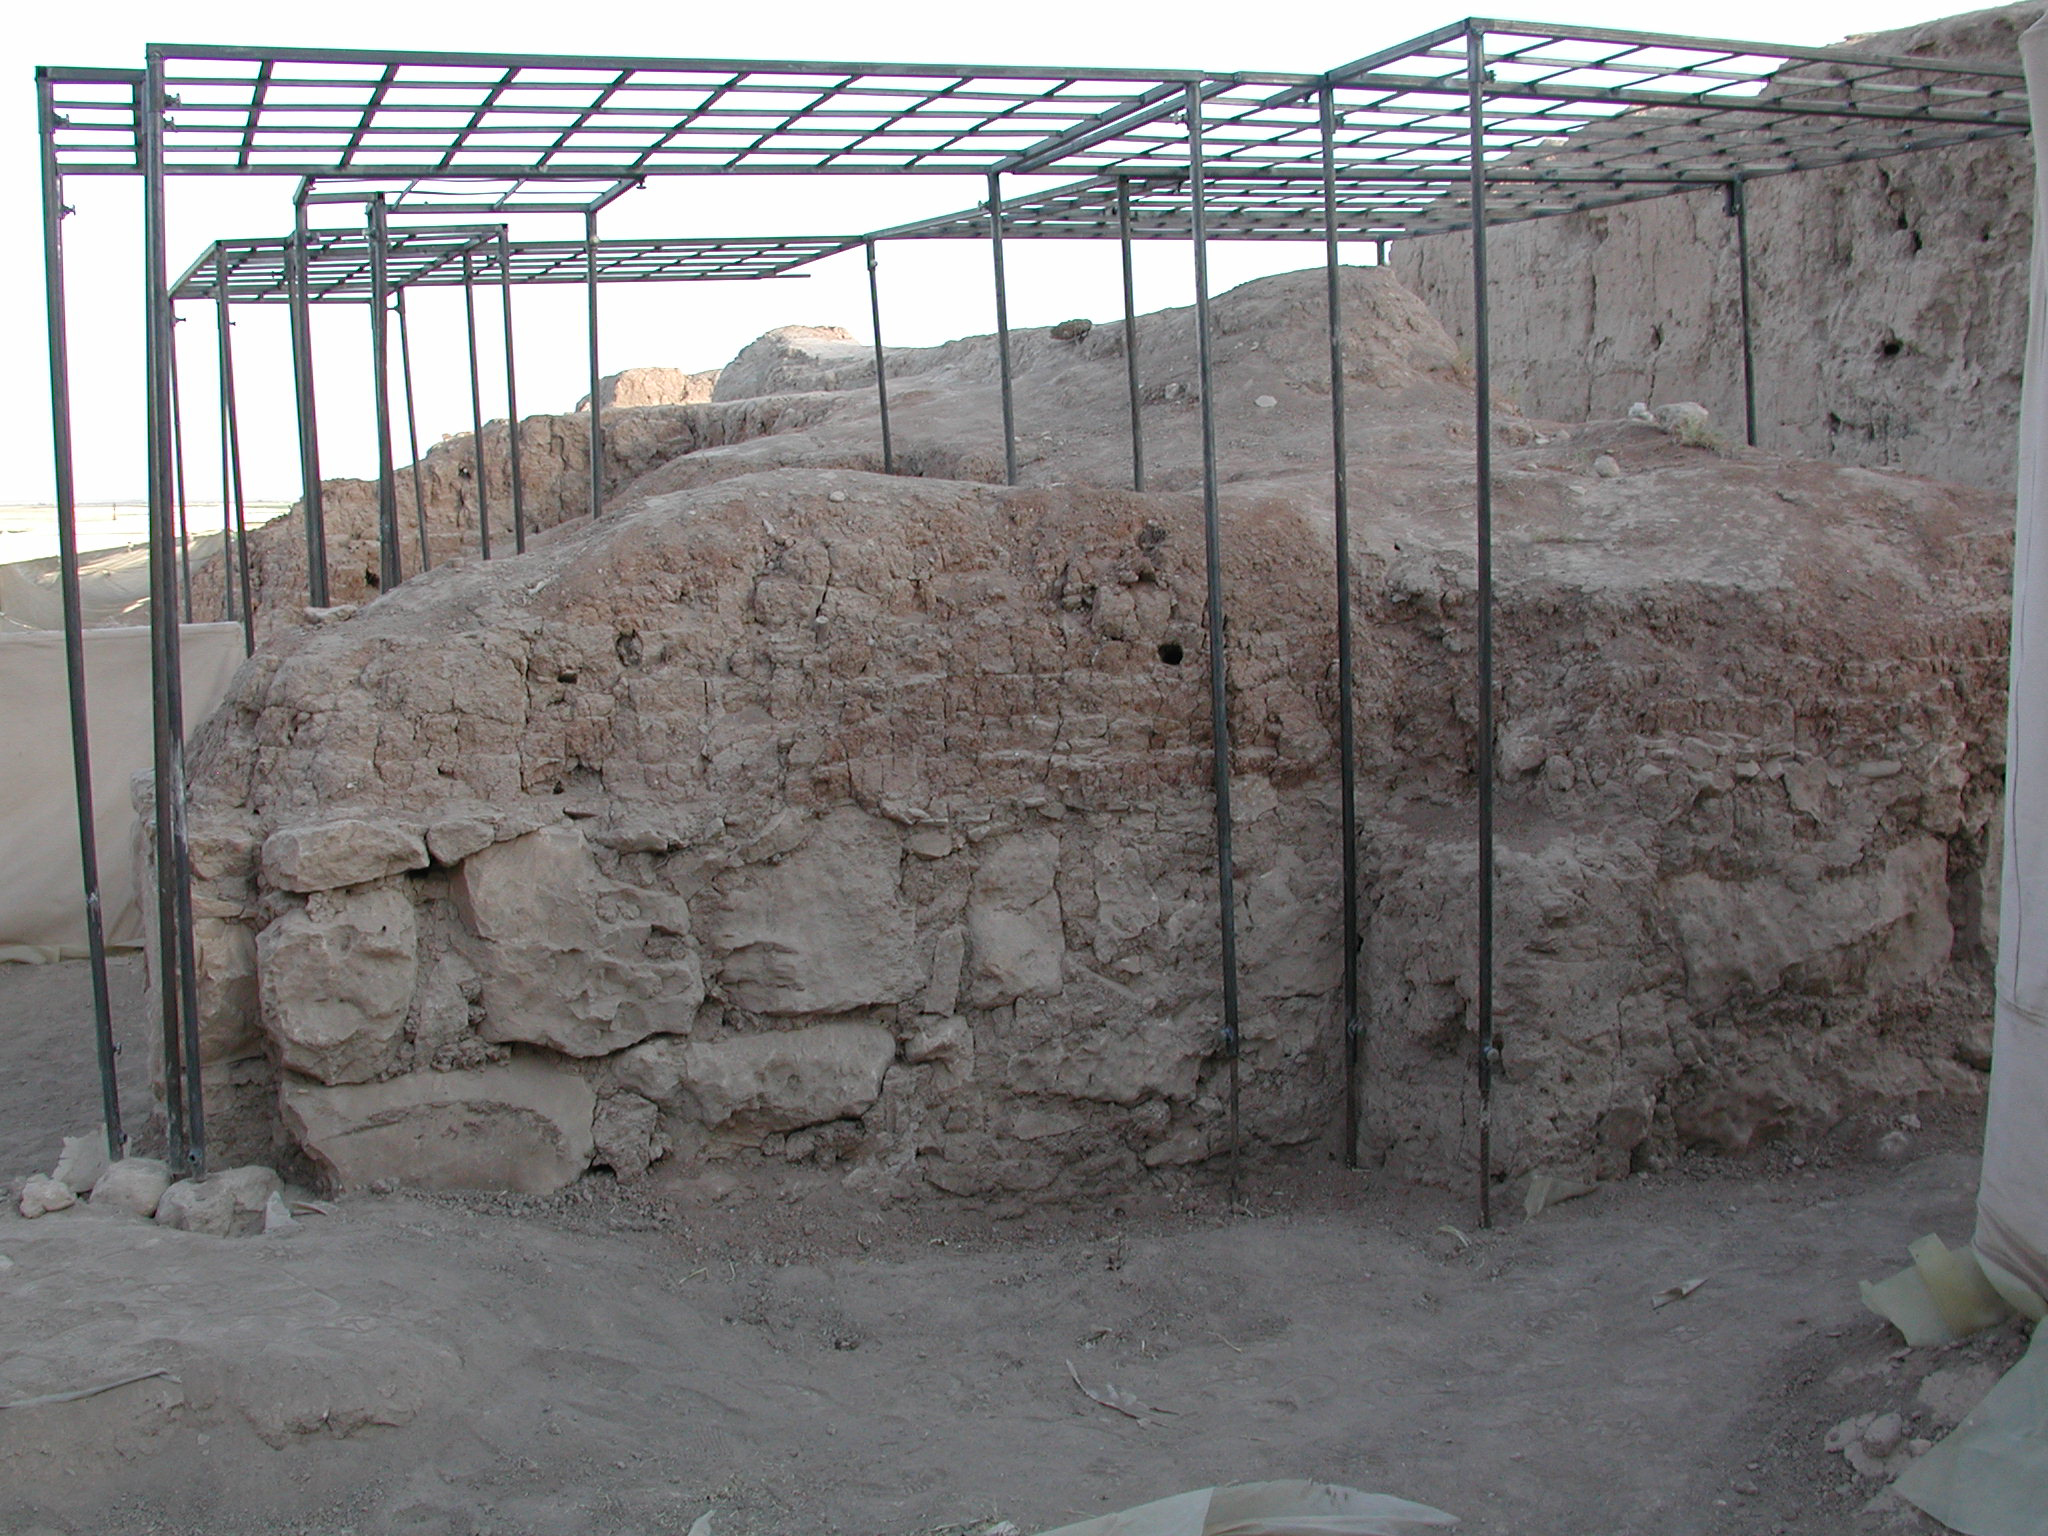
The metal frame in place, showing the uprights holding the grate-like top at a uniform height above the top of the preserved wall.
|
Back to top: A. Site Conservation 5 – Techniques
3. Exposed stone walls
Back to top: A. Site Conservation 5 – Techniques
General remarks
Stone walls do not present the same problems as the mud brick walls, essentially because they are not as susceptible to damage through erosion caused by rain and wind. The only vulnerable part are the joints, which generally consist of mud.
Consequently, I normally leave the stone walls exposed, with special precautions to protect the joints. The approach differs depending on whether we deal with a wall face or the top of the wall.
Back to top: A. Site Conservation 5 – Techniques
Wall faces
Wall faces are vulnerable primarily to birds and, in the lower courses, to foxes. To prevent animal intrusion, I suspend a bird net along the face, held in place at the top and at the bottom by “sausages” (to use the nickname we give them in the field), namely long sleeves made of tent material, filled with dirt from the excavations. The material is visible only at close range, and it works well with birds, less so with foxes. These, however, are fewer and their intrusion is large and readily visible, so that the guard can remove by force the intruder.
Back to top: A. Site Conservation 5 – Techniques
Wall tops
The tops of the walls present the same problem as the horizontal surfaces, and they are treated in the same way, with a piece of tarp and a mud plaster coating. We also channel the water so that it does not form puddles on top of the wall, since infiltrations would weaken considerably the core of the wall itself.
Back to top: A. Site Conservation 5 – Techniques
4. Alteration
Back to top: A. Site Conservation 5 – Techniques
5. Horizontal surfaces
Back to top: A. Site Conservation 5 – Techniques
Floors: overview
Back to top: A. Site Conservation 5 – Techniques
General problems
Horizontal surfaces (floors, pavements, staircases) present a special problem, for various reasons, attributable to rain water and snow, and to vegetation growth.
- The force of the rain, as it hits at a perpendicular angle the horizontal surface, can cause more damage than on walls, where it tends to drip down along the face.
- The rain can easily form water puddles that remain in place until the water evaporates. This is of course true of the snow as well.
- With staircases, the problem outlined in point 2 is compounded by the cascade effect created by the steps, which results in something close to a waterfall rushing down from the top.
- Vegetation growth is quite invasive. It is in the form of thorn bushes, that grow quite tall (between half and one meter).
Back to top: A. Site Conservation 5 – Techniques
Solutions adopted
The basic solution I have adopted has been to backfill the horizontal surfaces.
For mud floors, the backfill is total, meaning that it covers the entire floor.
It is different with pavements. While at first we backfilled the whole pavement, to protect the exposed stones, we then decided that potential weathering damage to the stones themselves was negligible, and that we could leave them exposed. The major damage would come to the mud joints, and as a consequence to the stones that could be dislodged if the mud of the joints was removed. Hence, I have reverted to a solution where I leave the stones exposed and only protect the joints.
Against the unwanted vegetation, I have, so far, avoided using herbicides, and have relied instead on pavers and on periodic cleaning. But I will in the near future experiment with chemicals as well.
Back to top: A. Site Conservation 5 – Techniques
Mud floors
Back to top: A. Site Conservation 5 – Techniques
Backfill
I have protected all mud floors with total backfill. I first placed strips of plastic sheeting to mark the boundary between the ancient surface and the recent dirt, and then placed a stratum of about 20 cm of dirt, derived from the excavations, on top of the entire surface of the mud floor. At the edges, along the base of the walls, I have placed a small berm, about 25 cm in height, in order to protect the base of the wall from infiltration of the water when it settles and forms a puddle across the entire surface of the space contained by the walls.
Back to top: A. Site Conservation 5 – Techniques
Pavers
On top of the backfill I have placed pavers, which provide a firm and well delimited base for walking and help reduce the incidence of unwanted vegetation. The pavers are square, half a meter on the side, and are made of cement with a couple of iron rebars inside, and body sherds on the surface.
Back to top: A. Site Conservation 5 – Techniques