Back to top: The Revetment Wall
Introduction
Following the early excavations (1984-89) of the Temple, a long trench was excavated (1999-2001), by a German team, with the purpose of linking the Temple with a new excavation area to the south (Area C2). This trench brought to light a small portion of the Terrace wall and of the staircase. The excavations of 2003-10 exposed more fully both the Terrace wall and the staircase. We will focus here on these excavations of the wall and of the Plaza in front of it.
|
to replace
|
to replace
|

The revetment wall served as a face for the glacis that sloped up to the Temple. The definition revetment wall is given for the function of covering the outer side of the terrace core, so that standing in the plaza the wall appears as a vertical barrier.
Back to top: The Revetment Wall
The articulation

The revetment wall defines the western, southern and eastern edges of the terrace core/mound. It has been exposed for about 70 metres in an east-west direction.
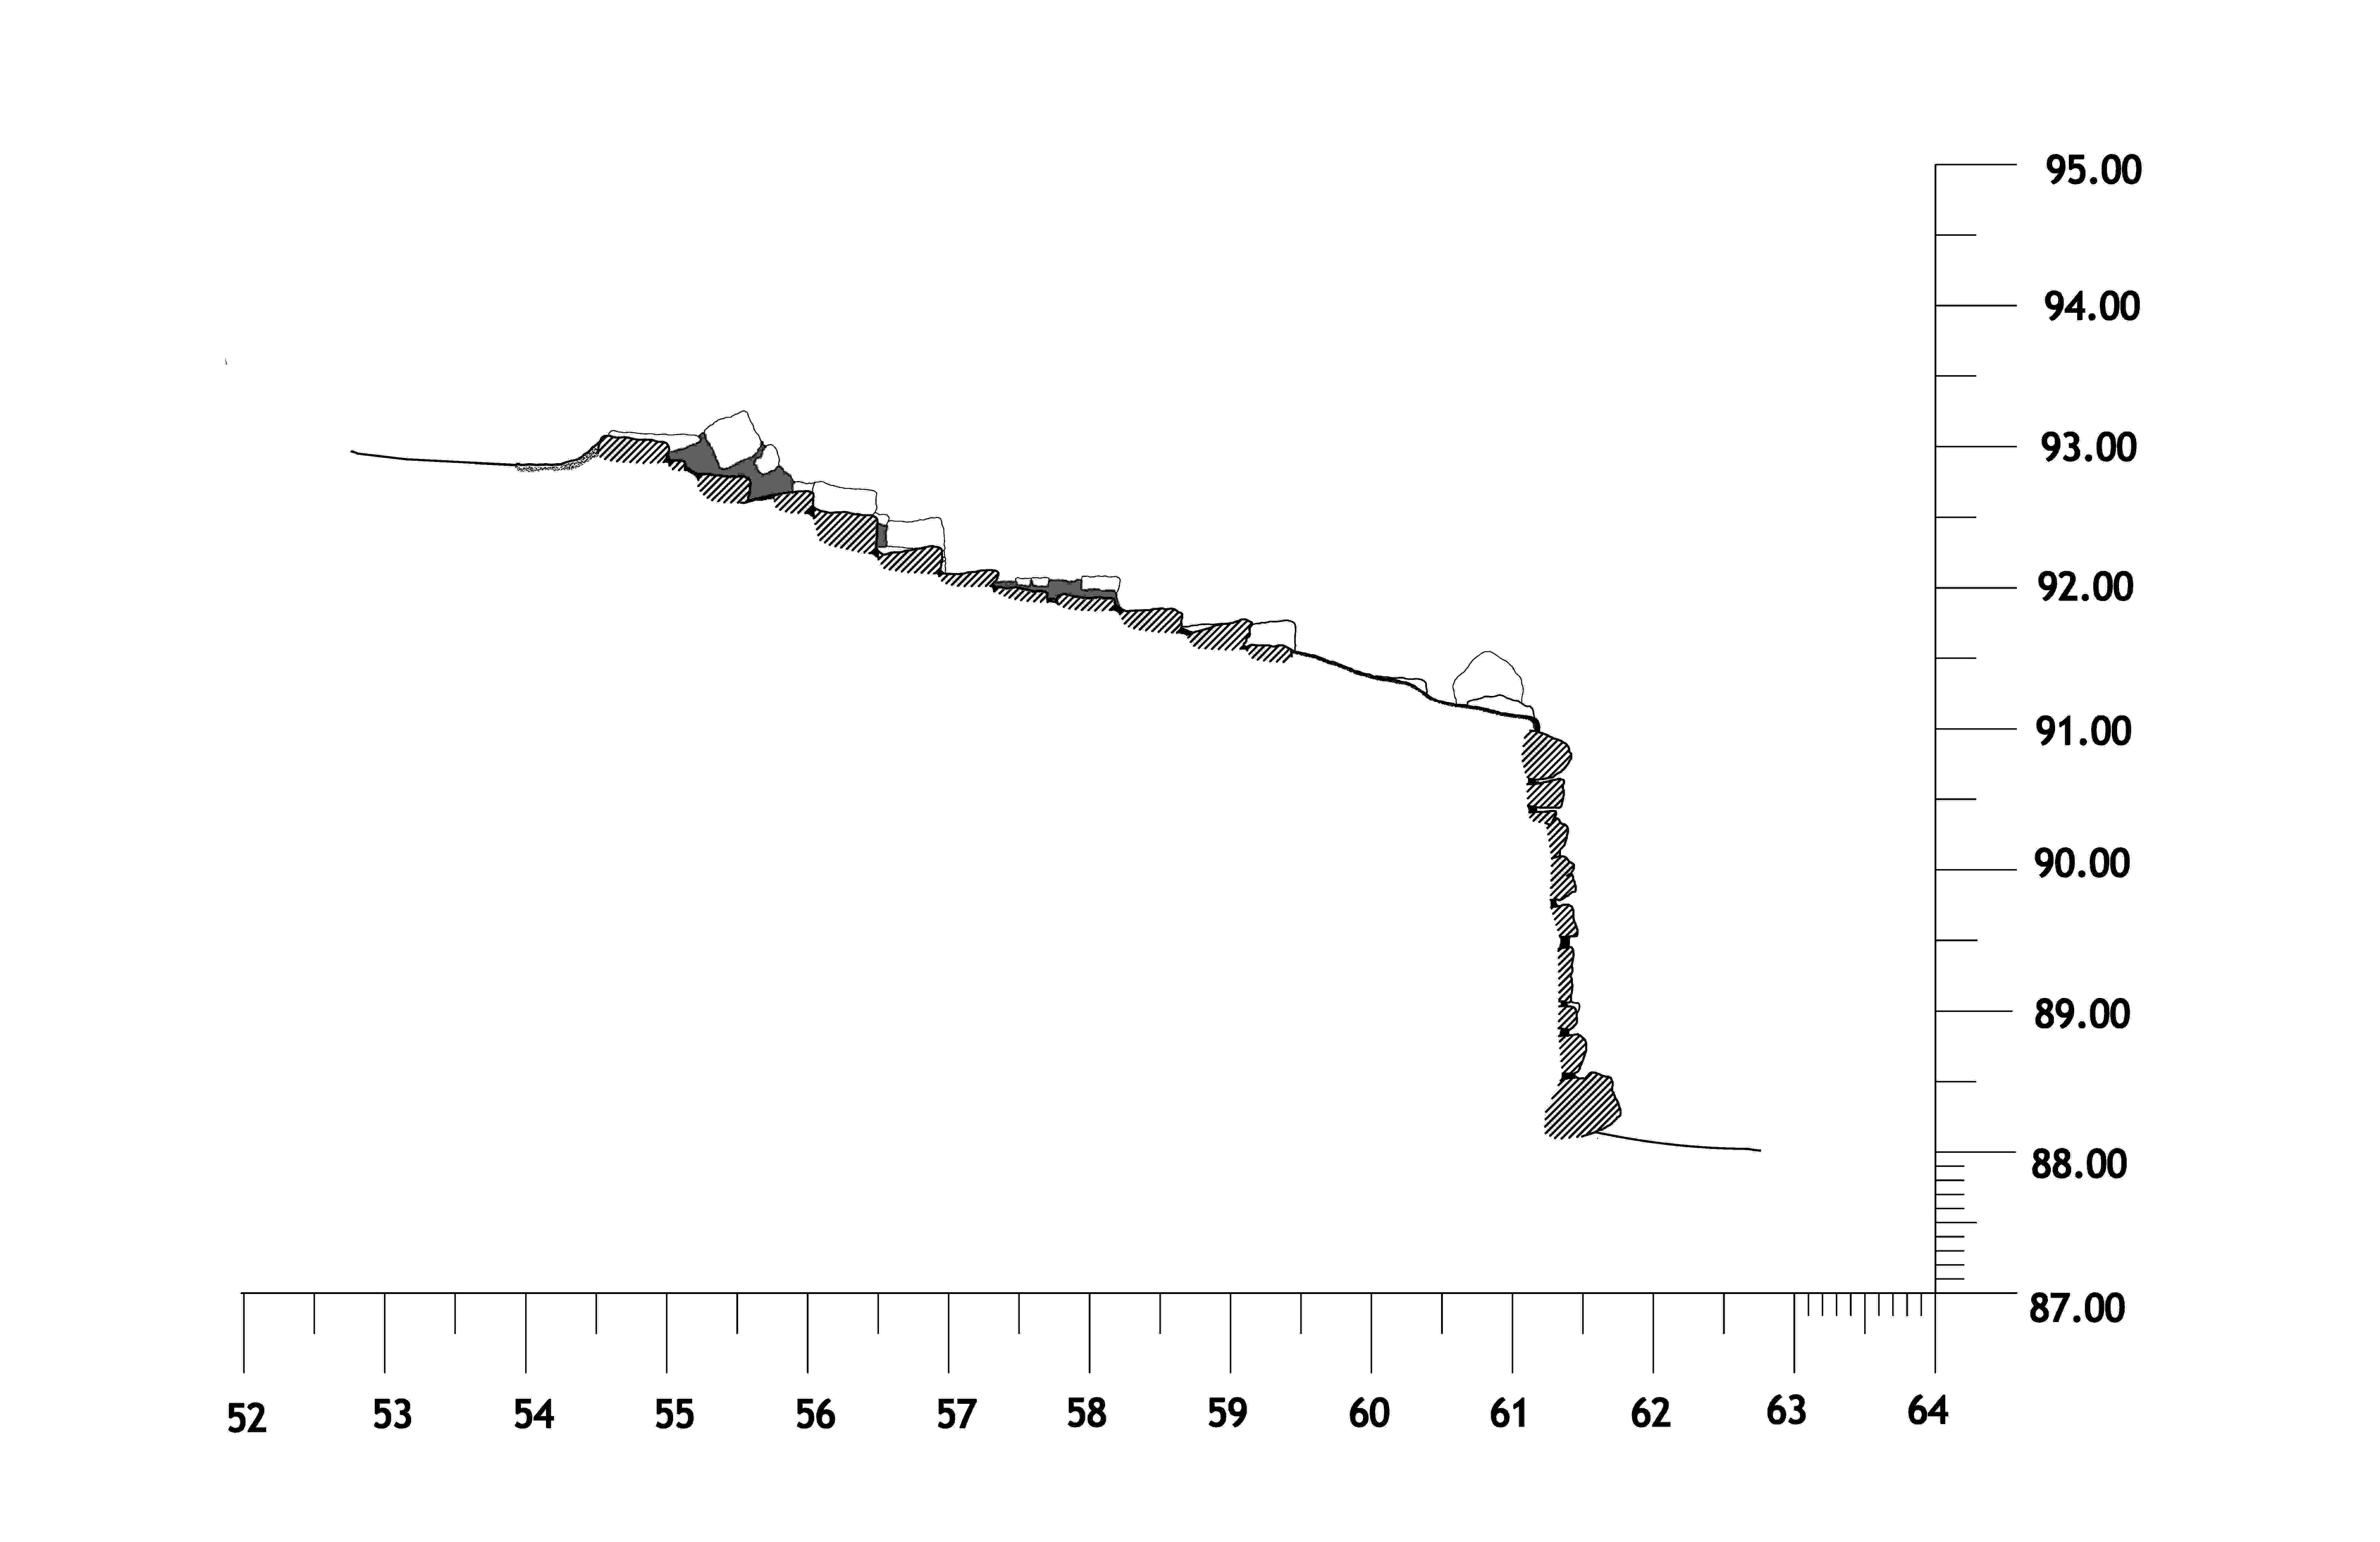
The various sections of the wall have not been excavated to the same extent. The southern section wall6 has been fully exposed along its upper courses and partially excavated at its base, reaching a maximum preserved height of 3 m (in J1). In contrast, only limited portions of the western side wall13 and the eastern side wall1 have been uncovered.
|
The westernmost exposed portion of the revetment wall is represented by wall13, located beneath stair4. From this point, the wall curves gently toward the southeast over a distance of approximately 9 m. The configuration of JP^wall13 at this bend remains uncertain because it is overlaid by wall10, a later repair of JP^wall13, as well as by a substantial accumulation that obliterates the wall. Approximately 4 m farther east, the base of the revetment wall reappears as wall8, which is preserved to two courses beneath JP^wall6. This wall continues eastward from wall10 without interruption for 53 m, terminating at apron1.
|
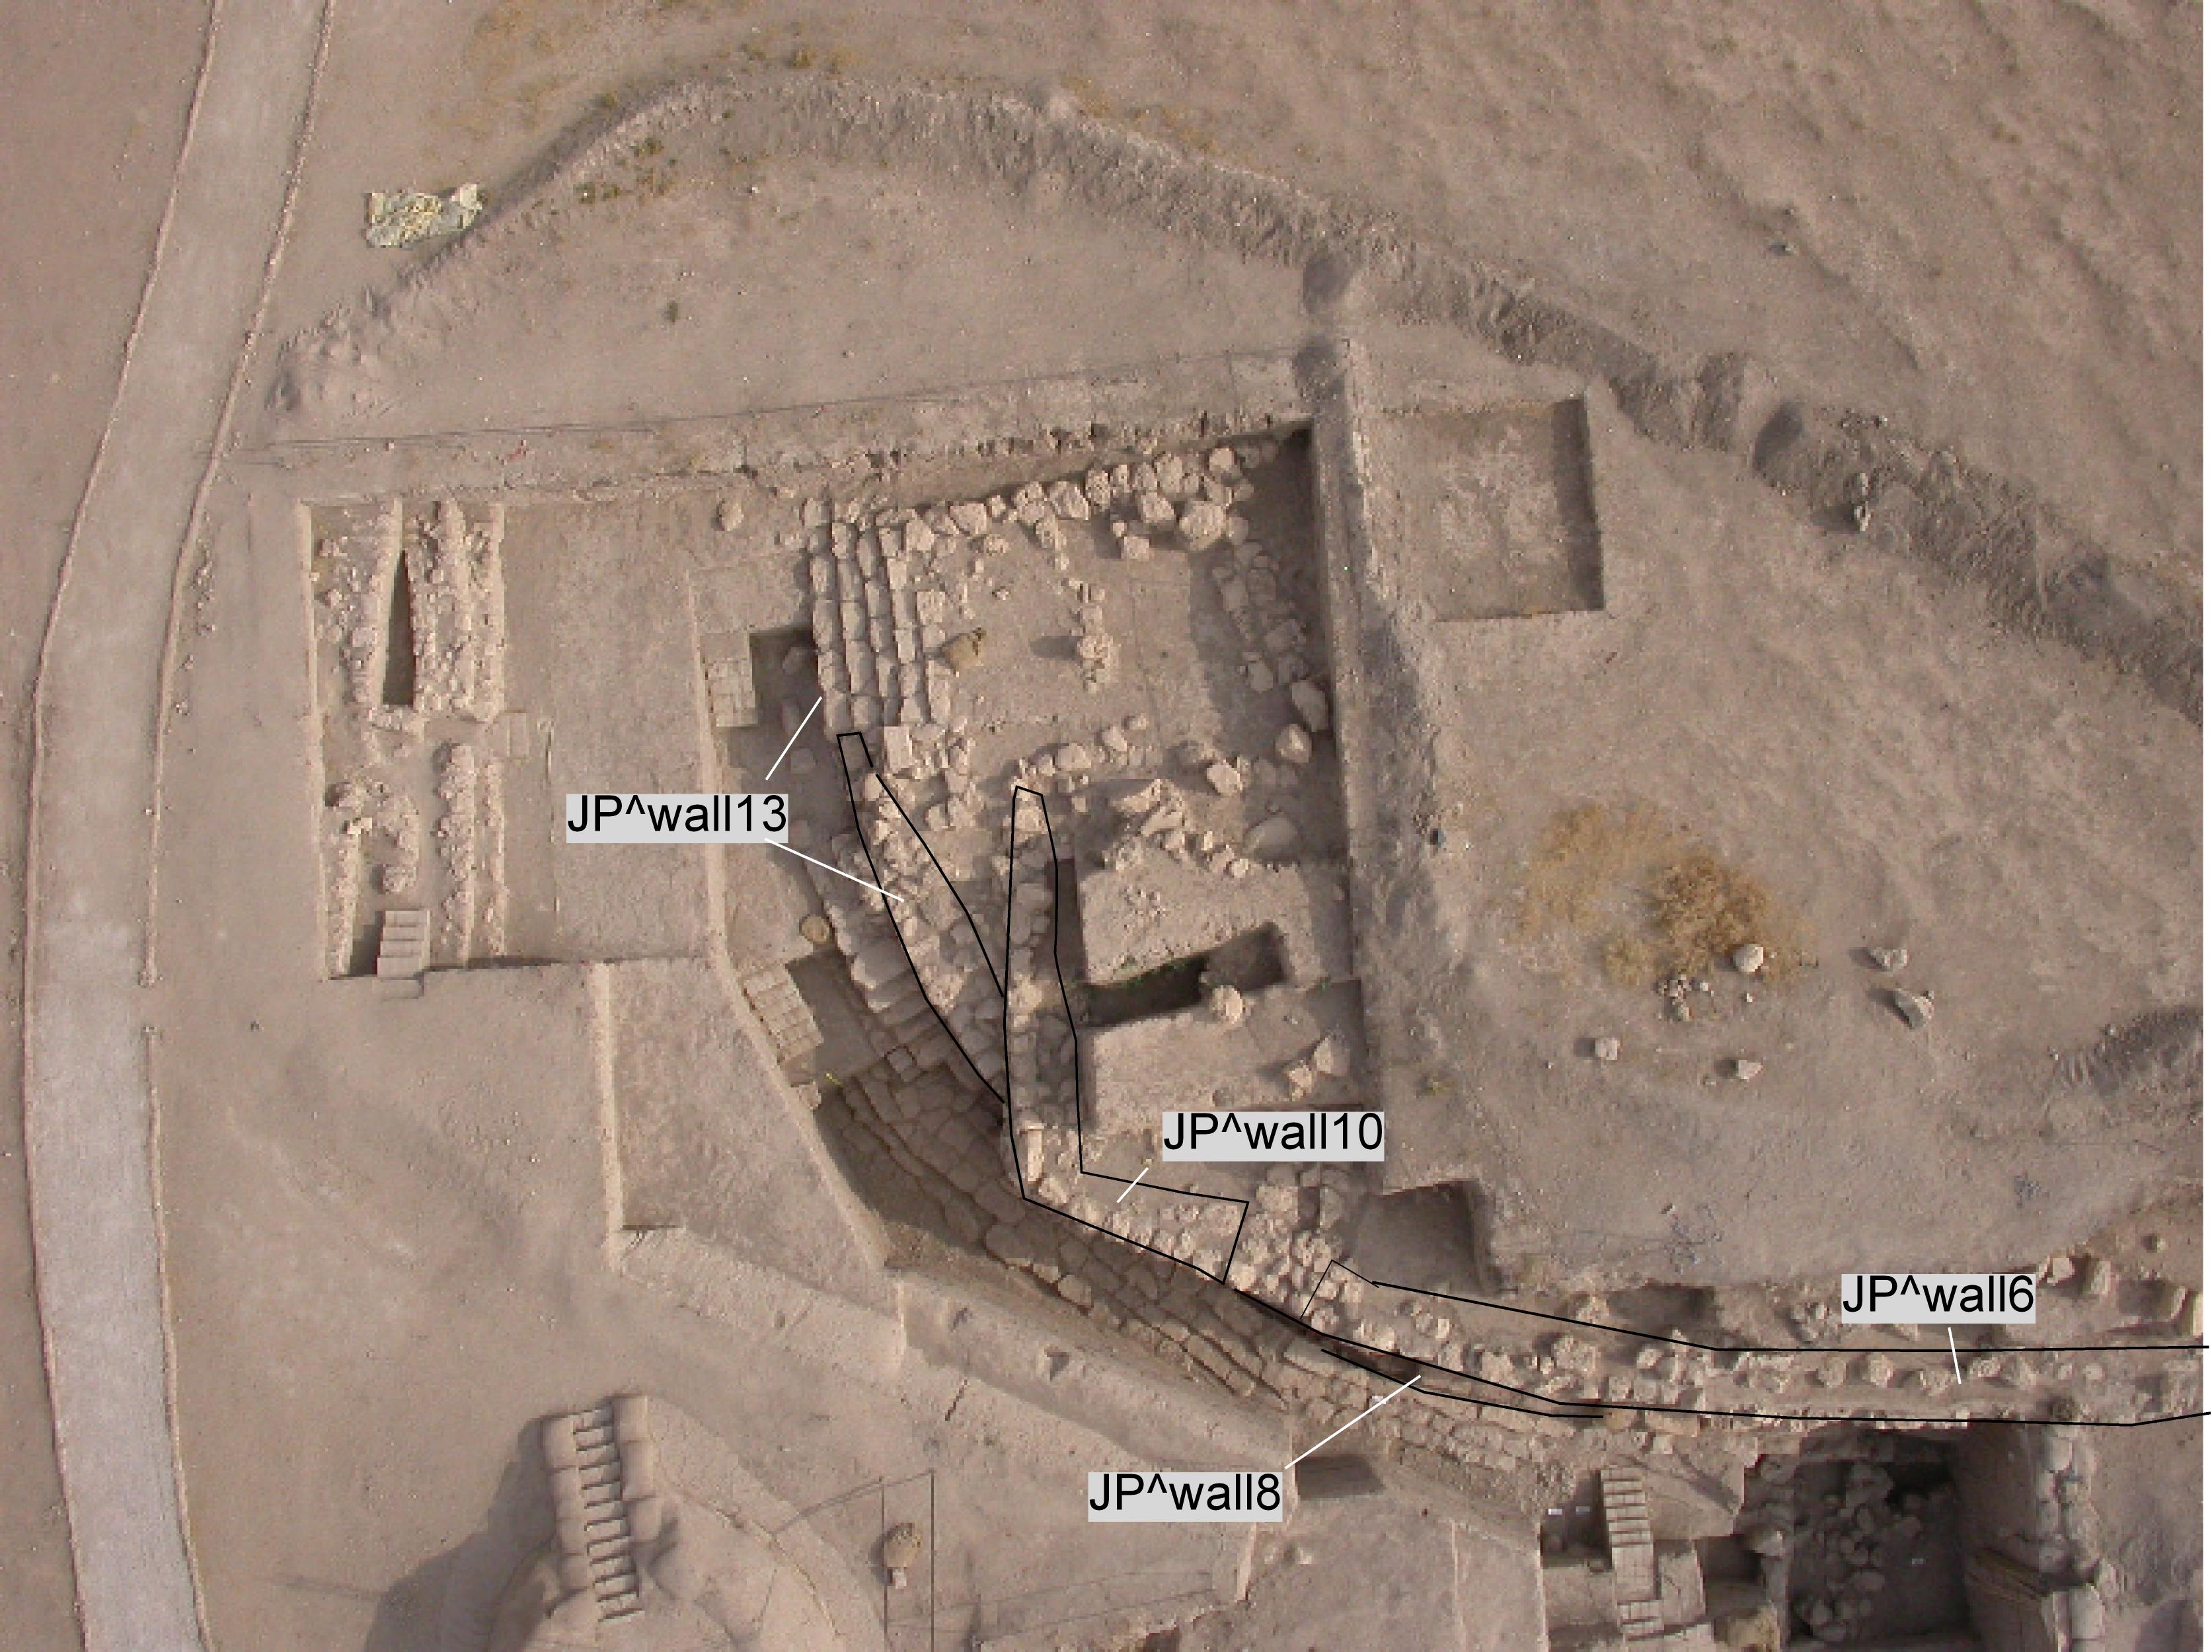
western side of revetment wall
|
|
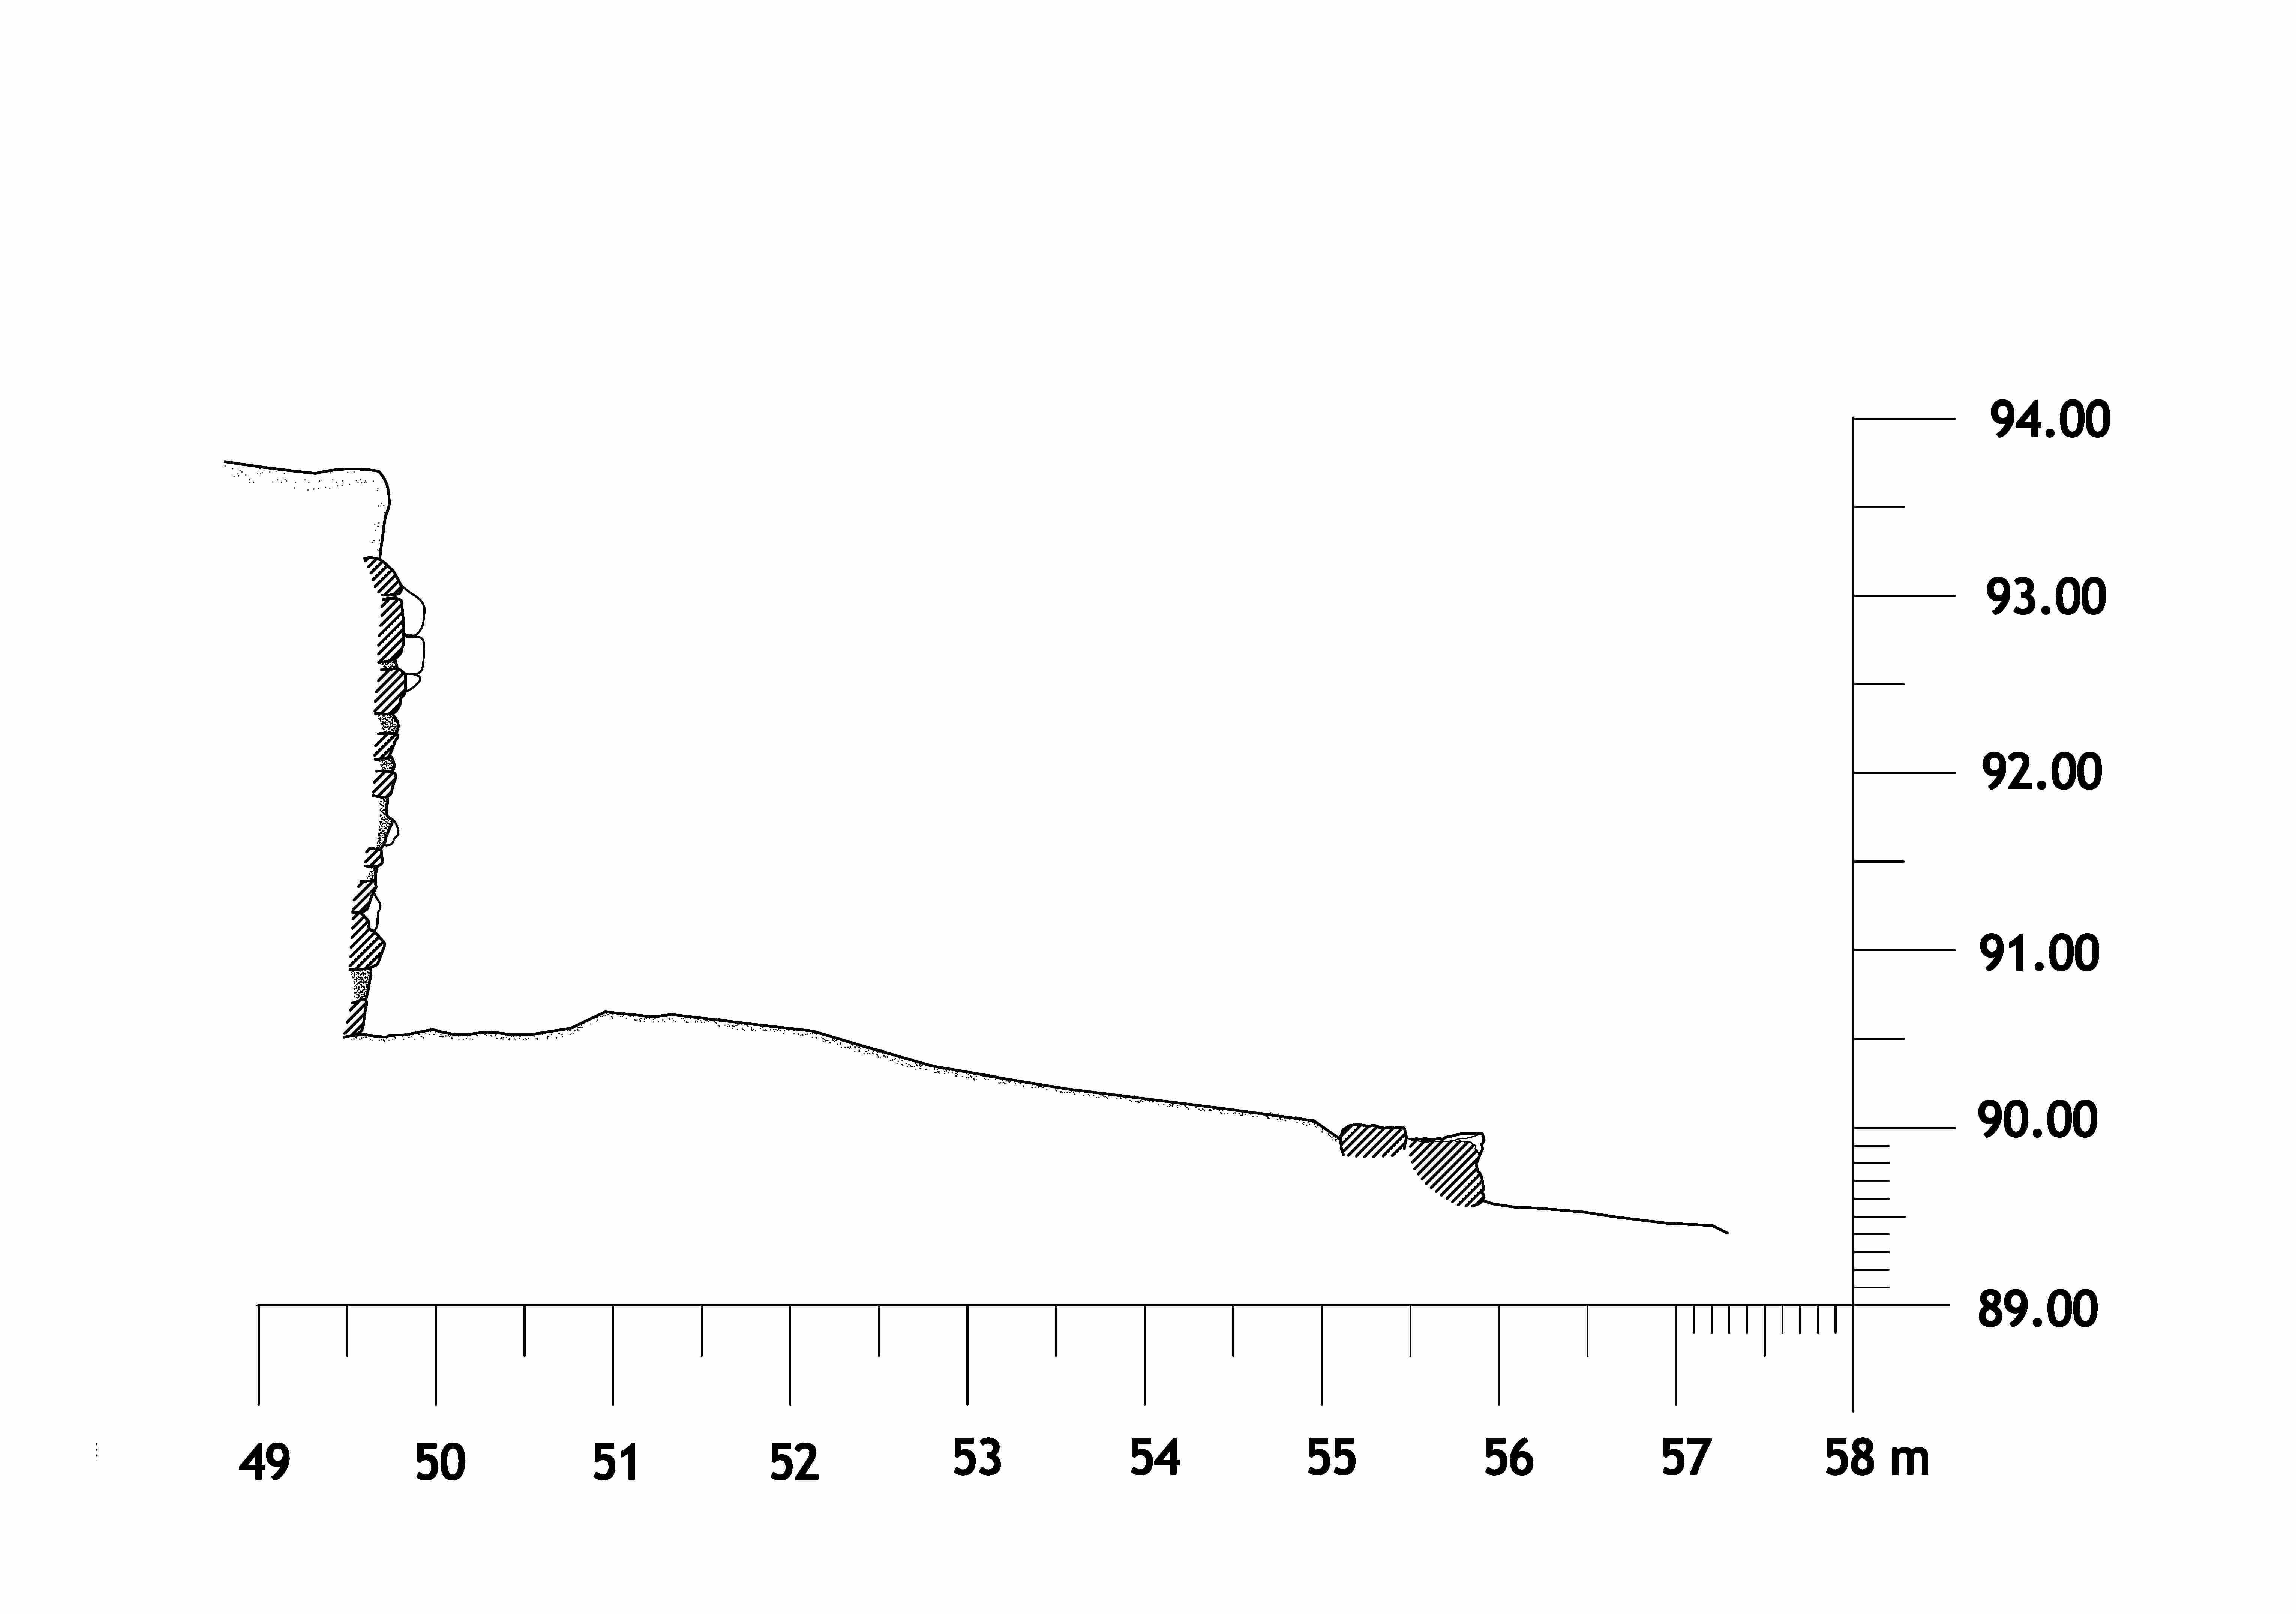
The revetment wall is interrupted for a distance of 10 m by the monumental staircase. East of the staircase, it continues as two separate walls. The southern wall3, follows the same alignment as JP^wall6, while the northern wall, wall1, is situated approximately 4.90 m farther north and runs parallel to it. wall1 begins immediately north of the flank wall2 of stair2 and extends eastward for 8.10 m before curving to the north. After a further 6.50 m, it disappears beneath the unexcavated deposits.
|
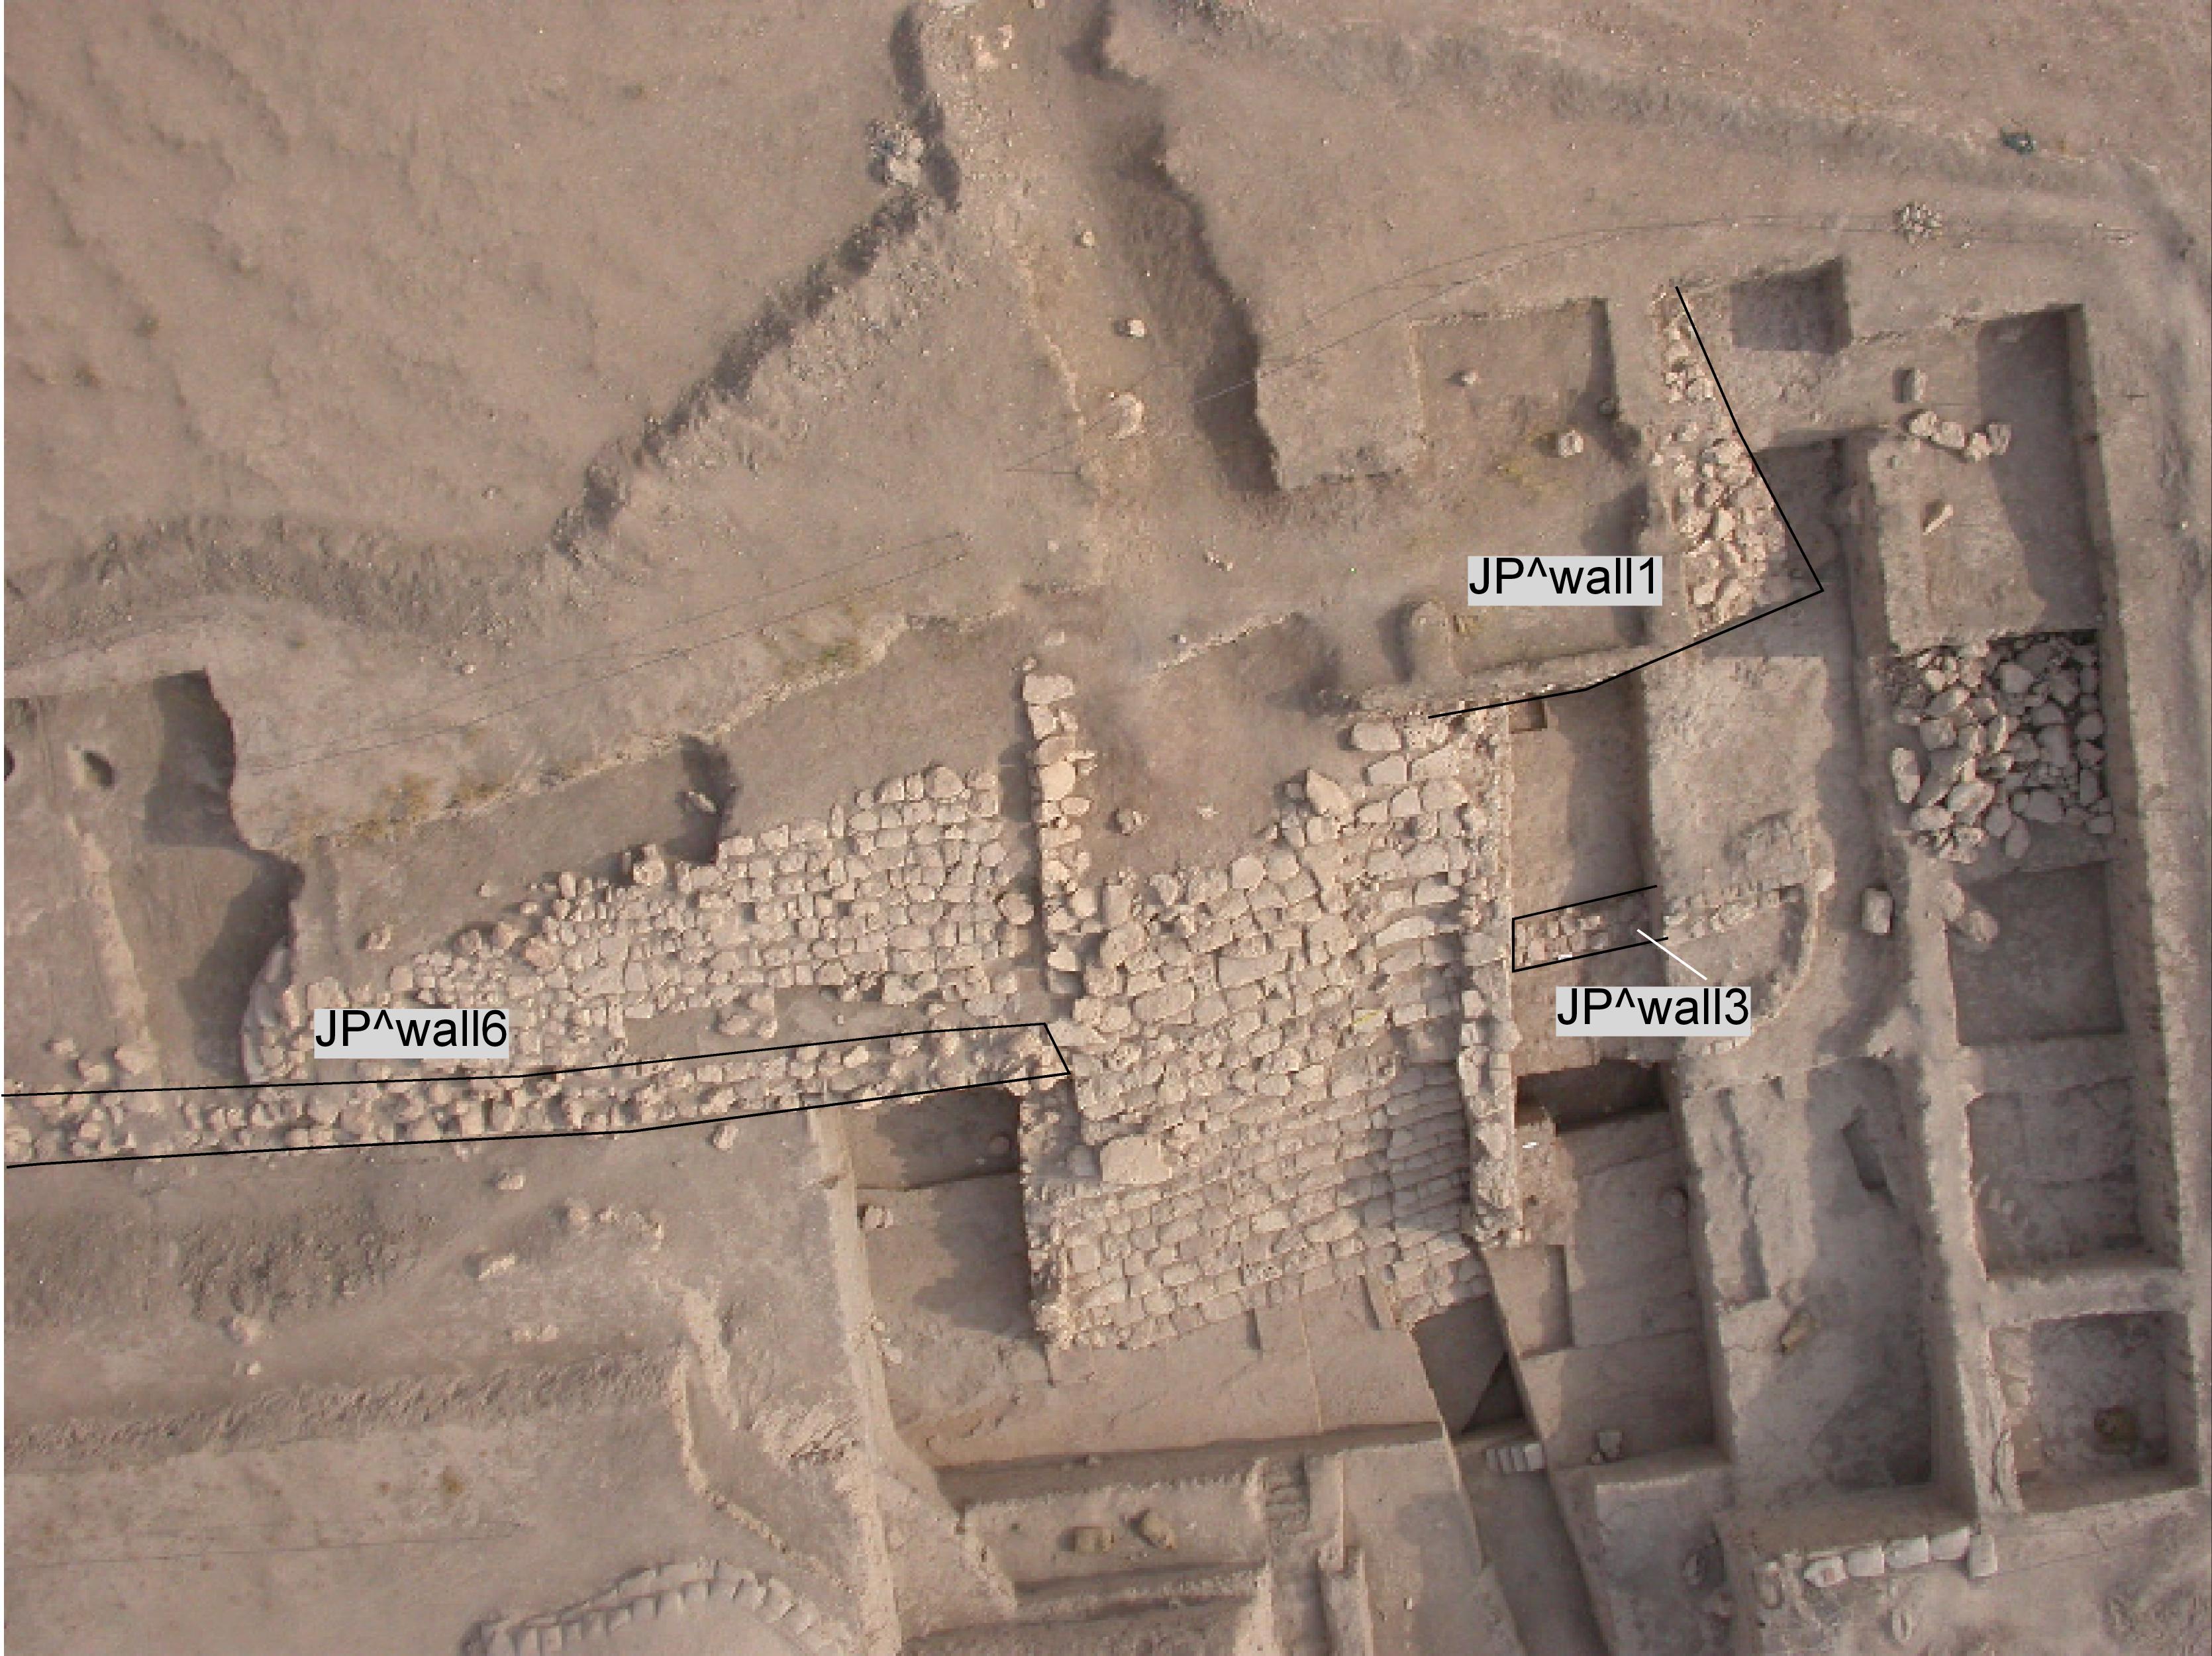
eastern side of revetment wall
|
Although the revetment wall was originally interpreted as forming an oval enclosure, the excavations demonstrate that the Temple Terrace is instead defined by a polygonal wall. This is particularly evident at the southwestern corner, where the wall changes direction sharply toward the north. The northern and northeastern sides of the Temple Terrace have not yet been investigated through excavation. Nevertheless, geophysical survey reveals a continuous anomaly surrounding the terrace in these areas, strongly suggesting that the revetment wall originally extended around the entire terrace magnetometry 2006.
Throughout the excavated western and southern sections, the top of the wall is consistently preserved at an elevation between approximately 9000 and 9100 m, indicating a remarkably uniform degree of preservation across the exposed portions.
Back to top: The Revetment Wall
The foundation
The revetment wall is built on top of an uneven ground. This is due to the previous situation of the ground before construction, and to the presence of other structures, on top of which the wall is built. The wall has no foundations or footings. The base of the wall is visible in two portions. Firstly in Unit J5, where the first course of JP^wall6 rests on top of a previous wall8 and in uniti J1, where the bottom of the wall was exposed.
Here the first course is built of parallelepipedal stones, whose lower faces form a regular line that rises gently towards the west and rests directly on the soil (JP^wf4).

reconstruction of the revetment wall
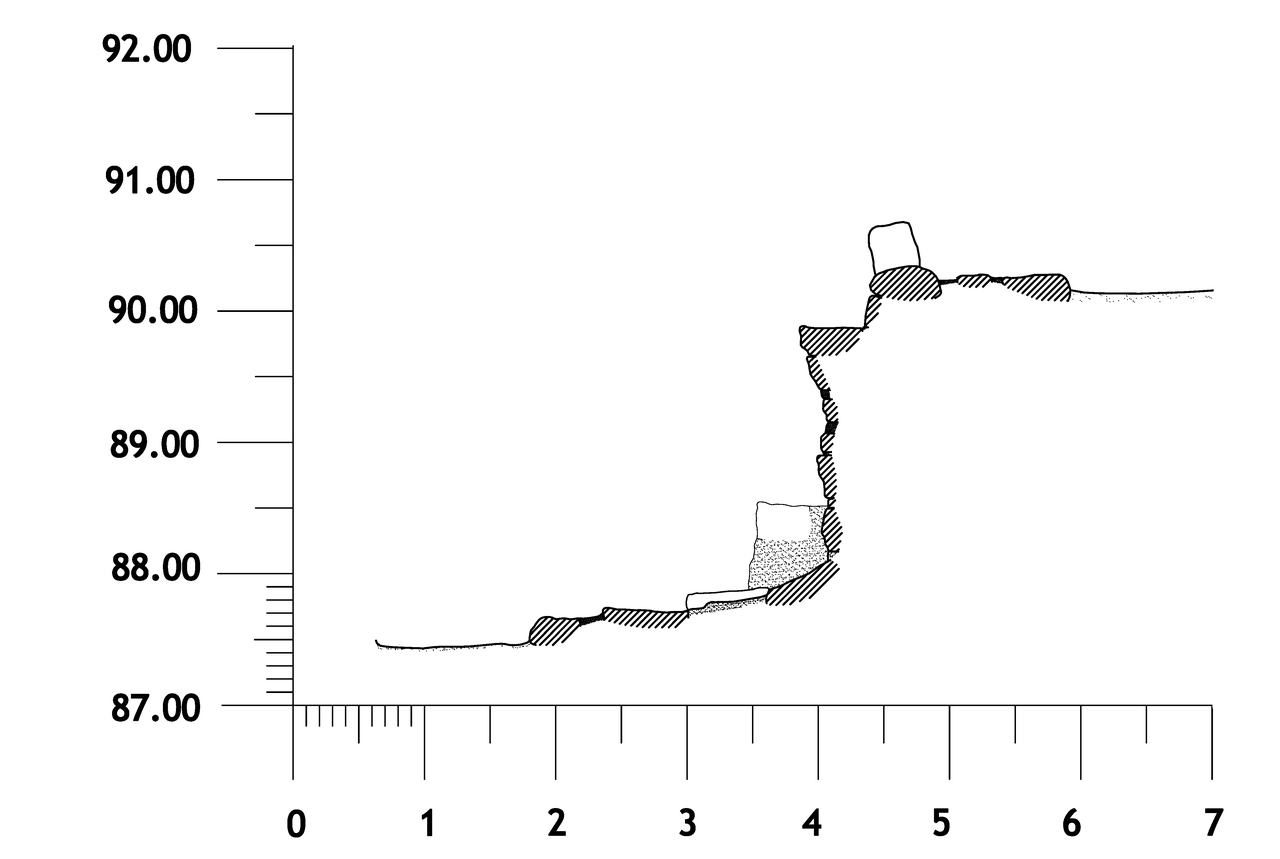
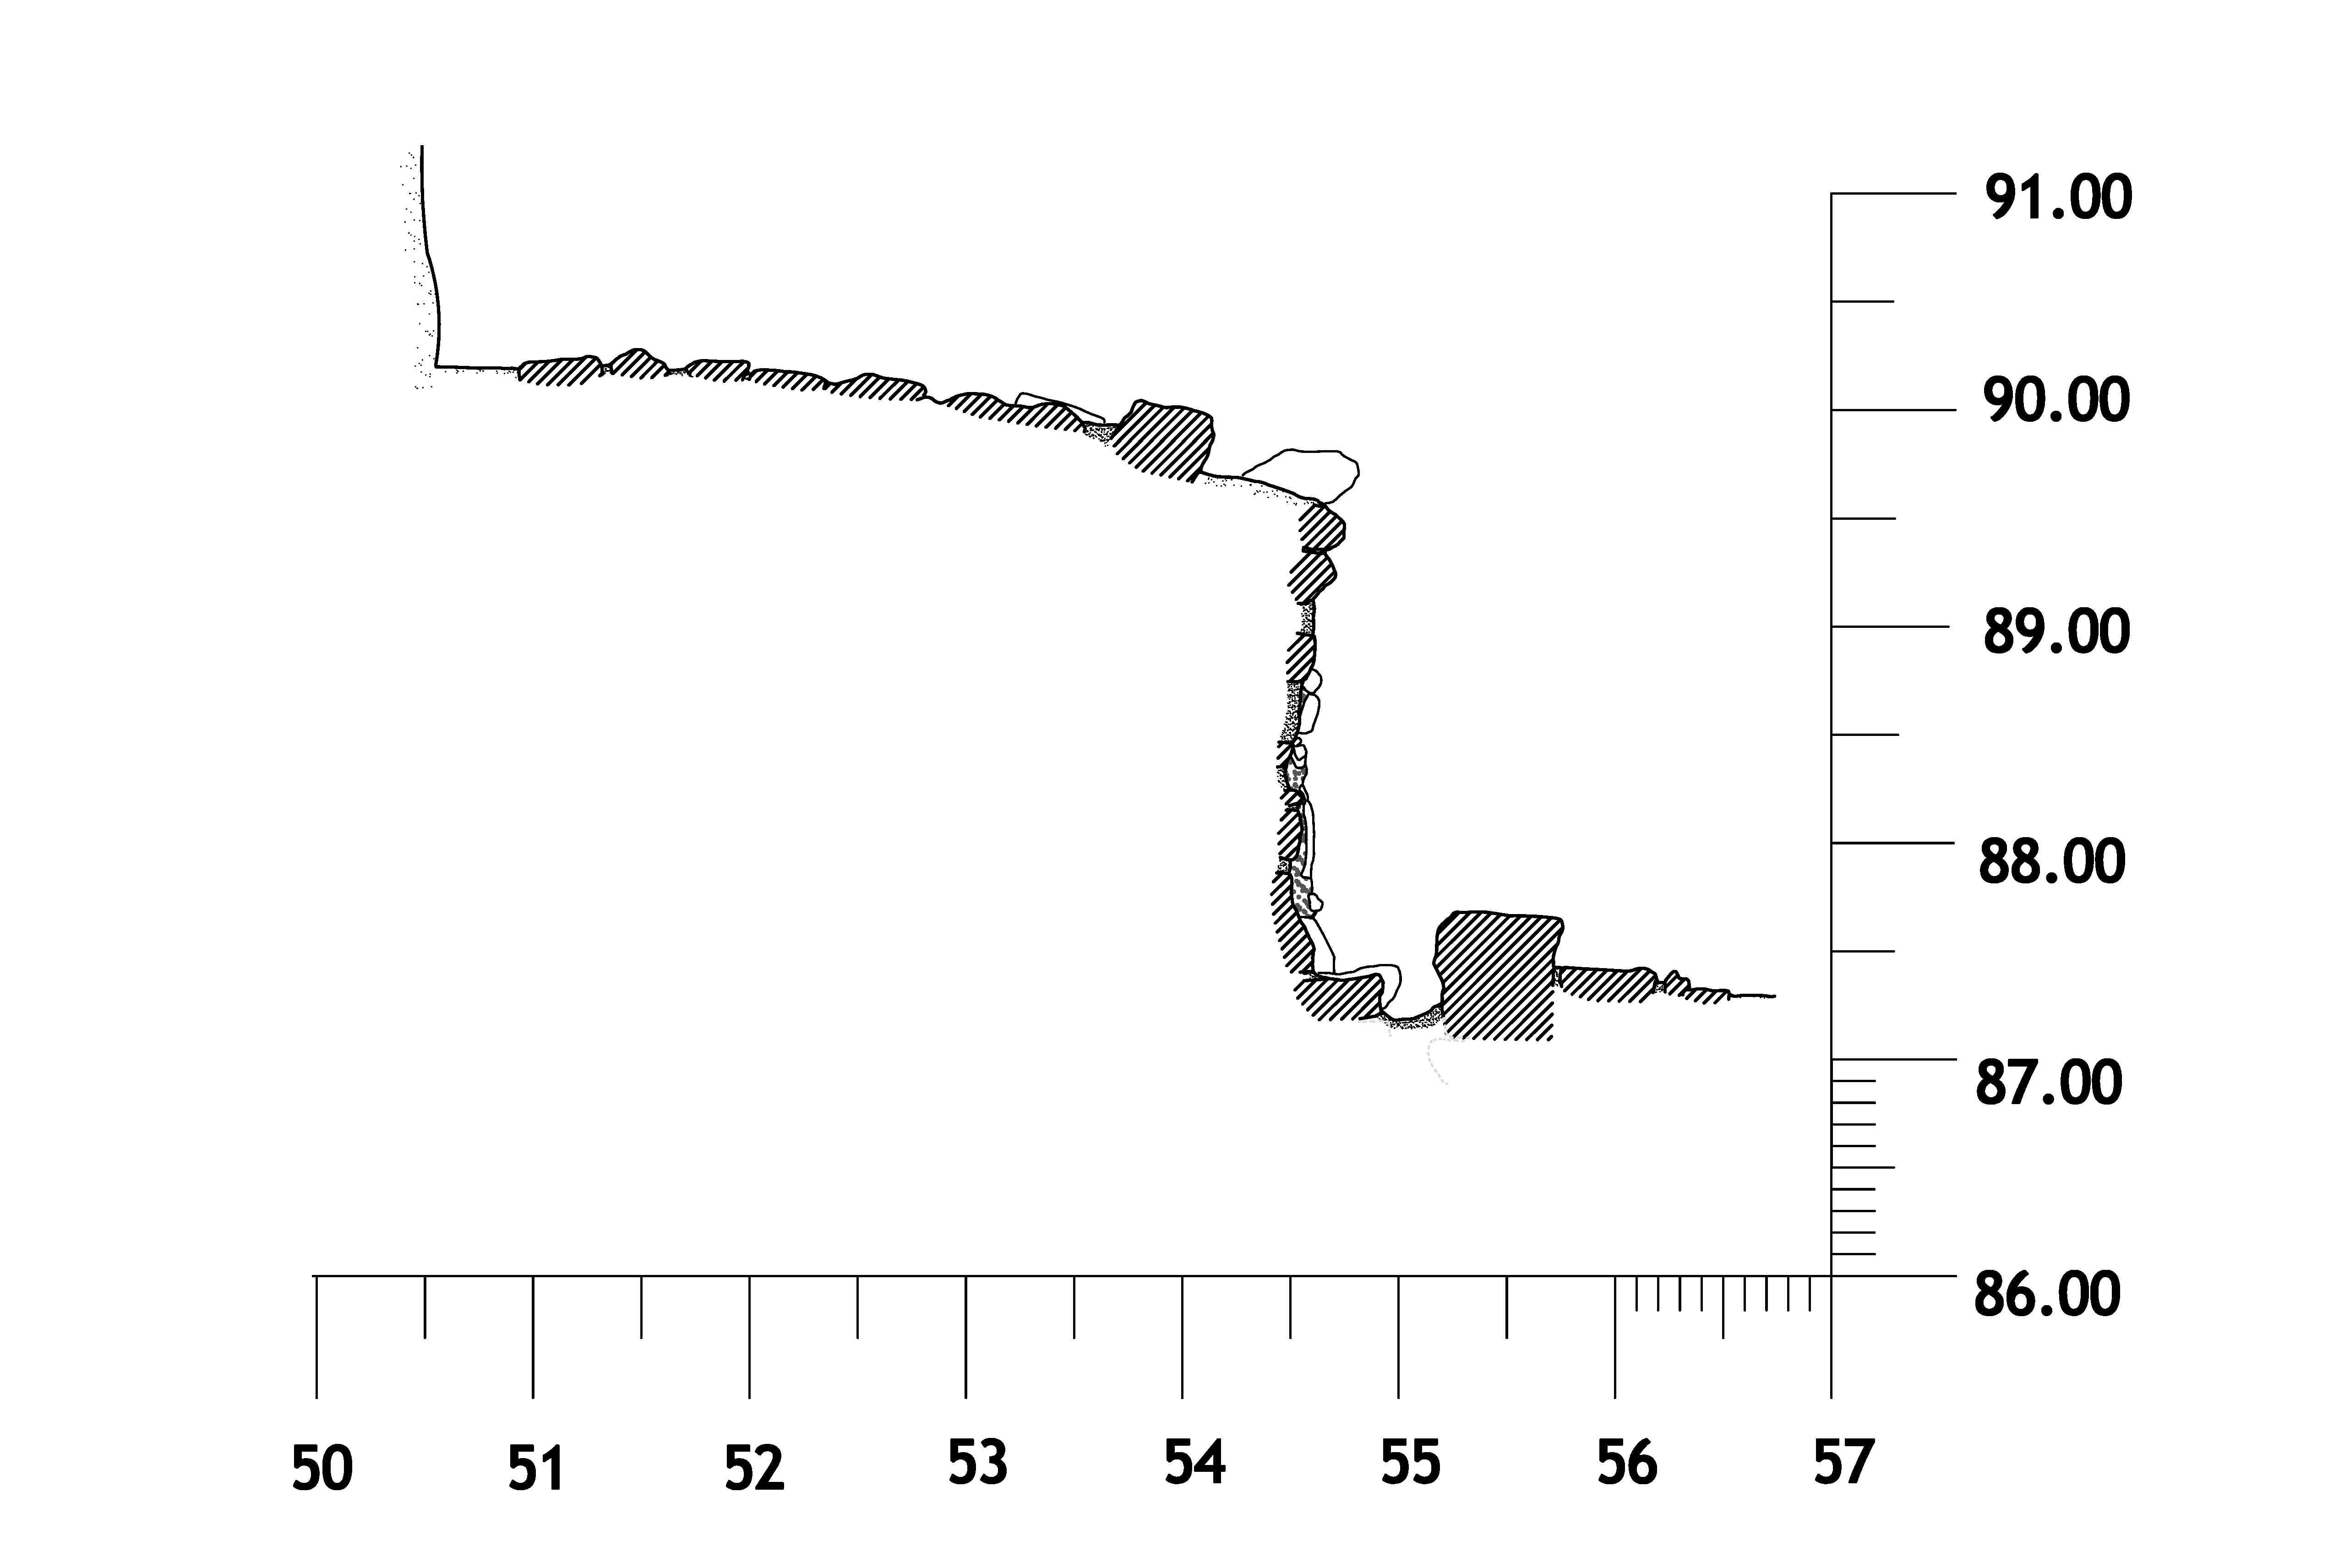
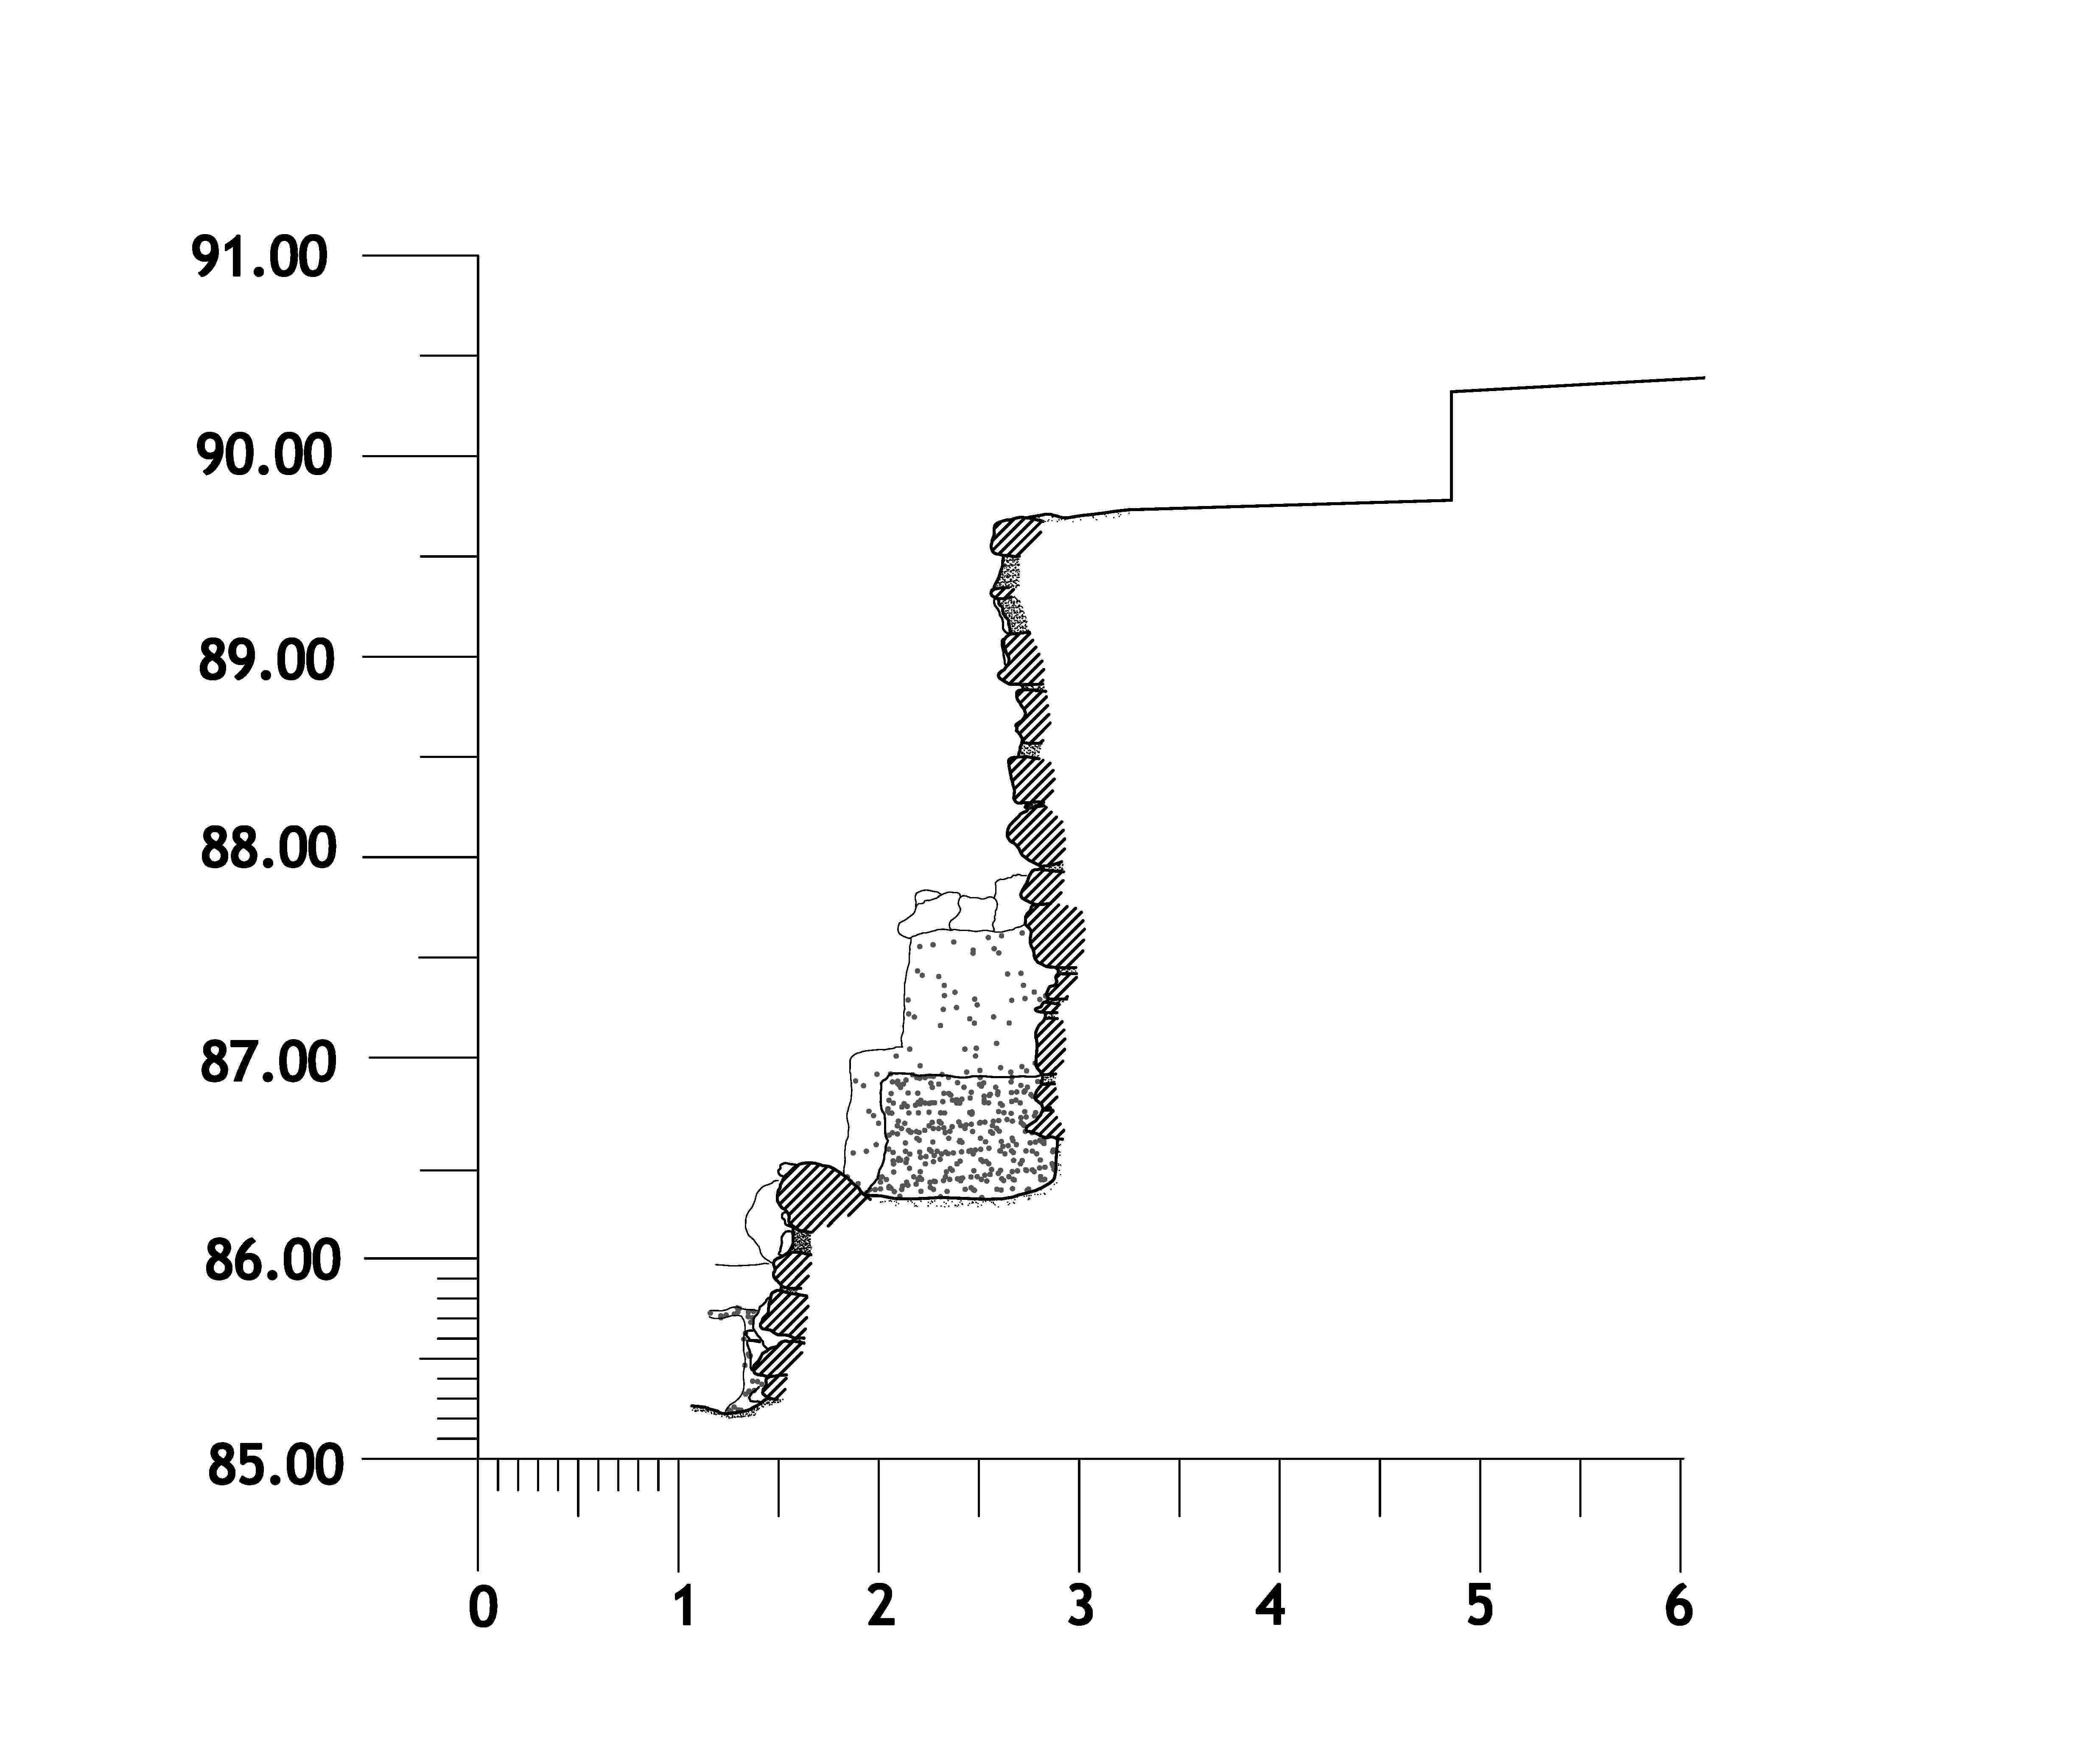
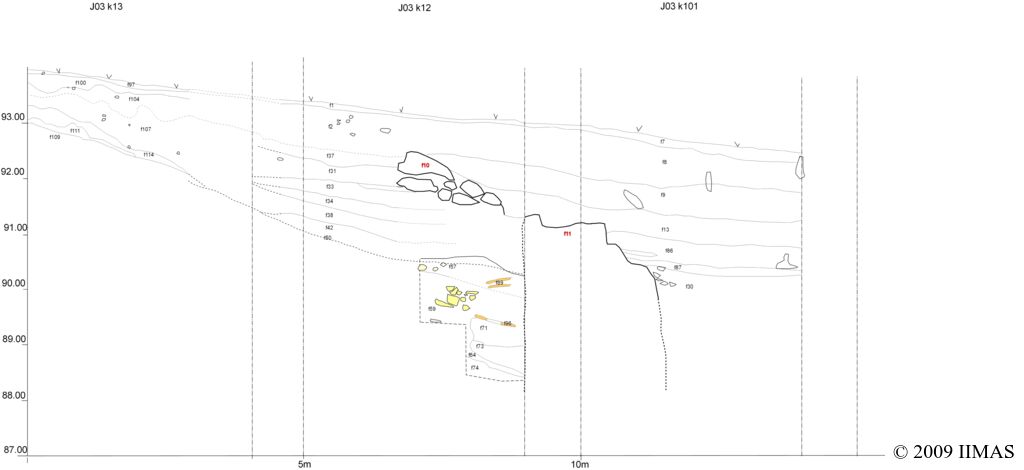
The table below shows the measures of the revetment wall:
|
wall
|
unit
|
width
|
height
|
bottom
|
top
|
drawing
|
|
wall13
|
J5
|
1.60 m
|
2 m
|
8800 m (no real bottom)
|
8990 m
|
|
|
wall6
|
J5
|
~ 2 m
|
2.30 m
|
8740 m (real bottom)
|
8956 m
|
|
|
wall6
|
J1
|
~ 2 m
|
3.10 m
|
8650 m (real bottom)
|
8970 m
|
|
|
wall6
|
J3
|
1.80 m
|
3 m
|
8826 m (no real bottom)
|
9100 m
|
|
|
wall6
|
J2
|
~ 1.60 m
|
3 m
|
8817 m (no real bottom)
|
9100 m
|
|
|
wall1
|
J6
|
~ 2 m
|
2.70 m
|
9050 m (real bottom)
|
9320 m
|
|
Back to top: The Revetment Wall
The construction
|
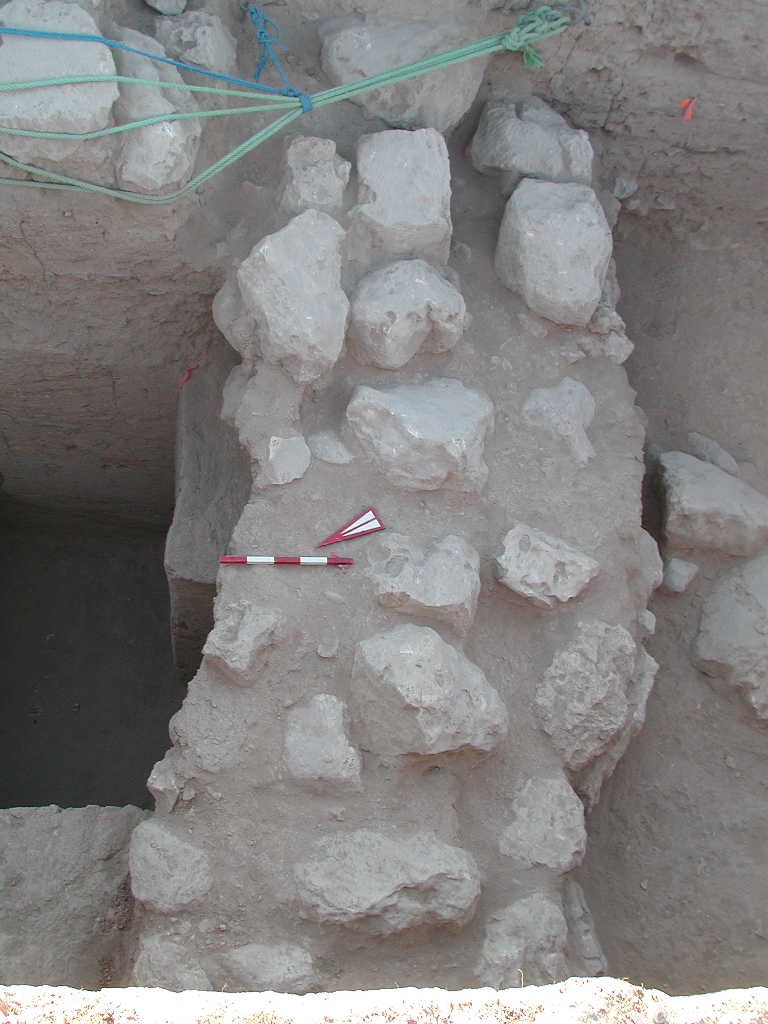
The width of the wall can be determined in the central part of wall6, in Unit J3, where a sounding behind the wall revealed how it was constructed. Here, the top reaches a maximum width of three large stones, which is about 1.80m.
|
wall width in J3
|
|

In J3 we found that the original surface of the glacis covering the mound was well preserved: it was made of a very hard and compact red clay layer, with large white calcite nodule. This material is known locally as baqaya. It is literally the “remainder” of the virgin soil after it has been quarried for stones and pebbles.
|
 |
The excavations behind the wall recorded a fill or packing consisting of predominantly horizontal layers of reddish soil with mudbricks. This material was clearly deposited as a backfill behind the wall, after the construction of the stone wall. This fill is visible in the east and west sections of unit J3where is the cut in the mound?visible in section?.
The top of the packing was coated with the same baqaya material used in the fill, creating a clearly defined surface, with an upward slope. This surface was the glacis, covering the mound. In the material overlying the glacis contained fragments of mudbrick, not set in place.
The glacis reached the backside of the revetment wall.
|
|
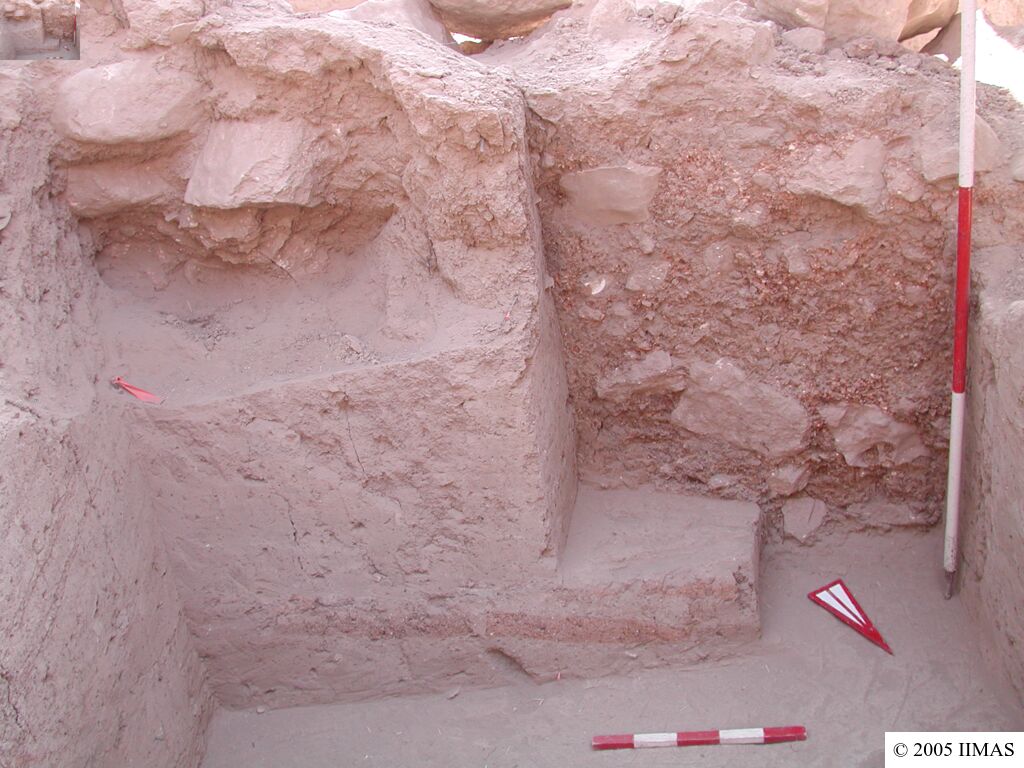
The inner face of the wall is irregular. The upper two courses are made from large, rough stones laide in mud mortar and small stones. These were added during the Mittani period, as they overlie the Mittani surface J3f42.
The remaining lower portion belongs to the original ED III construction. The stones are laid in irregular courses and consist primarily of medium- and small-sized rough and angular blocks. Unlike the front face, the inner face was not intended to remain visible and therefore lacks regular masonry. The wide joints between the stones are packed with baqaya, a red clay material with large limestone nodules that is still today used in house construction in the region. The entire face was coated with a baqaya plaster, with the purpose of coating the wall and regulating the passage of moisture from the packing behind to the front surface. In this way the water filtered evenly through the wall, so that it would not break from the pressure of the water coming from the mound (Hypothesis of architect Paola Pesaresi).
|
the inner face
|
This evidence suggests a construction sequence of the revetment wall as follows:
-
the existing mound (A) was cut back and the wall was not built against the cut face of the mound, but was built a couple of meters to the south (B). The backside was coated with baqaya plaster. The empty space between the mound and the wall was filled with layers of earth, mudbricks and baqaya (C). These layers, which are visible in the east section and in the west section, are different in nature and they were recorded during excavations as fills.
-
The layers adjoin the stones of the wall, so that the layers came after the wall was constructed, as a fill between the mound and wall.
-
On top of the fill the glacis was laid (D).
The revetment wall therefore is also a retaining wall, having the function of retaining the fill between the inner core of the Temple Terrace and the wall itself. It is a revetment wall because it does not retain a mass behind. The mass is the inner core.
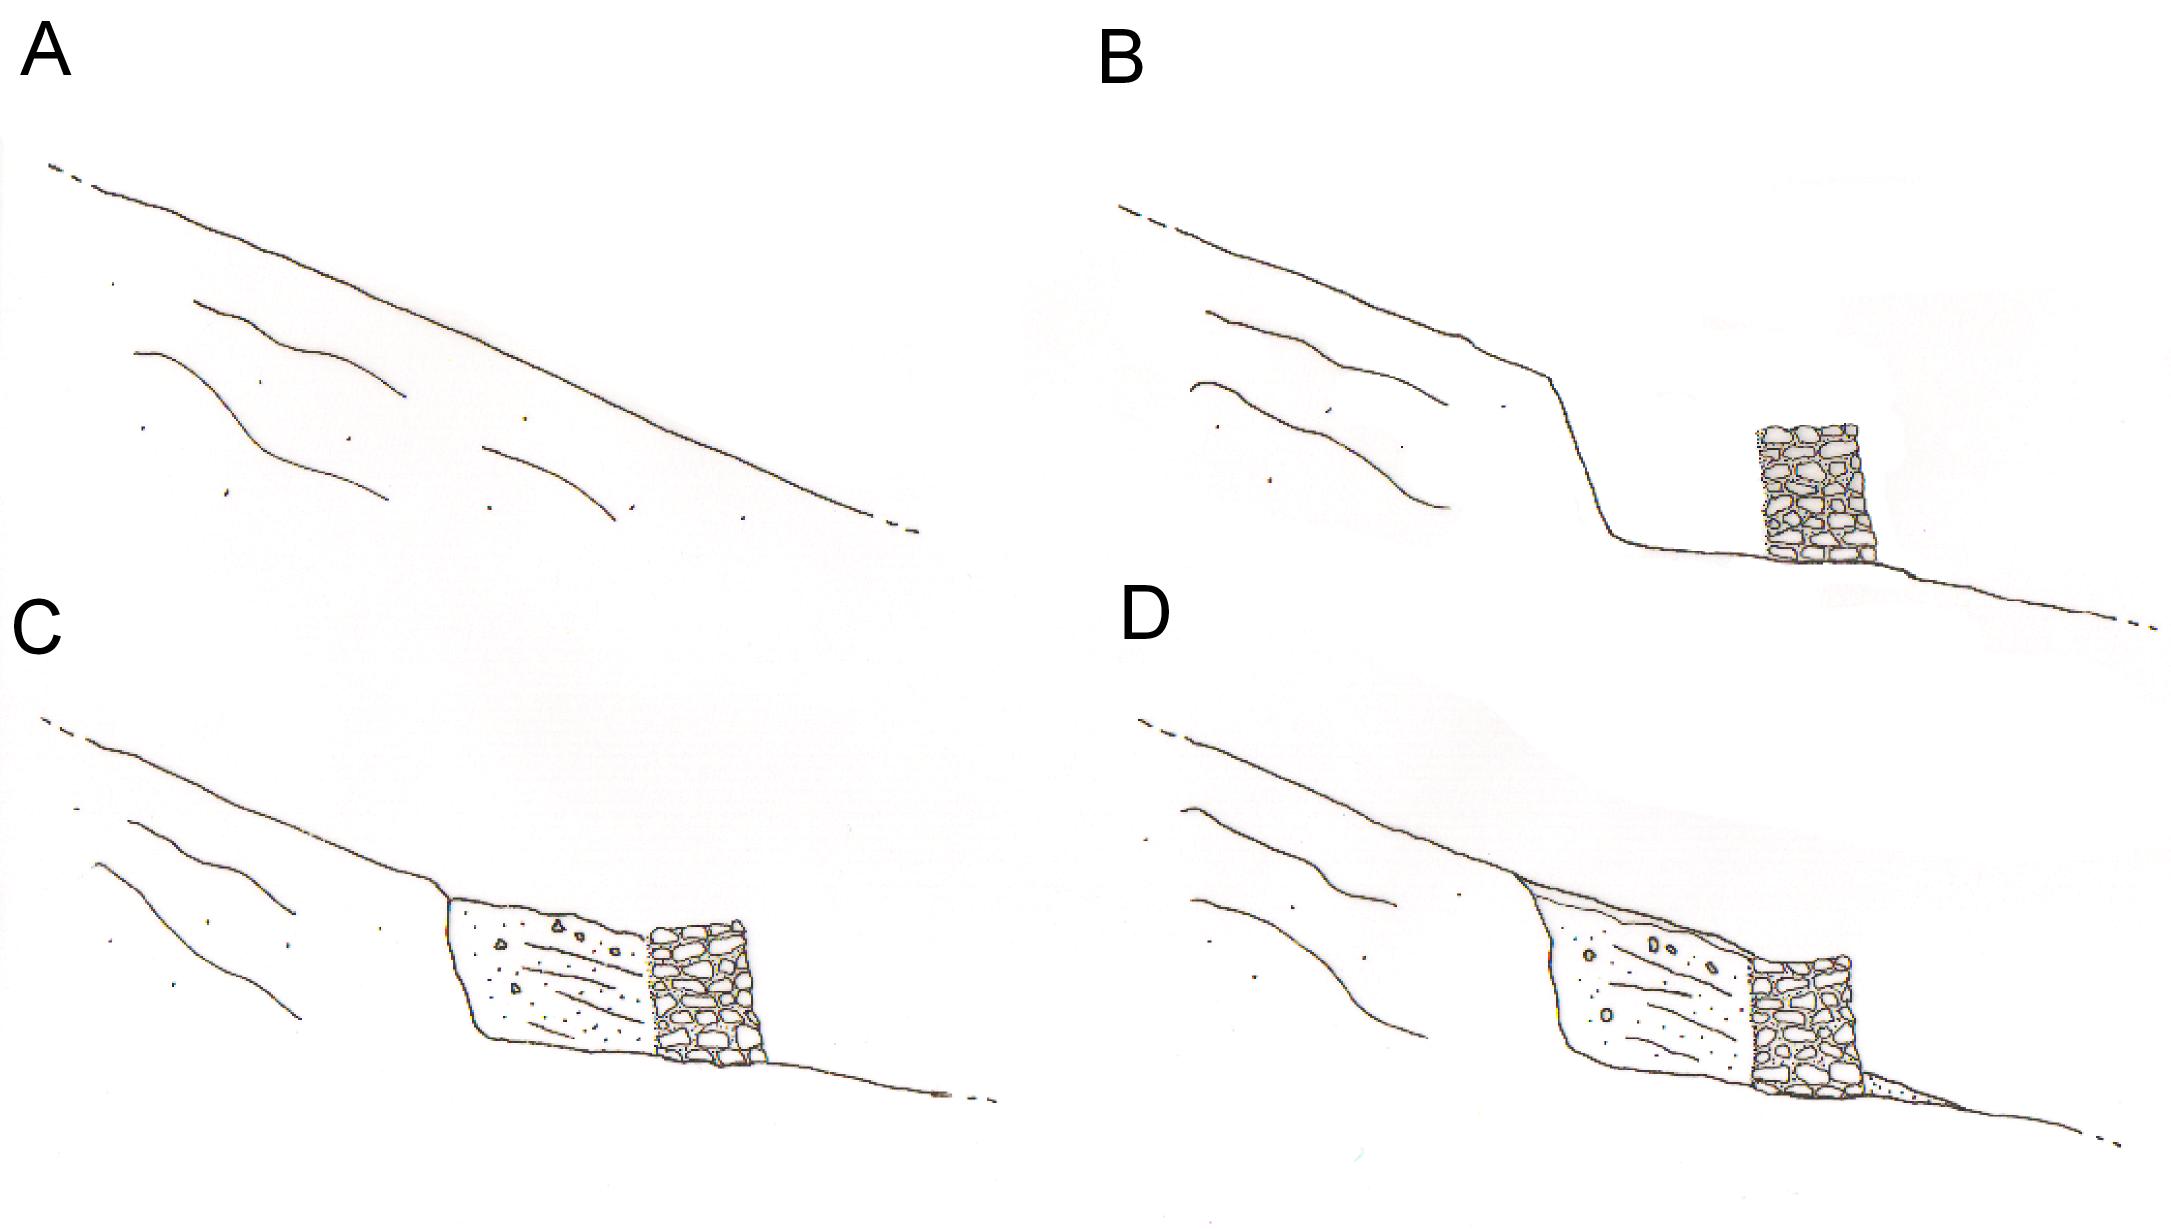
construction procedure of revetment wall
Back to top: The Revetment Wall
The outer look
The wall face of the revetment wall is irregular and has been described as catalog in the specific labels wf1, wf2, wf3, wf4, wf5, wf6. Here is a general description of the overall wall face:
-
the wall is constructed of 6 to 11 irregular courses, depending if it is fully exposed (JP^wf4) or only partially (JP^wf1)
-
the stone used are of predominantly medium-sized stones, with a few larger blocks. The masonry comprises both roughly parallelepipedal and unshaped, roughly rounded stones
-
the joints are 2–10 cm in thickness and filled with mud mortar and some small stones
-
throughout the wall face, each stone in an upper course is positioned over the joint between two stones in the course below, producing a characteristic triangular bonding pattern that extends continuously from the first to the uppermost preserved course.
-
the upper 1-2 courses are generally irregular, some stones are missing and larger boulders occur.
Back to top: The Revetment Wall
Triangular motif: typology
The wall is constructed in a regular bonded masonry pattern, with each stone in an upper course positioned over the joint between two stones in the course below. This arrangement produces a characteristic series of upward-pointing triangular units across the wall face and ensures an effective distribution of loads, contributing to the structural stability of the approximately 3 m high wall.
The pattern is regular for all the exposed wall face and better visible in J1 wf4 and in J2 wf5.
Another function of the triangular pattern may have been ideological rather than purely structural. The repeated upward-pointing triangles may have been intended to evoke the mountainous landscape surrounding Urkesh. The use of rough, irregularly shaped stones and uneven courses contrasts with the carefully aligned horizontal masonry characteristic of the walls of Palace AP, suggesting that the visual appearance of the wall was deliberately designed to recall a natural, rocky mountainside rather than to emphasize geometric regularity. Whereas the walls of Palace AP belong to the Akkadian period, the revetment wall dates to the Early Dynastic III period, predating the palace by several centuries (Buccellati 2009)
draw wall face and put wall face nr. and evidence collapsed portions, upper rows of memory stones and triangular pattern
Back to top: The Revetment Wall
Triangular motif: meaning
Logogram AND ethnography.
Back to top: The Revetment Wall
Stylistic mannerisms
Diamond patterns.
Back to top: The Revetment Wall
The Mittani “memory stones”
When the sediments above the Plaza reached the top of the revetment wall, (in the latter part of the Mittani period), there was no attempt at raising the wall itself. This may be indicative either of a lack of resources to undertake a major renovation project, or of the fact that raising the wall would have lessened the visual impact of the slope leading up to the Temple, or of course both.
|
Whatever the case, the flat surface of the Plaza came at one point to coincide with the base of the slope of the glacis. At this juncture, individual stones were placed in a loose row just within the perimeter of the revetment wall, to mark the boundary between the flat area and the slope, as if a symbolic hinge that retained the ideological, if not the structural, valence of the boundary between the two spheres. These we have called “memory stones”, referring to the memory of the ancient revetment wall.
|

memory stones
|
Back to top: The Revetment Wall